With the new 3D rendering software Lumion, it has never been easier to create architectural visualizations of your 3D models. Simply add water, trees, people, cars and amazing weather effects, and render awesome videos in minutes. Or present the scene to your client as a real-time 3D fly-through. Faster and easier than ever before.

Thursday, December 13, 2012
Wednesday, December 12, 2012
Quick Tip: How to Make a Feather Brush in Adobe Illustrator
This video will focus on the creation of a Feather Brush in Adobe Illustrator CS6, and although this tutorial is created with AI CS6, these techniques will transfer to legacy versions. This tutorial is a great introduction to custom brush creation. Let’s begin!
Tuesday, December 4, 2012
25 Christmas Inspired Free Fonts
Hello creatives! December is officially on so the most celebrated time of the year in most countries is just a few days to go. For designers and creatives, Christmas is not just a season for giving and a moment to spend time with loved ones but also a nice opportunity for possible design projects for the holidays. So today in You The Designer, we give you a nice collection of 25 free fonts just perfect for those Christmas themed designs you might be working on. Check them out below or bookmark this page for your future reference. Enjoy!

DK Clair De Lune font | Download Source

One Starry Night | Download Source

ChopinScript | Download Source

Candy Cane | Download Source

Snowhouse DEMO | Download Source

Mountains of Christmas | Download Source

St. Nicholas | Download Source

Santa’s Big Secret BB | Download Source

Fonts-Lab Symphony | Download Source

Harrington | Download Source

Lane – Cane | Download Source

AlaskanNights | Download Source

Noel | Download Source

Christmas On Crack | Download Source

akaPotsley | Download Source

XmasTerpiece | Download Source

Greetings | Download Source

Hultog Snowdrift | Download Source

Xmas Gingerbread | Download Source

Precious | Download Source

Eutemia I | Download Source

EasyLombardic Two | Download Source

Fuzzy Xmas | Download Source

Navidad | Download Source

Sh*t Happens | Download Source
NOTE: Please take time to read the terms and usage of each featured font in their respective download pages. Some of them are free to use both for personal and commercial while some are for personal use only.
Wednesday, November 14, 2012
Photoshop CS6 - 3D - Materials Part 2
Photoshop CS6 - Our next step to learn Materials in
Photoshop. High level overview of the Material Properties.
Photoshop CS6 - 3D - Materials Part 1
Photoshop CS6 - Our first step on our journey to learn
Materials in Photoshop!
Photoshop CS6 - 3D - Opacity Maps - Glass Cup
Photoshop CS6 - Create a Glass Cup, cut a hole using a
constraint and then add a taper in Photoshop CS6, apply some simple materials
and get your design on!
Tuesday, November 13, 2012

Thursday, November 8, 2012
The Anatomy Of A Graphic Designer
Illinois-based design company Glantz Design has created an infographic that looks at the anatomy of a typical graphic designer.
According to the infographic, graphic designers can be identified by their: love for Helvetica; black-rimmed glasses; large headphones; support for Apple products; graphic tees from Threadless; skinny jeans; sneakers; and constant need for coffee.
What do you think? Does this infographic accurately portray graphic designers?
Click to view enlarged version

Click to view enlarged version
[via Glantz Design]
100 Ideas That Changed Graphic Design
From visual puns to the grid, or what Edward Tufte has to do with the invention of the fine print.


Design history books abound, but they tend to be organized by chronology and focused on concrete -isms. From publisher Laurence King, who brought us the epic Saul Bass monograph, and the prolific design writer Steven Hellerwith design critic Veronique Vienne comes 100 Ideas that Changed Graphic Design — a thoughtfully curated inventory of abstract concepts that defined and shaped the art and craft of graphic design, each illustrated with exemplary images and historical context.
From concepts like manifestos (#25),pictograms (#45), propaganda (#22), found typography (#38), and the Dieter-Rams-coined philosophy that “less is more” (#73) to favorite creators like Alex Steinweiss, Noma Bar, Saul Bass, Paula Scher, and Stefan Sagmeister, the sum of these carefully constructed parts amounts to an astute lens not only on what design is and does, but also on what it should be and do.
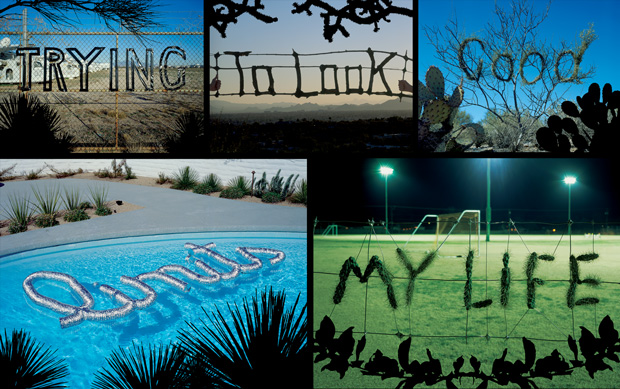
Idea # 16: METAPHORIC LETTERING
Trying to Look Good Limits My Life (2004), part of Stefan Sagmeister’s typographic project '20 Things I Have Learned in My Life So Far.' Words are formed from natural and industrial materials and composed in situ.
Idea # 83: PSYCHEDELIA
Gebrauchsgraphik (1968). The youth style influenced by drugs and rock and roll quickly became a commercial visual vocabulary. Founded in San Francisco, this German version smoothed out some of the rough edges.
Idea # 31: RED WITH BLACK
A Season in Hell (1944), a black-and-red assemblage of stark and wobbly forms characteristic of Alvin Lustig’s highly abstract visual vocabulary, is a graphic equivalent of the tormented prose of poet Arthur Rimbaud.
Heller and Vienne write in the introduction:
[Big ideas] are notions, conceptions, inventions, and inspirations — formal, pragmatic, and conceptual — that have been employed by graphic designers to enhance all genres of visual communication. These ideas have become, through synthesis and continual application, the ambient language(s) of graphic design. They constitute the technological, philosophical, forma, and aesthetic constructs of graphic design.
Idea # 19: VISUAL PUNS
Gun Crime (2010), illustrated by Noma Bar, is a commentary on the tragic toll of gun-related violence in the UK. The trigger serves as the mechanism and outcome of gun attacks.
Idea # 17: PASTICHE
Chez Panisse Second Birthday Celebration (1973), a poster designed by David Lance Goines in an homage to the Jugendstil style of the Vienna Workshops and Vienna Secession movement.
Idea # 80: TEEN MAGAZINES
Teenagers Ingenue (1962) capitalized on the developing female teenage commercial market for fashion, cosmetics, and other beauty aids. Teens were now treated as young adults.
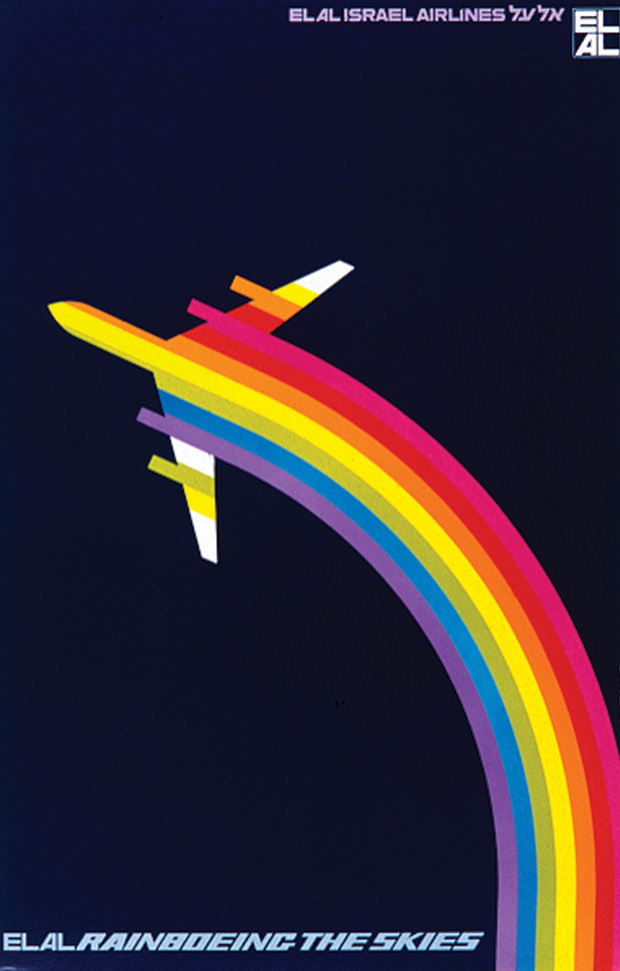
Idea # 35: EXPRESSION OF SPEED
Rainboeing the Skies (1971), an ad introducing the new Boeing 747 to El Al Israeli Airlines by graphic designer Dan Reisinger. This iconic image is at the center of an Internet controversy, with some claiming that it was in fact an Air Canada poster.
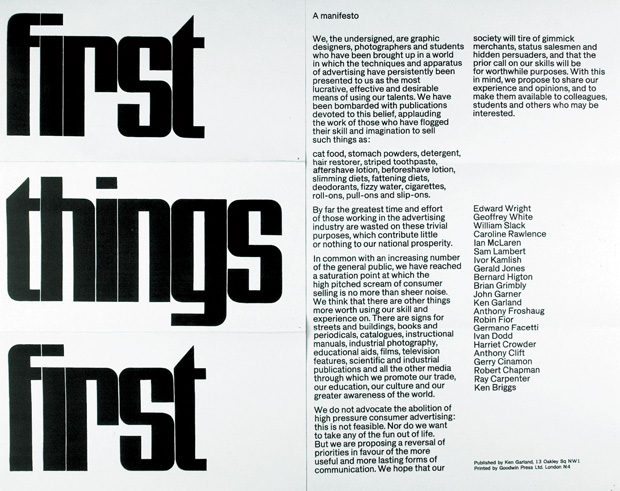
Idea # 25: MANIFESTOS
First Things First (1964), published by British designer Ken Garland, who intended to radicalize the design practice that was fast becoming a subset of advertising. In 2000 an updated version was printed in cutting-edge magazines including Adbusters, Emigré, Items, and Eye.
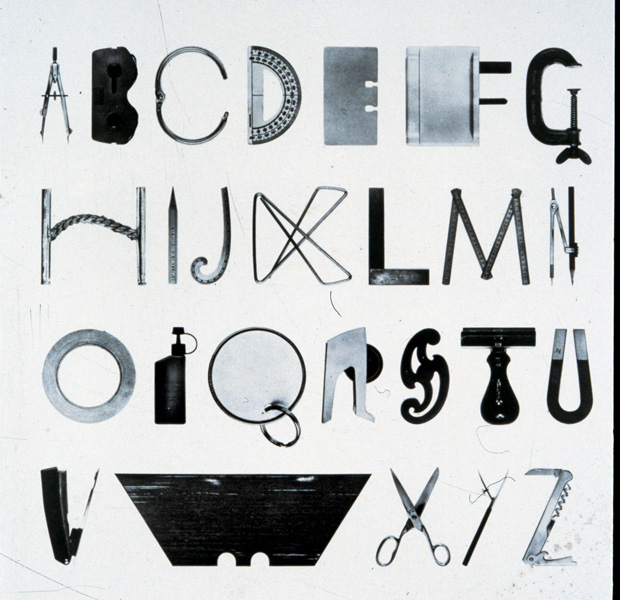
Idea # 38: FOUND TYPOGRAPHY
Alphabet with Tools (1977), by Mervyn Kurlansky, takes everyday objects found in homes and workshops and transforms them into the letters of the Western alphabet.
From how rub-on lettering democratized design by fueling the DIY movement and engaging people who knew nothing about typography to how the concept of the “teenager” was invented after World War II as a new market for advertisers, many of the ideas are mother-of-invention parables. Together, they converge into a cohesive meditation on the fundamental mechanism of graphic design — to draw a narrative with a point of view, and then construct that narrative through the design process and experience.
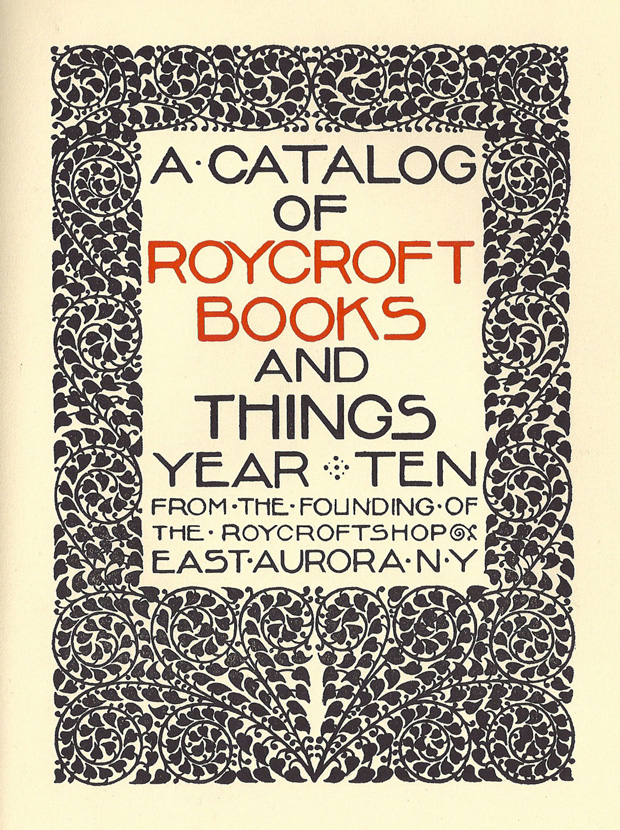
Idea # 15: ENTREPRENEURSHIP
A Catalog of Roycroft Books (1905?), designed at the Roycroft workshop in East Aurora, New York. Influenced by William Morris’s Arts and Crafts Movement, Elbert Hubbard established a crafts colony that sold books, textiles, and other products.
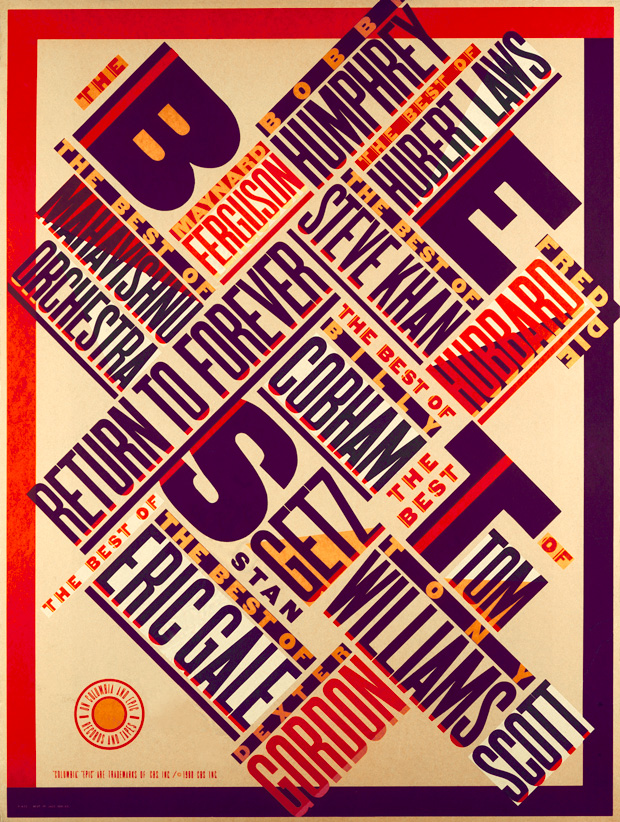
Idea # 48: TRIANGULATION
The Best of Jazz (1979), a typographical masterpiece by Paula Scher, was done when she was discovering Aleksander Rodchenko and El Lissitsky. She recalls her work being acclaimed as 'new wave' and 'postmodern' when in fact it was a private homage to the pioneers of the Russian avant garde.
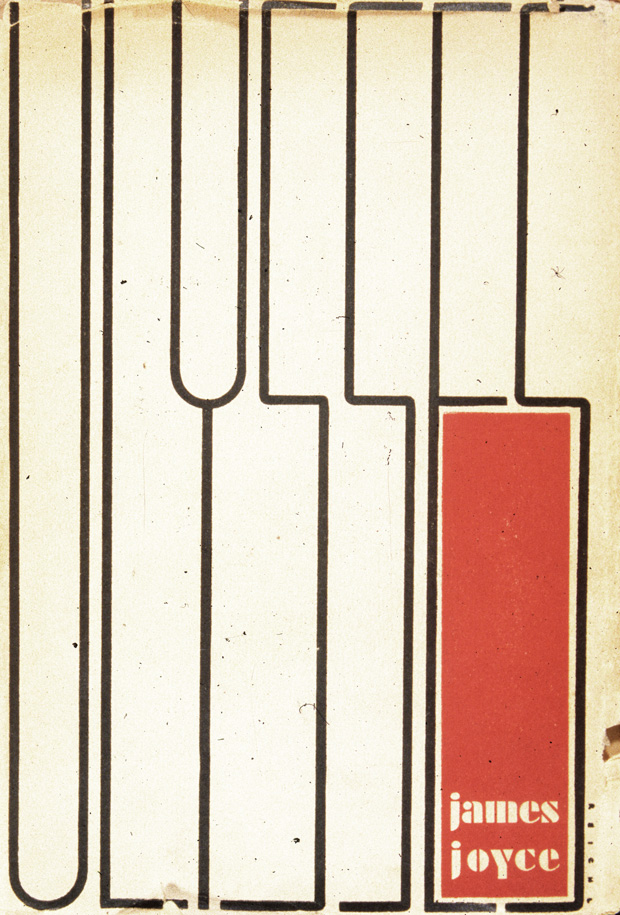
Idea # 37: DUST JACKETS
Ulysses (1934), hand-lettered and designed by Ernst Reichl, was said to be influenced by the paintings of Piet Mondrian.
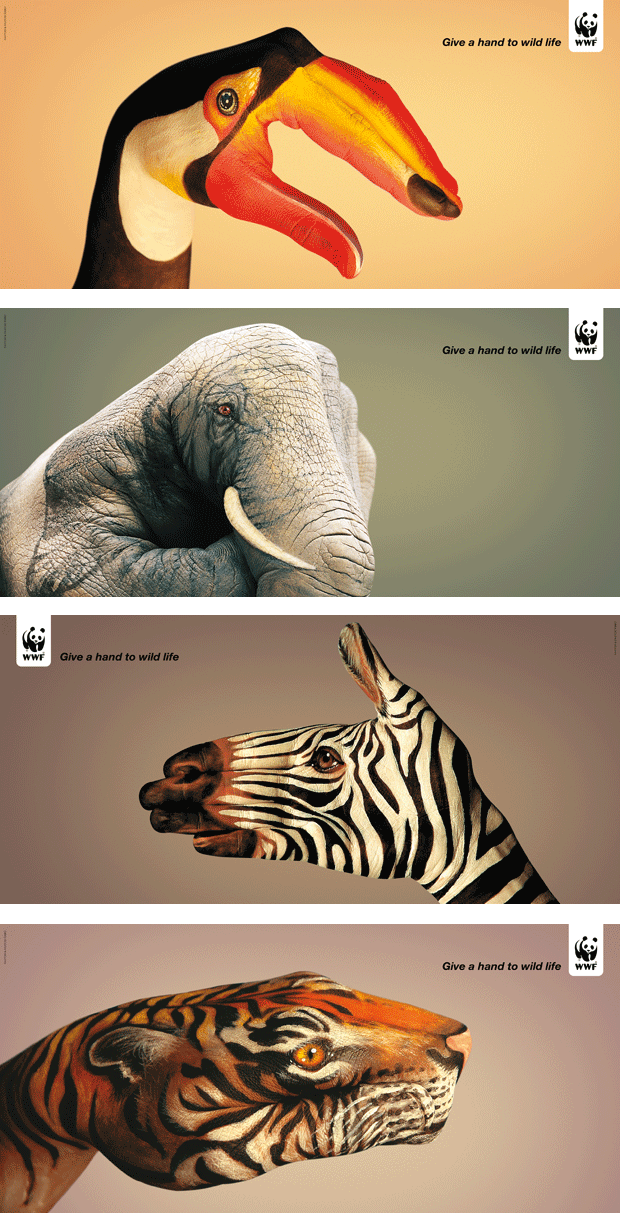
Idea # 66: PUBLIC SERVICE CAMPAIGNS
Give a Hand to Wild Life (2008), by Saatchi & Saatchi Simko agency in Geneva, is a series of clever and beautiful photographs of human hands camouflaged as wild animals by bodypainter Guido Daniele.
On the latest episode of Debbie Millman’s invariably excellent Design Matterspodcast, Heller talks about the process and rationale behind 100 Ideas that Changed Graphic Design:
History, as we all know, is written by the survivors. And there are certain historical facts that never get covered. And, in graphic design, it’s fascinating how many things don’t get covered until somebody uncovers them.
Wednesday, October 31, 2012
Our Services
.jpg)
An overview of what I have been doing.
If you don't see something here, feel free to ASK.
Branding
Logo Design
Letterheads
Envelops
Name Cards
Printed Projects
Posters
Calendars
Brochures
Banners
Flyers
Graphics
Illustrations
Children Books
CD Covers
Photo Editing
If you don't see something here, feel free to ASK.
Branding
Logo Design
Letterheads
Envelops
Name Cards
Printed Projects
Posters
Calendars
Brochures
Banners
Flyers
Graphics
Illustrations
Children Books
CD Covers
Photo Editing
Monday, October 15, 2012
/In Uxbridge with Paul Neale/

So as it turns out, living in the countryside is not without benefits -- for example, I got to meet Paul Neale in his home! Paul lives in Uxbridge, which coincidentally, is a shorter trip than going to the Toronto office (the former Alias HQ). Anyway, we had a good chat and here is the edited version ;-)
Paul, you're someone who has been active in the 3ds Max scene for over 2 decades. Let's go back to the very beginning -- how did you get started with 3d Studio?
This goes back to a friend who got me started in the business. He was one of the really early guys who got involved, even before the DOS version of 3DS. We're talking spheres...and not even chrome ones. So this friend got me in around the time when 3D Studio DOS Release 3 had come out. I was then attending Seneca College and they were teaching it at the time. Anyway, the year I started doing 3D was the year 3ds Max came out, so I've been using it ever since!
As someone who specializes in character rigging and coding, what is it about these things that appeal to you most?
Coding appeals to the problem solving side of me. I like to figure out how things work and enjoy doing it. I also like modeling and texturing. I enjoy the creation and art side of modeling and texturing.
Going back to problem solving, it must have come from my dad who was a mechanical draftsman and was one of the principal designers for the 3D IMAX cameras from some time ago...anyway, my brother and I grew up learning how things worked. When I started 3D, I was doing everything at first...modeling, rigging, you name it. But over time, I became interested in how I was going to move a character and how it should be rigged. I always tried to figure out a better way, rebuilding rigs and such. People starting passing characters to me and said that I could fix them, so that was how I got started as a character TD. I didn't look for it, it was just something that I turned out to be good at.

What are some of your favourite projects and clients over the years?
Good question. I would say the different ones, moreso than the mainstream stuff. I enjoyed working on Bioshock, that was cool. There were considerations for MotionBuilder or Character Studio, but I suggested that I could write a rig that would allow you to dump straight mocap data onto it, directly in Max. I had never done such a thing before, but I figured it was all just math and there had to be a way to do it! Things like that stood out to me the most. Another client...one I have been working with for 6 years and counting, he's doing a product called Perfect Fit. It's a rehab tool for sports injury and related physiotherapy needs. We did 2000 mocap capture sessions that needed to be physically accurate and exact, and again, I wrote a motion capture system for that, where the data could be brought into Max and dumped right onto the rigs. Having to solve problems on the fly and thinking of things that hadn't been thought of before, it makes the job very interesting for me and that's what I like most.
Another project I'm working on, a bird for an undisclosed client. Doing a rig that will handle thousands of feathers... how do you make a rig that can handle 3000 feathers? I didn't want to pay for a plugin, so I wrote it! I wrote an entire paint system where you can paint feathers right on the surface, fluffing and combing all those individual feathers... all of it is MAXScript. Being able to custom-make what I need to deliver on projects, these are what make them most memorable.
Another project I'm working on, a bird for an undisclosed client. Doing a rig that will handle thousands of feathers... how do you make a rig that can handle 3000 feathers? I didn't want to pay for a plugin, so I wrote it! I wrote an entire paint system where you can paint feathers right on the surface, fluffing and combing all those individual feathers... all of it is MAXScript. Being able to custom-make what I need to deliver on projects, these are what make them most memorable.

Have you always worked freelance under PEN Productions and if so, what are your reasons?
The only place where I've ever been on staff was at Red Rover in Toronto. I was hired by Red Rover co-founder Andy Knight, to put together a 3D department and get them up and running. Prior to that, Red Rover was exclusively a 2D animation studio. I stayed on for a year and returned to freelancing afterwards. All of the work I've gone on to do, everything from Disney to Rockstar, has been freelance. My clients are spread around the world, from Mexico to England, US and Canada.
What usually happens is an internal artist will reach out to me when they've run into some problem which requires a highlevel TD. I go in and help them out of their situation. I've never looked for work; everything has been word of mouth, either from past clients or from posting and being active on forums like on AREA. I enjoy working out of the comfort of my home, in my bathrobe with a mug of coffee in hand :-)
I've heard that you are also training and teaching at Humber College?
Yes I do. I am a professor, teaching 3ds Max and Mudbox, with focus on modeling and TD. I got the opportunity to teach at Humber thanks to Terry Posthumus. He’s the Course Coordinator at Humber College; Terry and I worked at Disney together and eventually he offered me the position at Humber. I've been there for 7 years and 4-5 of those years have been fulltime. I also do a handful of productions in the year, usually around summertime when I have time off school.
The latest animated short with the boy and ogre... how much time did you work on it?
First off, it's a girl ;-) Or his name is Gwen... you decide ;)
Good question... how long? We've been working on that for a while actually, but only because the story and animation went through so many iterations. I worked with Brian Lemay, at least a year ago on the character design. I also worked with Keith Chamberlain and Shawn Hendriks, coming up with the original designs. In the end, everything came back to me for rig work. I worked out of my office here at home, so I can't answer for anything outside the scope of rigging, but the short was spread over about four months with me.

So what are you working on nowadays?
Asides from Humber, I'll be teaching three classes for the upcoming Autodesk University classes, so I'm preparing for those: "Developing Character Rigs from the Ground Up in 3ds Max", "Advanced Character Tools and Systems in 3ds Max", and "3ds Max MAXScript + Microsoft® .NET: Discover a Bigger World". I'm also working on 2 projects in-house. One is with Tombolo; the client is Disney for an undisclosed project, and also the project for Perfect Fit Health, the physiotherapy work I mentioned earlier.
And those three classes, even though they are going to be covered and demonstrated in Max, is it possible that users of other applications like Maya and SI can benefit from them?
Yeah, absolutely. When I teach anything, I try not to teach button-pushing. You can go through some tutorials out there step by step, but you don't know what you're doing in the end. The way I teach is a lot less about coming up with a specific end-product, and finishing that end product. It's more about how do all the parts of that product function and work, what's going on under the hood and how does it all come together. With that - you should be able to make many more different things. Not just this product we're working on, like a bipedal character. Or how do you rig an IK/FK arm. I don't teach how to rig an IK/FK arm. Ok I do, but I explain how do constraints work and how does the idea of it work. How does an animator want to work with this sort of system, etc., etc.

After so many years, why do you still continue to use Max? Asides from the time you've invested...in developing techniques, custom scripts and in tools you've written -- but is there some other reason for it?
Yes, it's fast and easy to work with for a lot of productions. Max has been called the Swiss army knife; great for doing small to mid-size productions quickly. It's got almost everything in there and you don't have to go out to something else; not that there isn't a better solution somewhere else, but a smaller midsize shop can't necessarily afford to buy a specific plugin or tool to do a specific job and then train on it. The job needs to be done in a month, so get it done. Max has got a lot inside that will get the job done in a really great way and plenty of other tools that will get you through areas that you just need to get through…it’s all in there. It's quick and easy to learn, has a big userbase and a large pool of artists which is important for productions. And also, I guess I just know it really well, so sticking with it is also partly because there's always been a call for it. I'm always having people call me because I know Max really well. So that's a big part of the reason why. Max has kept me busy. Though I also use Mudbox, Combustion and Composite, I still mostly keep to Max.
Thursday, October 11, 2012
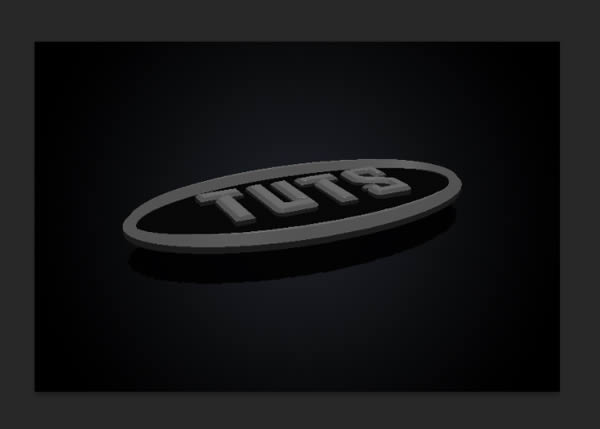
Create a 3D, Chrome, Logo Animation With Sound FX Using Photoshop CS6 Extended
Photoshop has become a multi-purpose tool that can create some complex animations without the need to purchase additional software. In this tutorial, we will show you how to create and composite a 3D animation with sound and lighting effects. We will also cover techniques on how to optimize your rendering time. Let’s get started!
Tutorial Assets
The following assets were used during the production of this tutorial.
- 3D Object (In Free Download Files)
- Material Presets (In Free Download Files)
- Living Room
- Audio Clips
Step 1
Create a new document at a video resolution you prefer. In this case, I’m using 720 px by 480 px.

Step 2
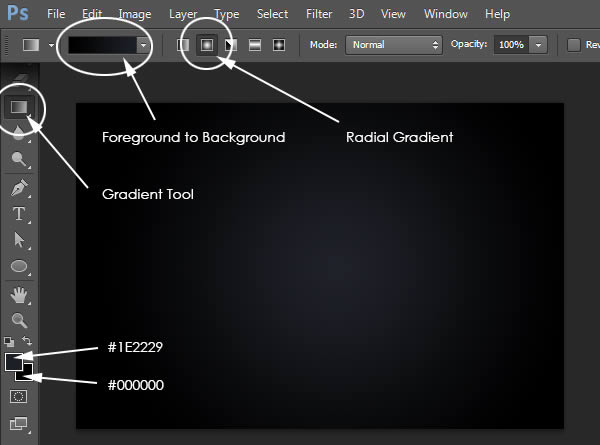
Choose a Foreground and Background Color and use the Gradient Tool to make a radial gradient as shown. Make sure the Radial Gradient icon is selected in the Top menu.
Step 3
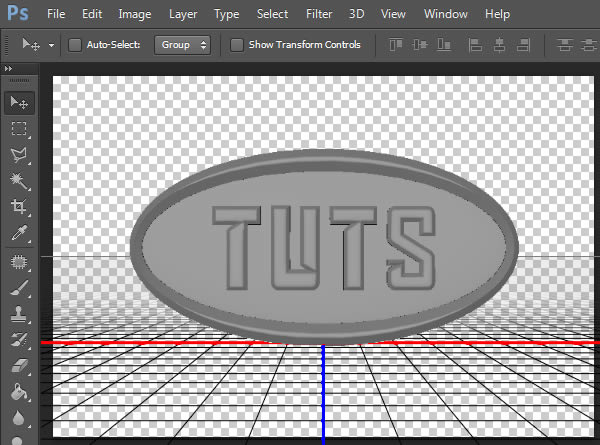
The next step is to create our 3D object which we will later texture and animate. You can use or build any object that you want, but for this tutorial, we’ll be using a 3D object from one of my previous tutorials (included in the resources). To learn how to create this object, please refer to my Realistic Chrome Hood Ornament Premium Tutorial.
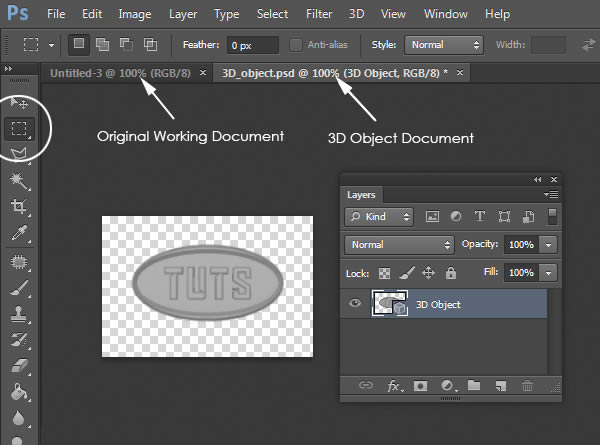
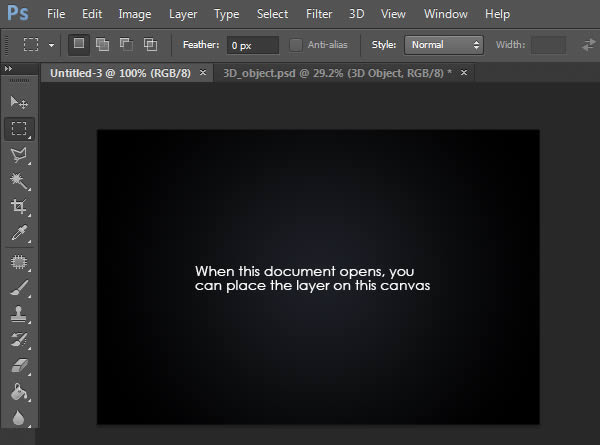
We will now add the 3D Object to our scene. Go to File > Open and navigate to the “3D_object.psd” file. This will open as a new document.
Step 4
We want to move the “3D Object” layer into the scene we were just working on. Normally, you would use the Move Tool (V) to click and drag the layer from the canvas to the correct document tab at the top. Hovering over a document tab would open that document to allow you to drop the new layer into that new document. Unfortunately, with a 3D layer, you cannot use the Move Tool directly. So, we will have to use it indirectly.
In the “3D_object.psd” document, make sure the 3D Object layer is selected in the Layers Panel. Also, make sure to select the Rectangular Marquee Tool (M).
Holding Ctrl will change the cursor to the Move Tool temporarily which will now allow us to click and drag the 3D layer from document to document. Go ahead and hold down Ctrl + Shift while clicking and dragging the object from the canvas to our working document. Hovering over the working document will open it up.
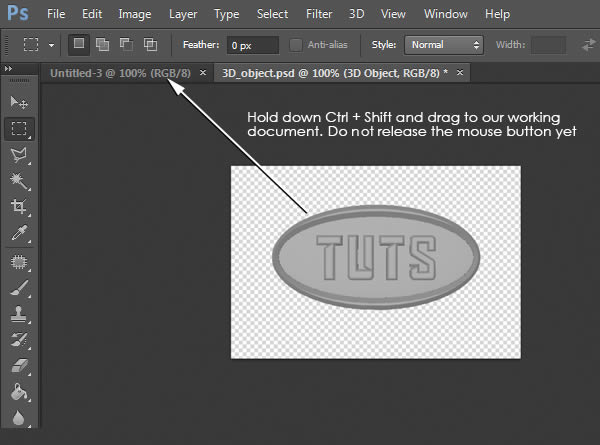
When the working document opens, drag your cursor over the canvas and release the mouse button to place the layer. Since we were holding Shift, the layer will automatically be placed in the center of the canvas.
Step 5
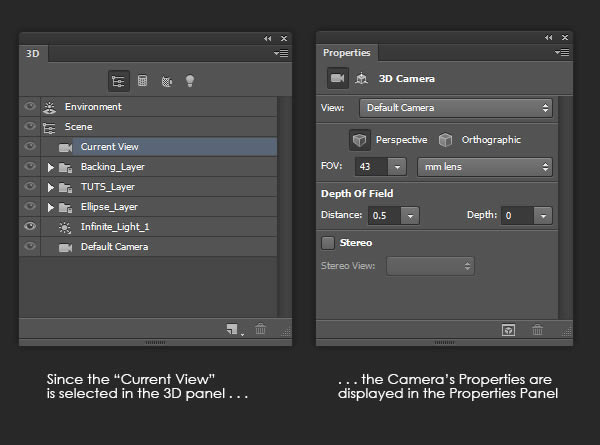
With the 3D layer selected, make sure the Properties Panel and the 3D Panel become visible. If these panels are not visible, just open them by going to Window > 3D, or Window > Properties. Here is an example of both windows when the “Current View” is selected:
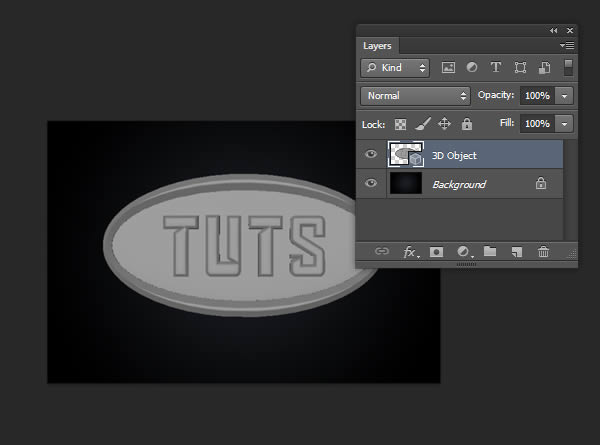
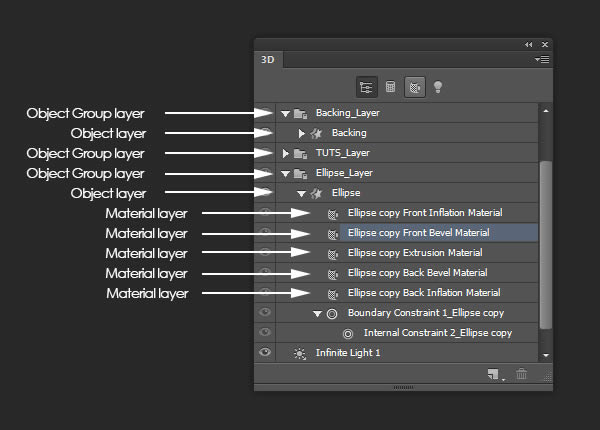
Our next step is to go through and apply textures to each surface. If we go to the 3D Panel, we can see the three object groups that make up our 3D object. By twirling down a group layer, we can see the 3D Object layer as well as its Material layer.
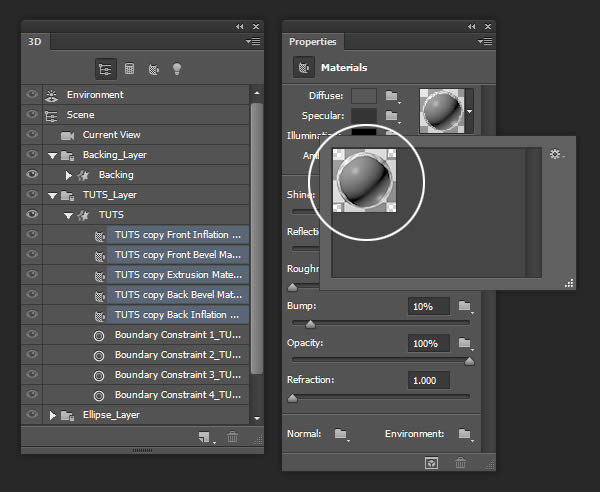
Select the “Ellipse” object’s “Front Bevel Material” layer in the 3D Panel. In the Properties Panel, make the following adjustments. Our goal is to create a chrome material for this surface.
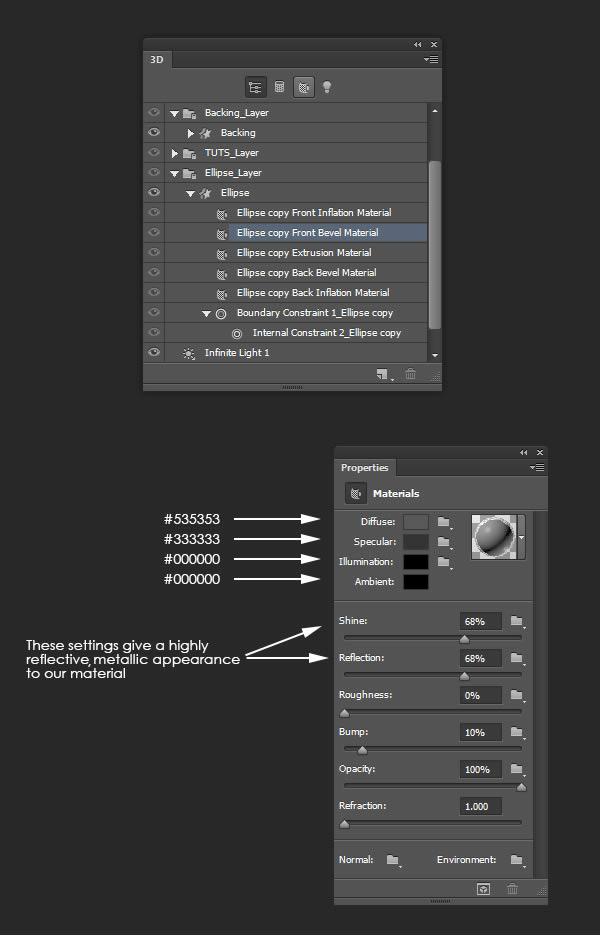
Step 6
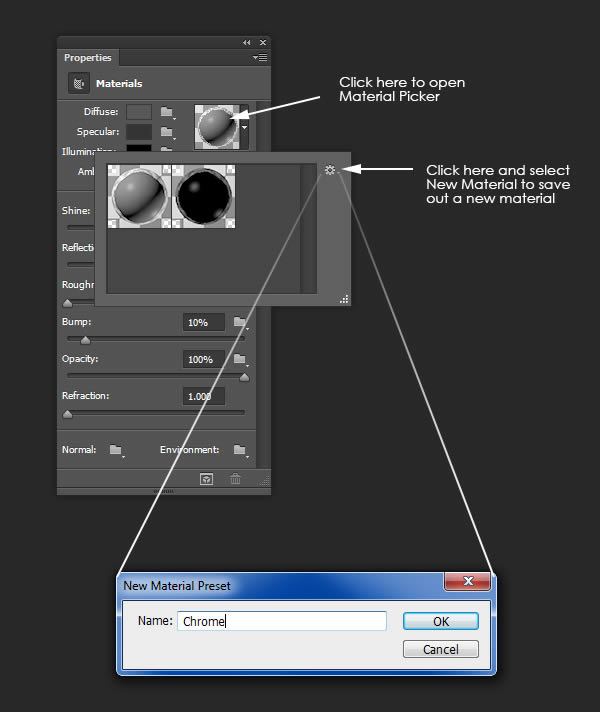
In order to apply this material to other surfaces, we need to save it to the Material Picker. To do this, click on the Material Picker preview window in the Properties Panel, select the small gear icon to open a fly-out panel with additional options and choose New Material. Name the new material “Chrome.”
Step 7
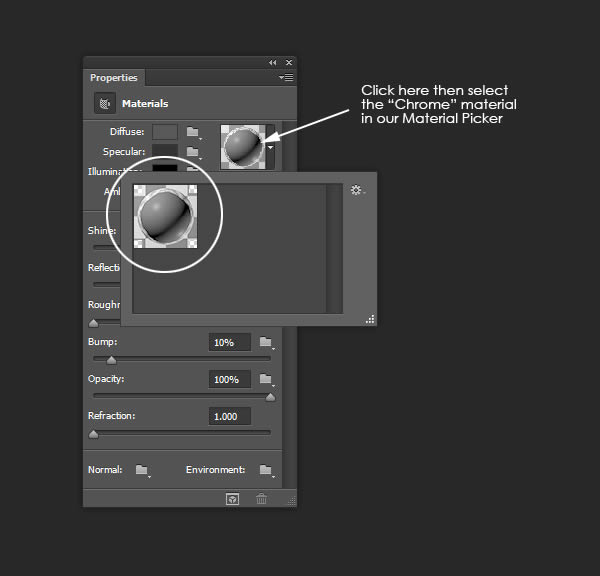
To apply the newly created “Chrome” material to the rest of the “Ellipse” material layers, go back to the 3D Panel and shift-click the rest of the surfaces. Next, go to the Material Picker in the Properties Panel and navigate to our “Chrome” material.
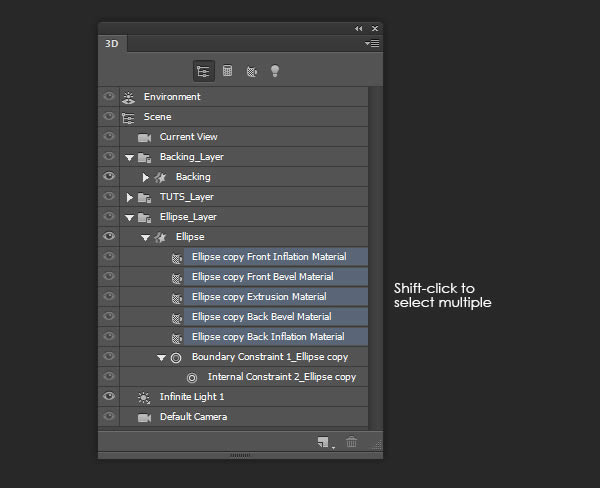
Now, the entire “Ellipse” object should be textured with the “Chrome” material. As you can see, there’s not much difference. This is because there’s nothing to reflect. We will address this later.

Step 8
We will use the same “Chrome” material for the “TUTS” object. Select all of the material layers for the “TUTS” object and apply the “Chrome” material. Your image should resemble that following:

Step 9
The last material we need to apply is on the “Backing Front Inflation Material” layer. Select this material layer and apply the following settings in the Properties Panel.

Step 10
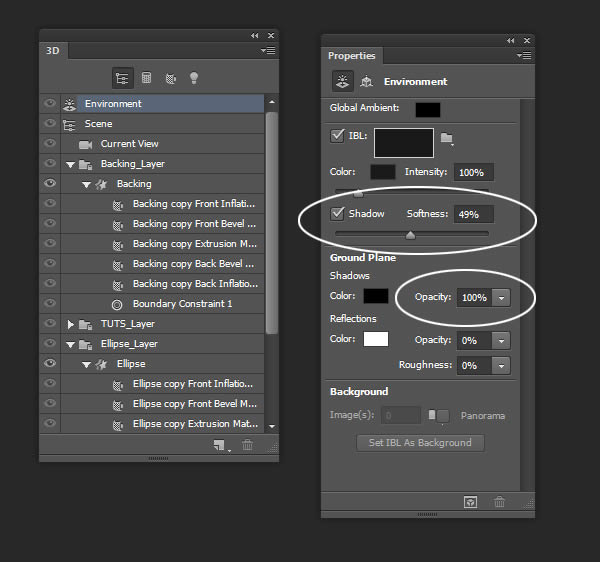
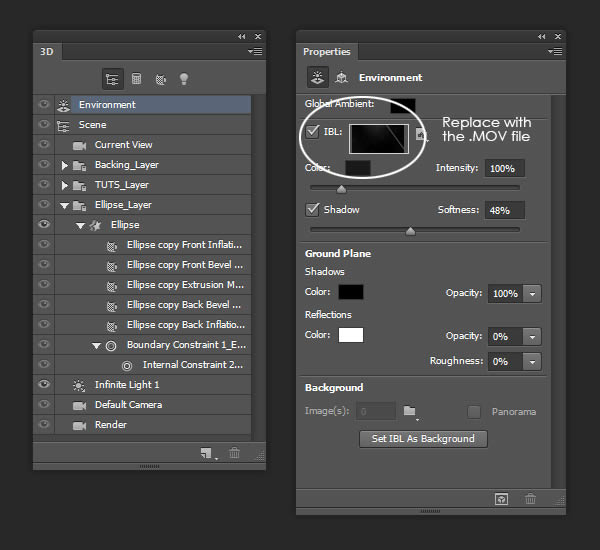
Photoshop automatically includes a ground plane in every 3D scene (denoted by the grid). It also allows the option to cast shadows on that ground plane. In the 3D Panel, select the “Environment” layer, then go to the Properties Panel and make sure the Shadow and Ground Plane settings are set as shown:
Step 11
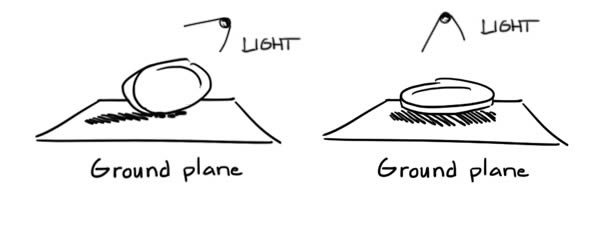
Since our object is ‘standing’ on the ground plane, the object’s shadow will cast across it. We eventually want the object to be parallel with the ground plane and the light directly above so the shadow will be cast directly beneath the object.
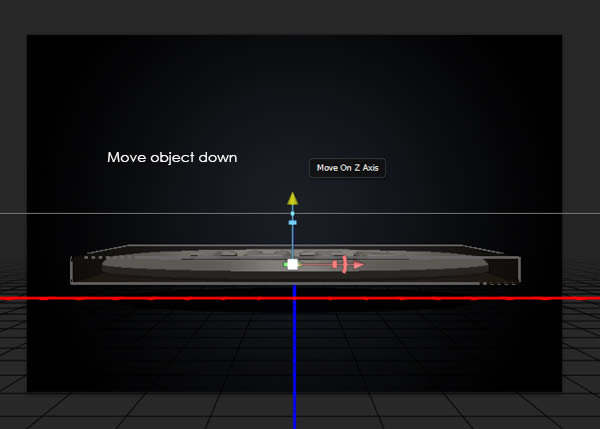
To achieve this, we will first move the object into position. Make sure the Move Tool (V) is selected and, in the 3D Panel, select the “Scene” layer (this selects all objects at once).
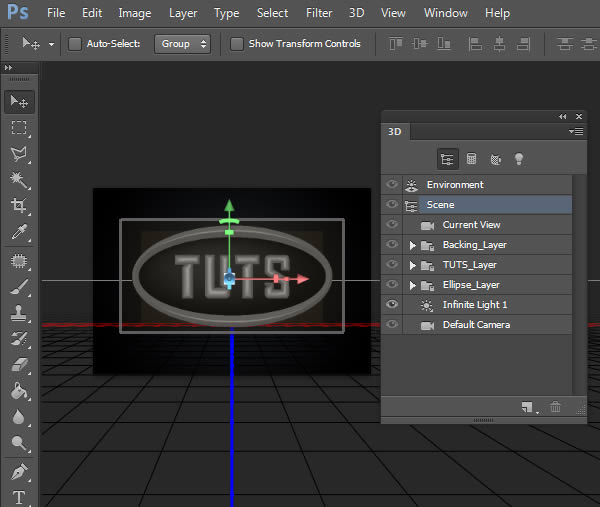
Use the onscreen widget to rotate the scene 90 degrees around the X-axis. You can also manually set the rotation using the Coordinated Tab in the Properties Panel.
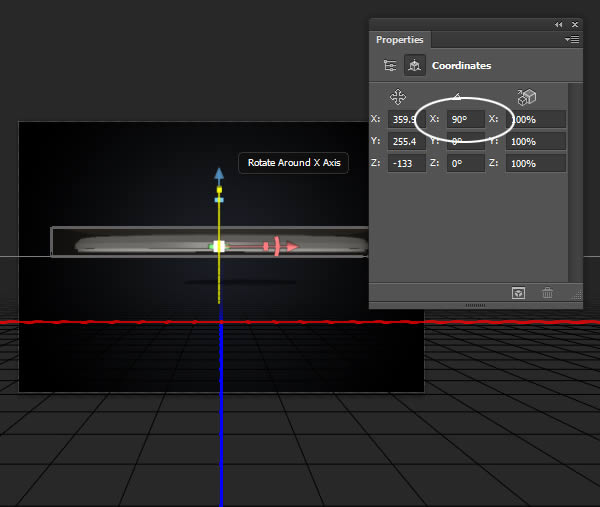
Lastly, use the onscreen widget to move the scene down so it’s closer to the ground plane.
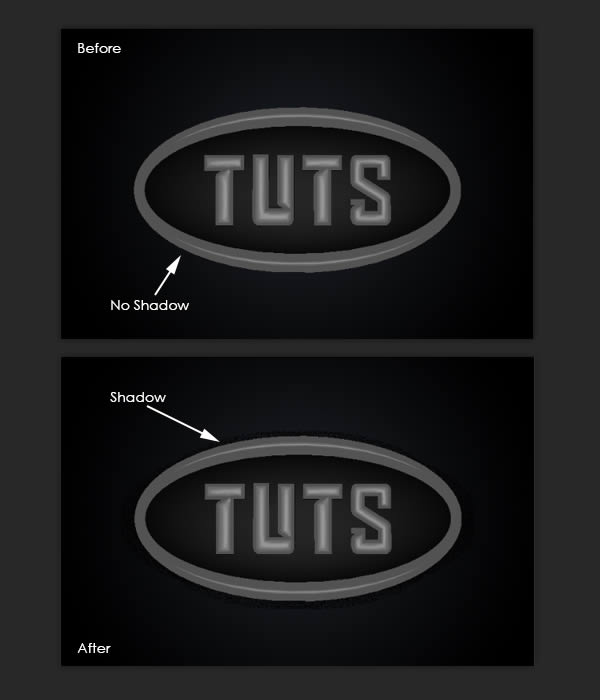
Step 12
The next step is to adjust the lighting to get better looking shadows. In the 3D Panel, select the “Infinite Light 1″ layer and use the onscreen widget to rotate the light so that if points straight down at our object.
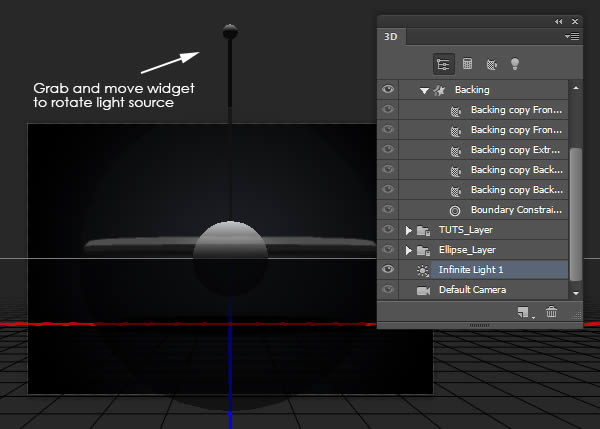
Here is a different angle so we can see how the shadow looks. If you need to reposition the object so that it’s closer or further from the ground plane, refer back to Step 11.
Step 13
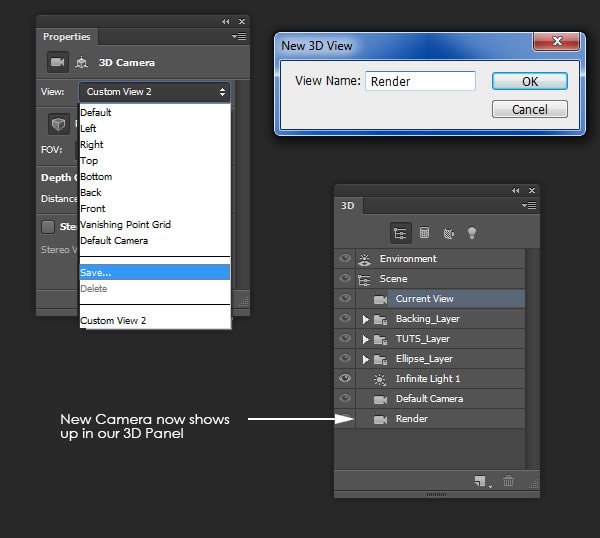
Before we finish adjusting the lighting, let’s move the camera so we are facing our object straight on.. In the 3D Panel, select the “Current View” layer and use the tools in the Top Menu to manipulate the camera’s position.
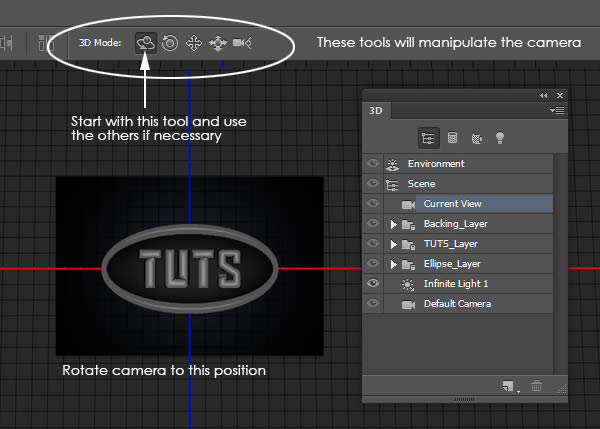
To save this camera, go to the Properties Panel and click the dropdown under “View.” Name this camera “Render.” Saving the camera will automatically add it to our 3D Panel so we can jump between multiple cameras at any time.
Step 14
Now, it’s time to finish the lighting. We are going to change the settings of the light to allow for a small amount of shadow to be visible from behind the object. This will help our scene from looking too flat against the background. In the 3D Panel, select the “Infinite Light 1″ layer again and make the following changes in the Properties Panel.

Notice that we can now see some of the shadow
Step 15
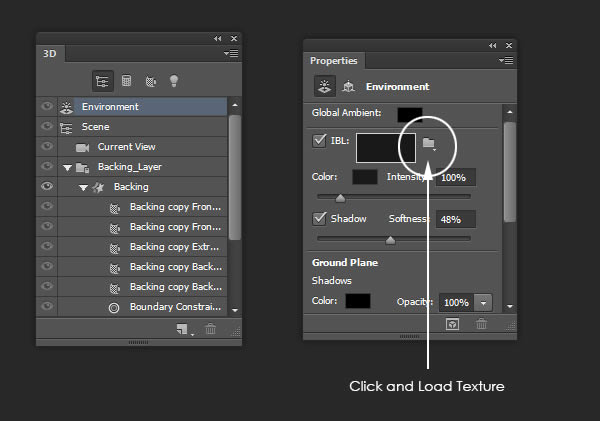
To finish lighting our scene, we are going to add an Image Based Light (IBL). As the name implies, it uses an image to light the scene (essentially mimicking the lighting in the image). The result is a much more natural and realistically lit scene.
In the 3D Panel, select the “Environment” layer. In the Properties Panel, make sure IBL is checked and click on the icon to load a texture. Go ahead and add the image of the living room from the Tutorial Assets.
Our scene is now lit by the IBL which is represented in the background of our canvas. This image is for reference only and will not render in the background.
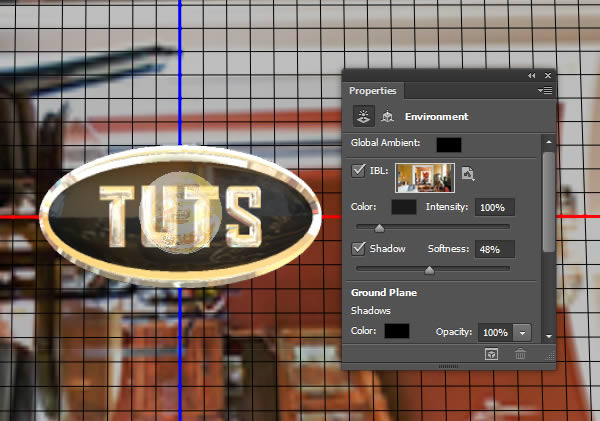
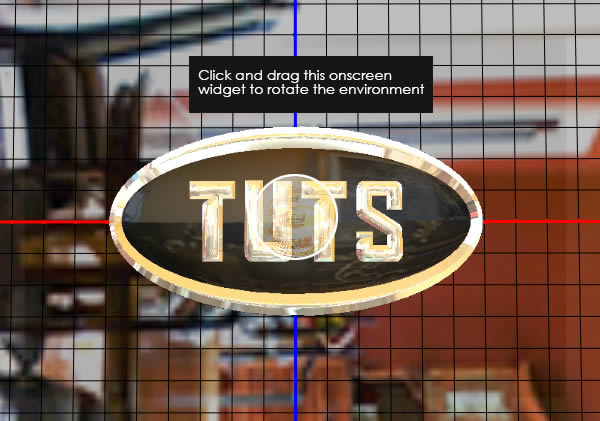
As long as the Environment layer is highlighted, we will see this reference image as well as an on-screen widget that can be used to rotate the IBL around. By moving the image, we can change the reflections in our scene. Feel free to rotate the environment as you see fit.
Step 16
Lastly, the reflections appear too yellow. We can change this by editing the source image for the IBL. To do this, go to the Properties Panel, click the IBL thumbnail and click Edit Texture.
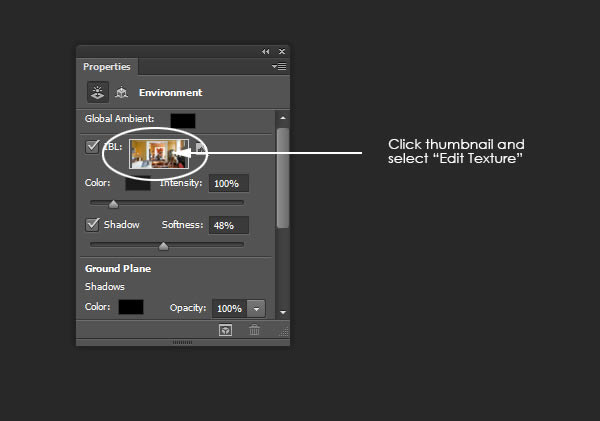
This will open the texture file in a new window. I’ve used Image > Adjustment > Replace Color to replace the yellow to a blue. This doesn’t have to look realistic; we are just introducing a new color.
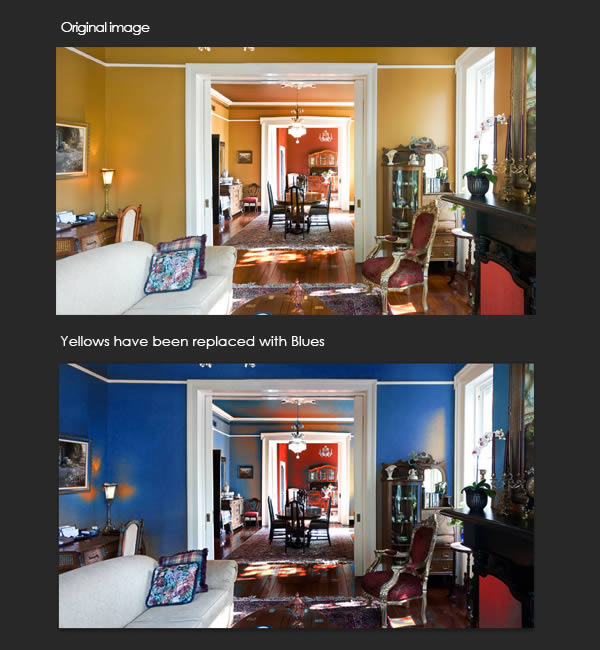
Here is how our scene reflects the new colors from the IBL map.

Step 17
We will now create a small amount of animation in our scene. Start by clicking on the Create Video Timeline button to activate the timeline. If this button is not visible, you can go to Window > Timeline.
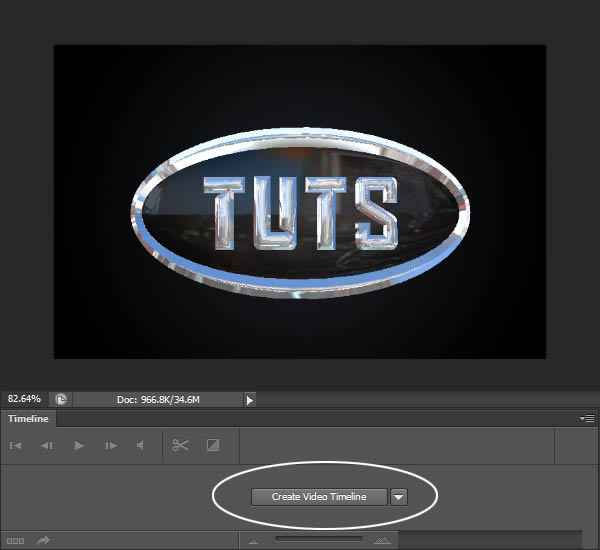
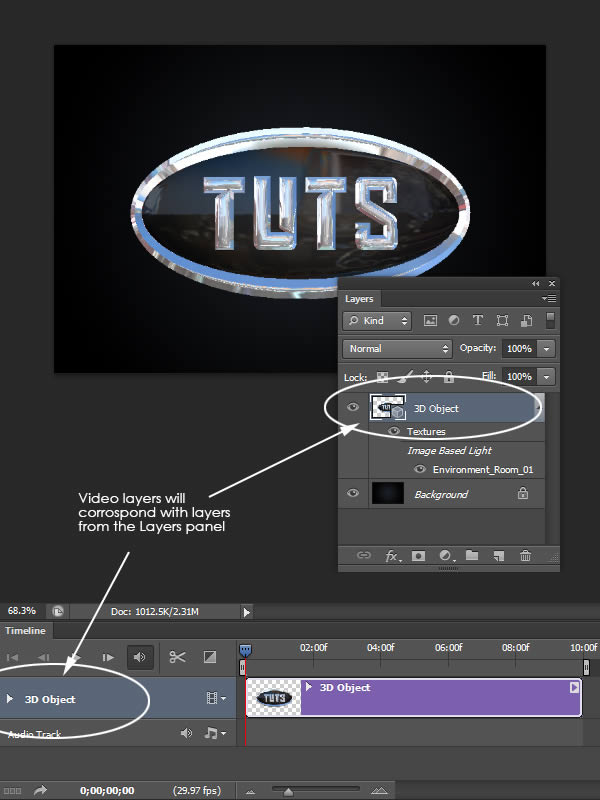
The “3D Object” layer will now be portrayed as a video layer in the Video Timeline.
Step 18
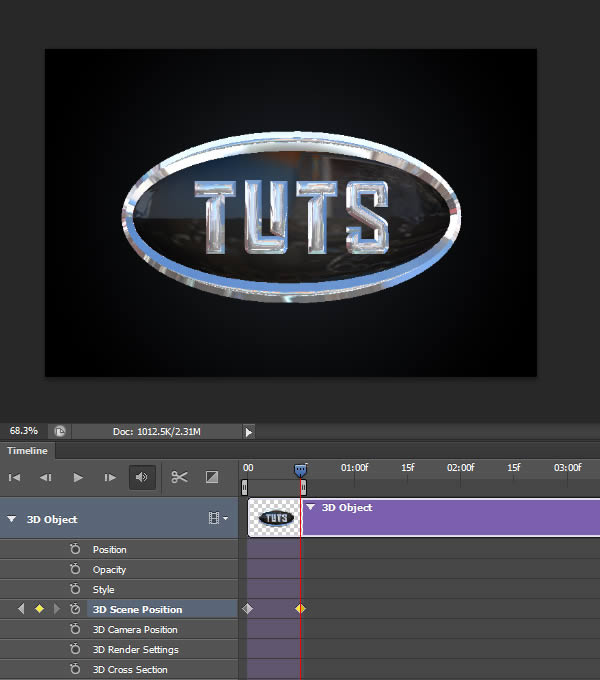
Since we’ll be animating the “3D Scene Position” of the “3D Object” layer, twirl down the “3D Object” layer in the timeline.
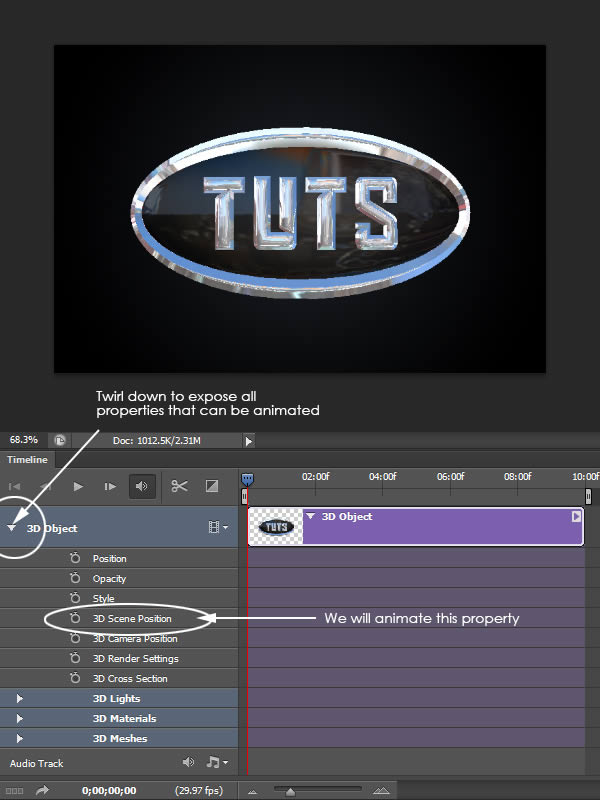
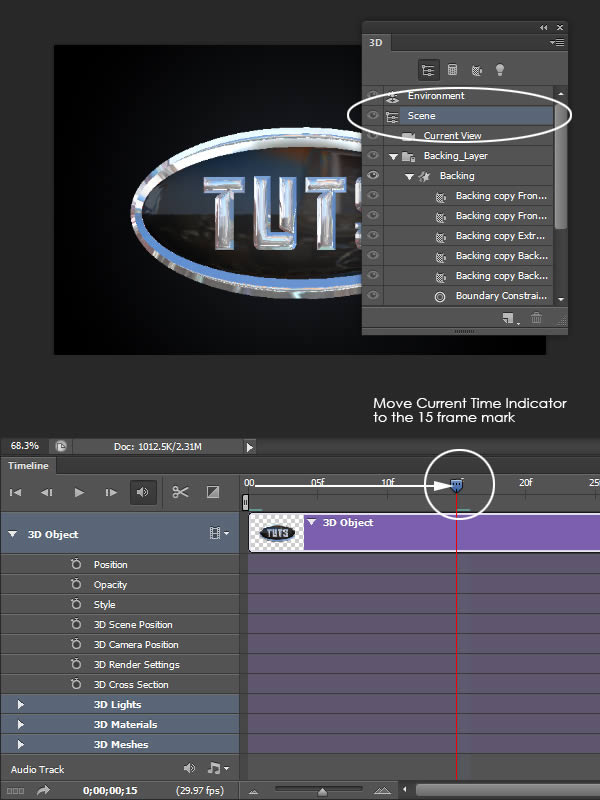
Step 19
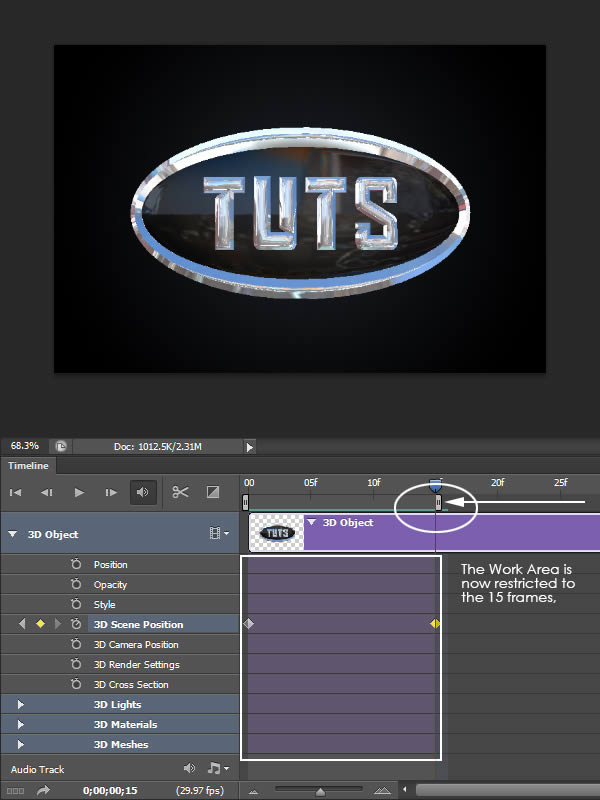
In the 3D Panel, make sure the “Scene” layer is selected. Next, move the Current Time indicator to the 15 frame mark and click the “Enable Keyframe Animation” icon.
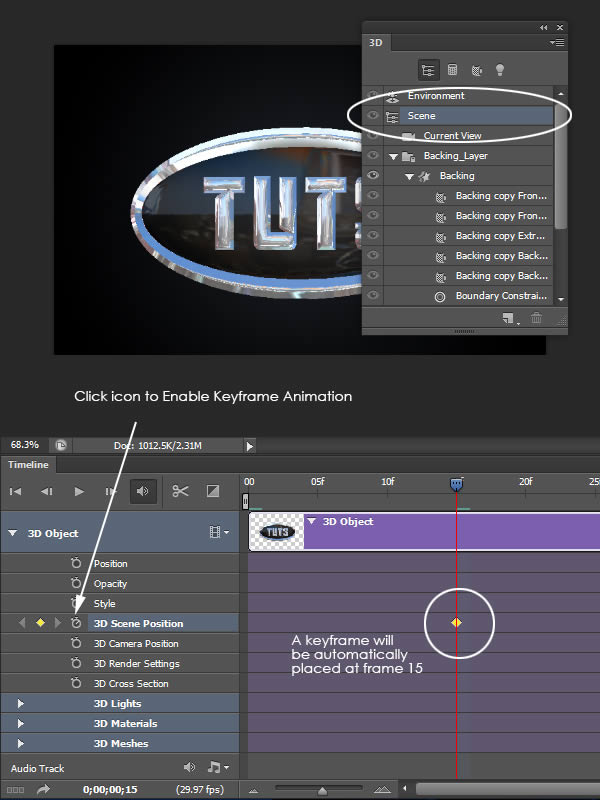
Next, move the Current Time Indicator to the “00″ mark and use the onscreen widget to rotate the scene roughly 30 degrees around the Y Axis. A new keyframe should automatically appear at the first frame for the 3D Scene Position.
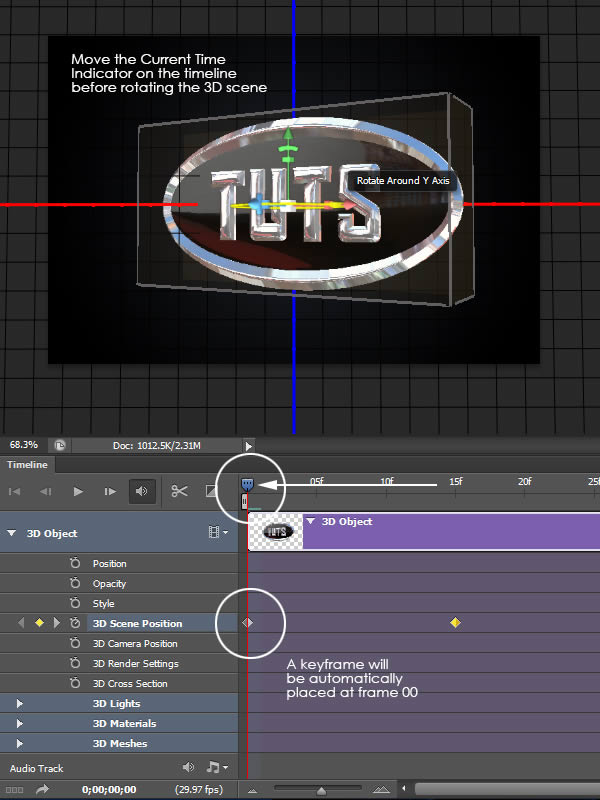
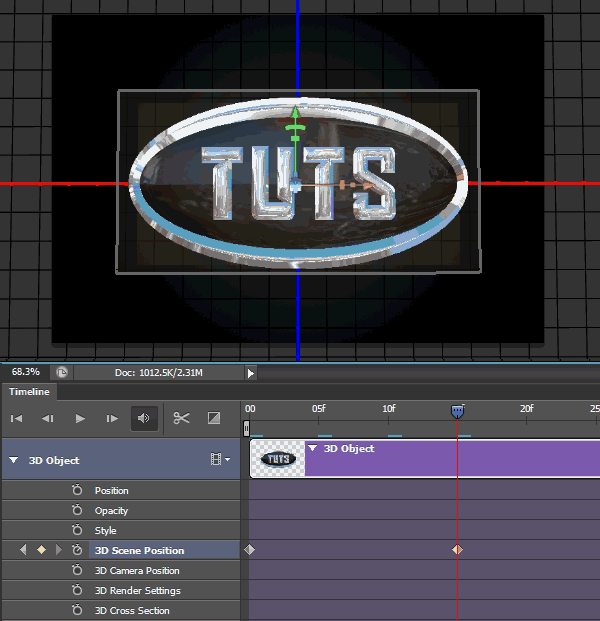
Scrubbing the Current Time Indicator back and forth between the keyframes will allow us to preview the animation.
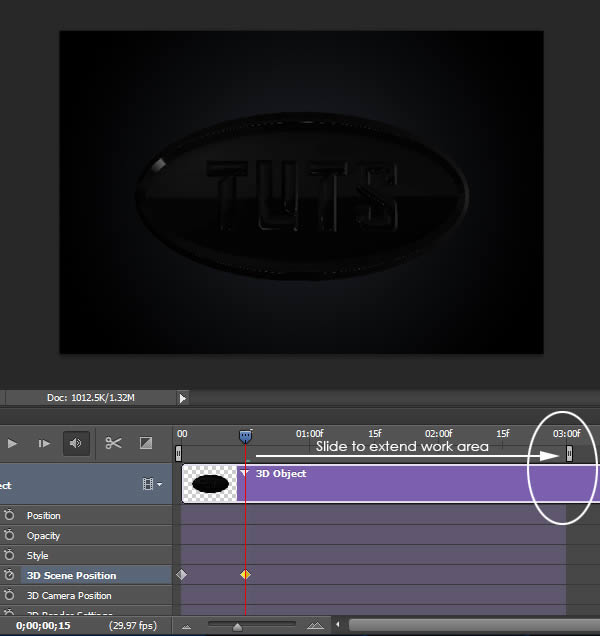
Step 20
Use the slider directly below the Timebar to set the end point of our Work Area to 15 frames.
Step 21
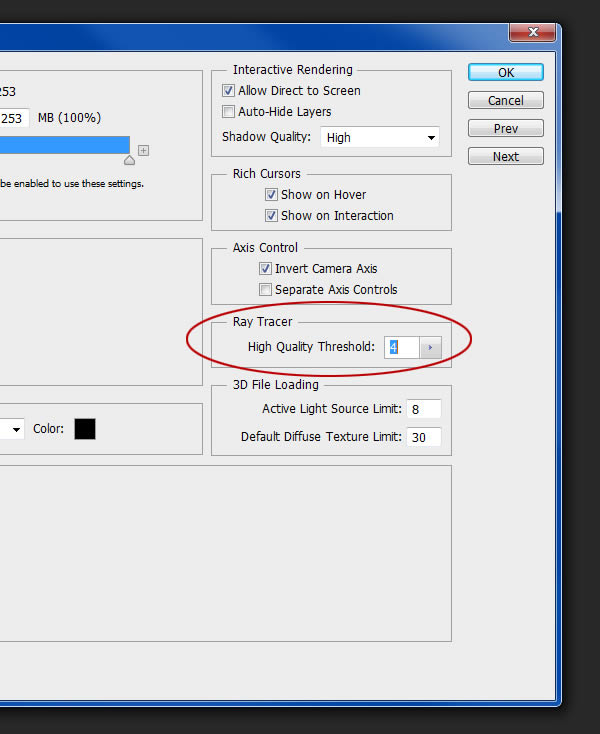
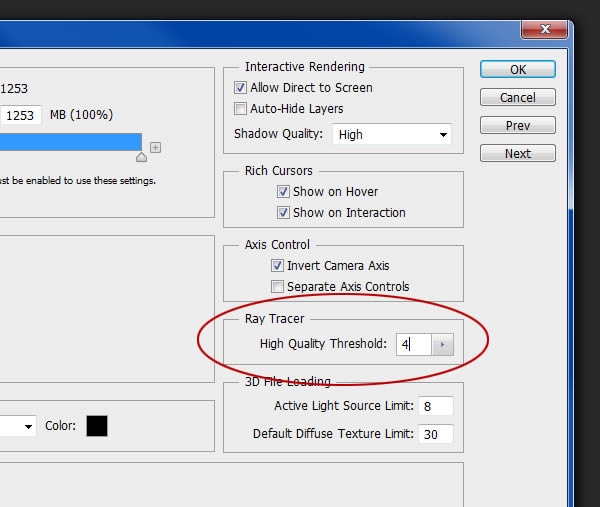
Before we render the animation, we can make some small changes to optimize the rendering time. Go to Edit > Preferences > 3D and set the Ray Tracer High Quality Threshold to 4. Alternatively, if you want a more polished final rendering, and don’t mind waiting a little longer, feel free to set this to 5 or even 6 (we are only rendering 15 frames after all).
Step 22
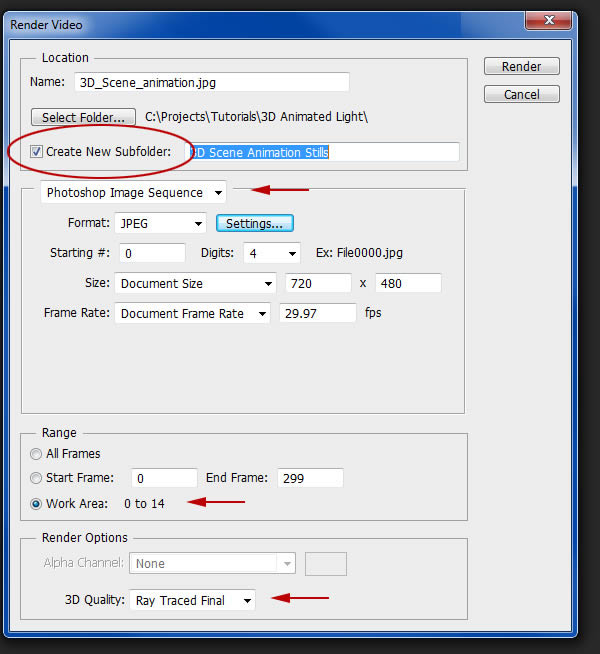
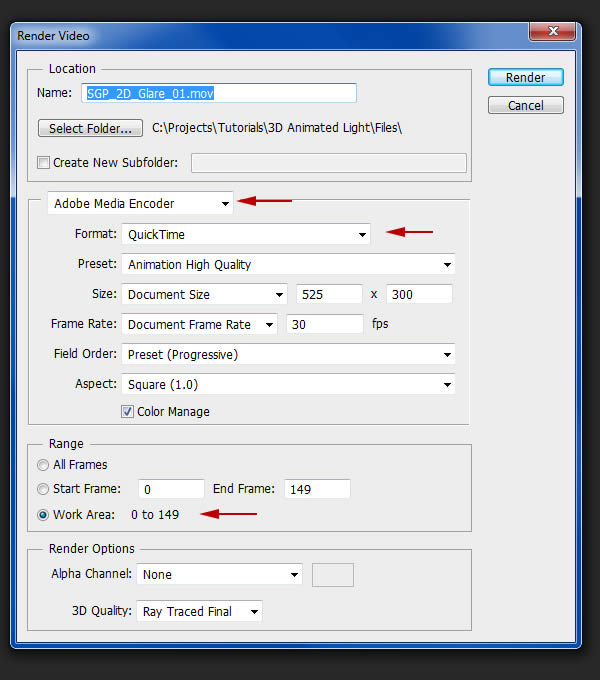
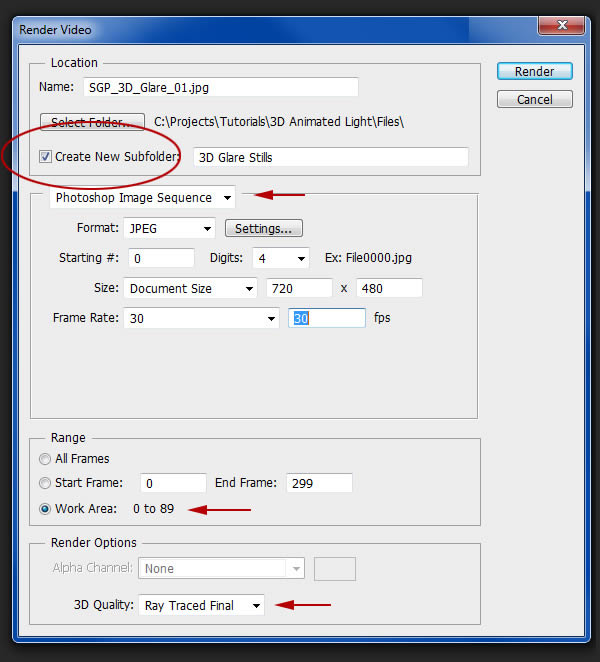
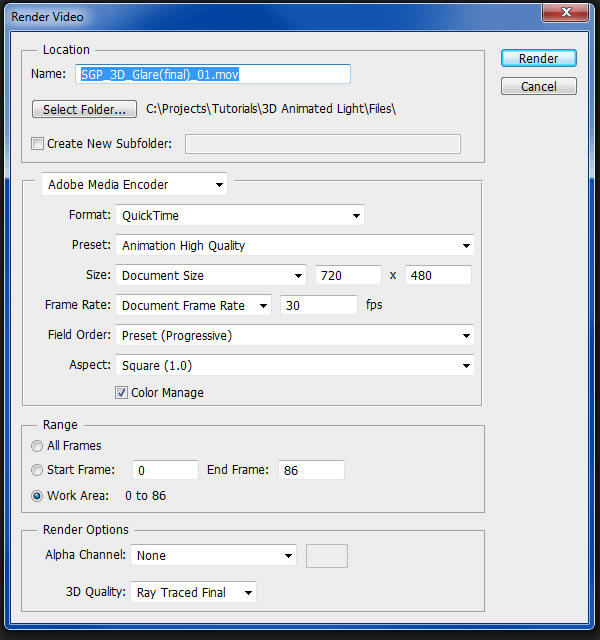
Go to File > Export > Render Video and apply the settings as shown. We will be rendering our scene as a JPG sequence instead of a video. This will give us more control later. I recommend saving the rendered stills to a new folder to better organize the files.
Step 23
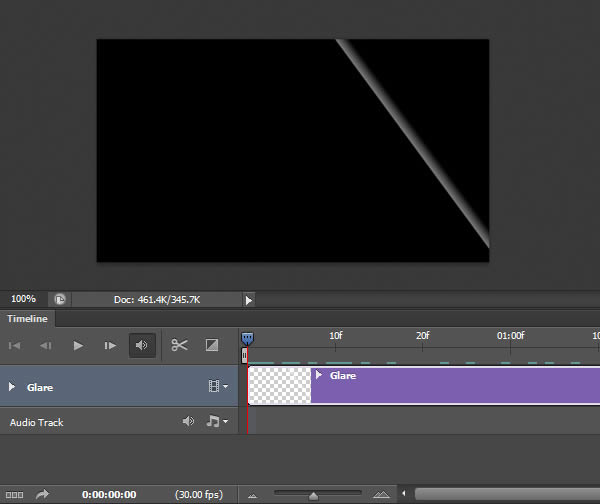
At this point, save your file and open a New Document. We are going to build a quick 2D animation of our glare effect. We will later apply this to our 3D object. Create a new document 525 px by 300 px with a black background.
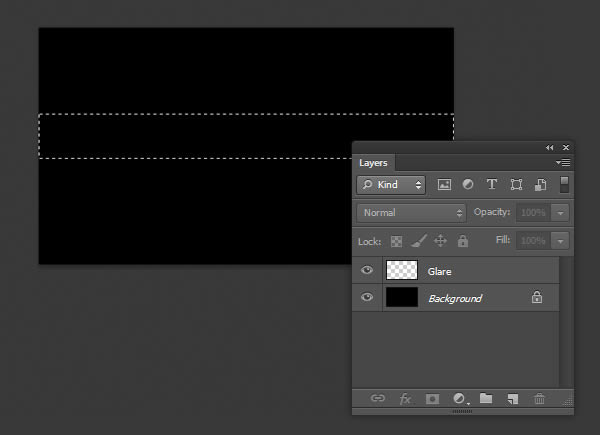
Step 24
Create a new layer called “Glare” and use the Rectangular Marquee Tool to make a horizontal selection as shown.
Step 25
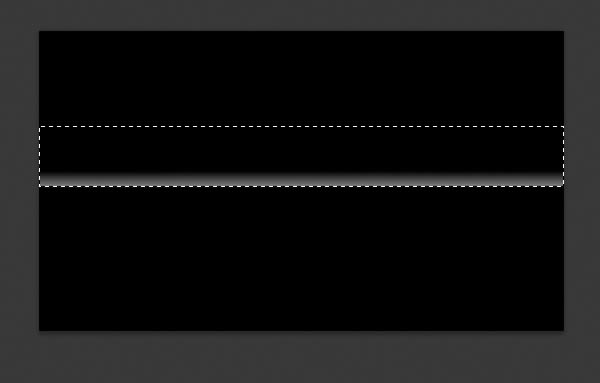
Select the Gradient Tool and make sure it is set to Foreground to Transparent and Linear Gradient. Also, set the Foreground Color to White.

Using the Gradient Tool, make a small gradient at the bottom of the selection.
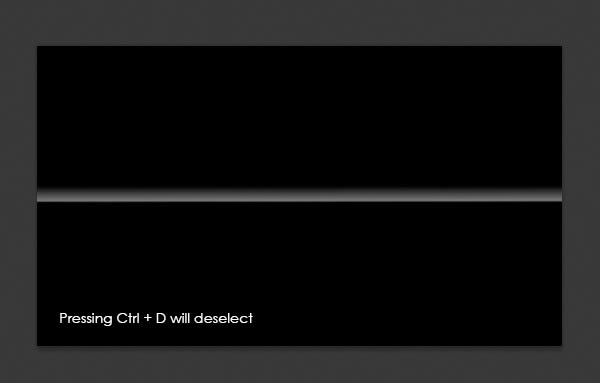
Press Ctrl + D to deselect.
Step 26
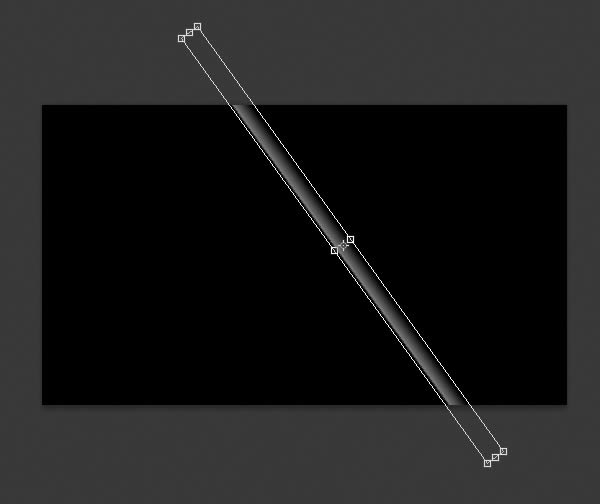
Rotate (Ctrl + T) the “Glare” layer as shown.
Step 27
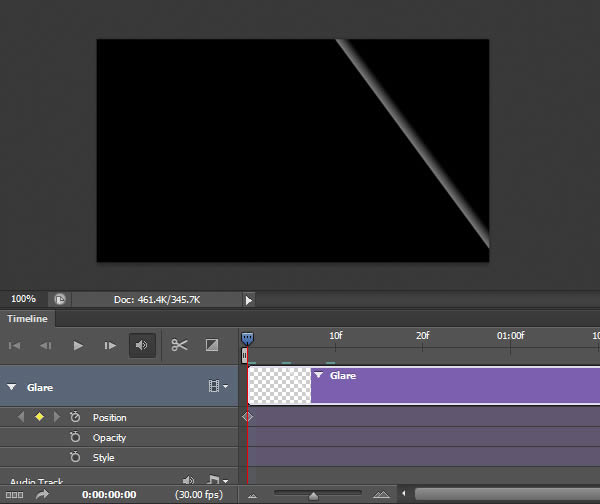
The next step is to animate this layer across our canvas. To do this, open the Timeline like we did in Step 17.
Twirl down the “Glare” layer and click on the icon to Enable Keyframe Animation for the “Position” property.
Move the Current Time Indicator to frame 50 and click on the Add Keyframe icon to set the position..
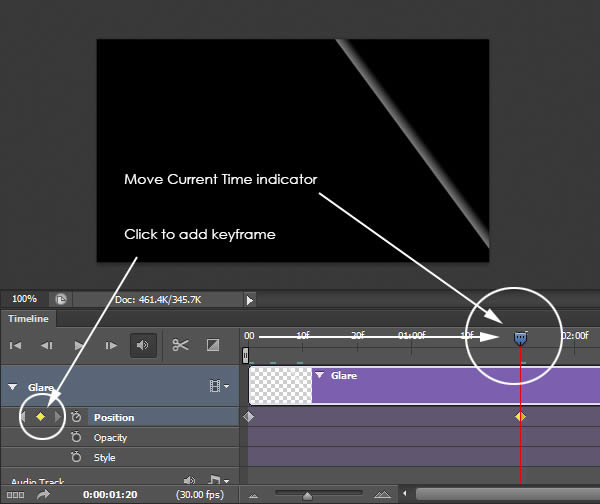
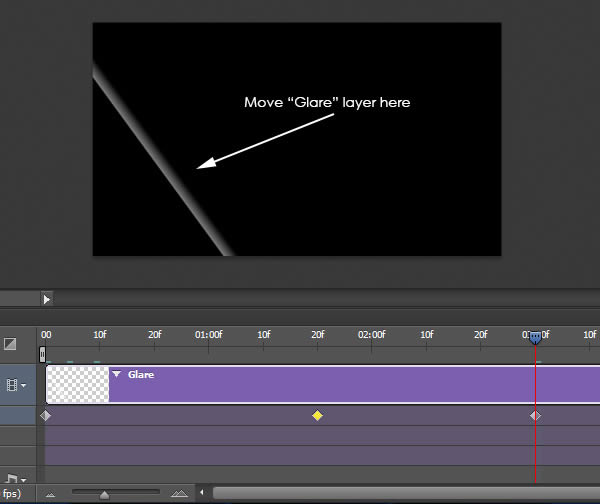
Move the Current Time Indicator further down the timeline (to frame 90, or so) and move the “Glare” layer across the canvas as shown. A key frame should automatically be generated at this position.
Step 28
Pressing Spacebar will preview the animation.

Feel free to embellish this animation as you see fit. I’ve added a few additional layers with different types of glare moving at different speeds. Here is a short preview.

Step 29
Go to File > Export > Render Video. Since we are working with a 2D animation (and don’t have to worry about rendering times), we can save out as a .MOV file.
Step 30)
Now that we have our 2D glare animation finished, we can go back to our original scene to work on the glare effect.
Step 31
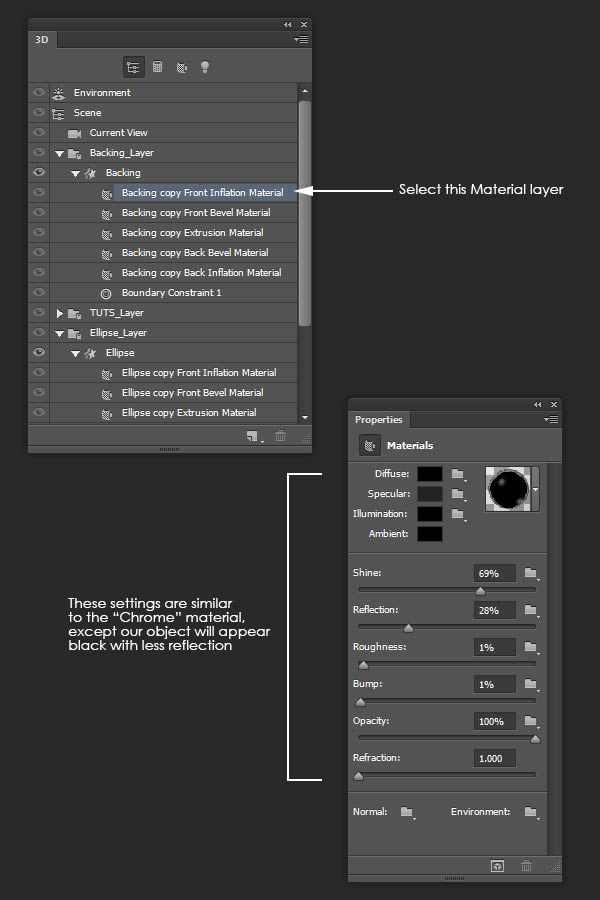
For this next part, we want the object to be all black. Click on the first material layer of the “TUTS” object and change the material settings in the Properties Panel as shown.
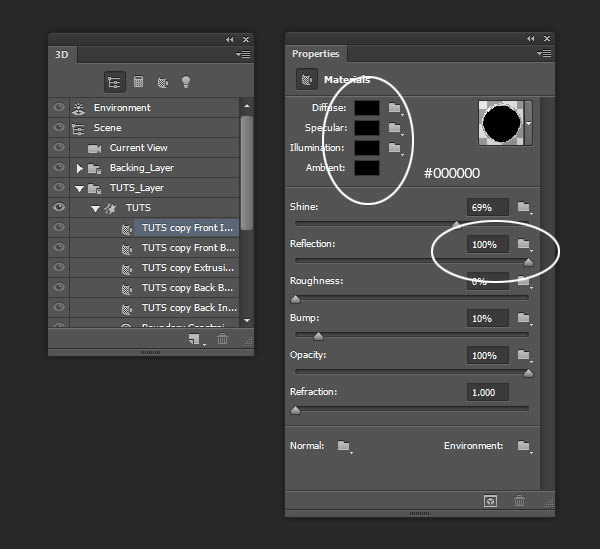
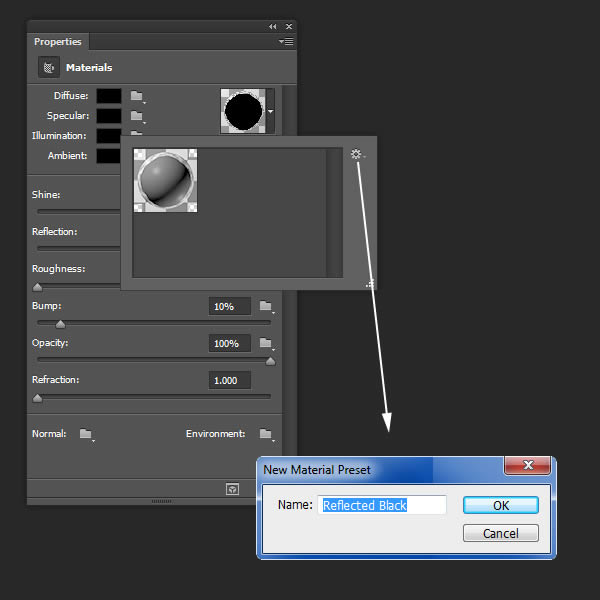
Step 32
Save this material like we did in Step 6. Name it “Reflected Black.”
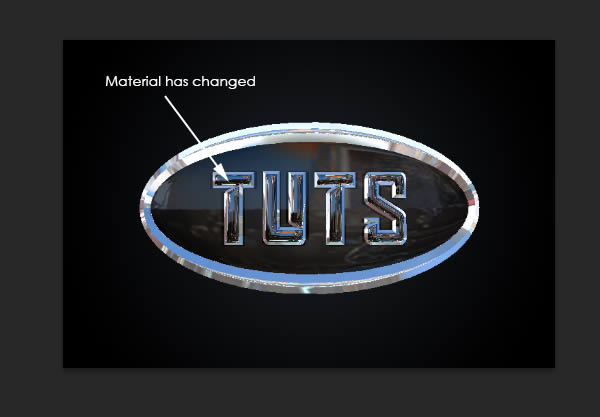
Step 33
Apply this texture to every surface on all three objects. The result should be an unrealistically reflective object.

Step 34
One of the great features in Photoshop is the ability to add animated GIFs or MOV files as textures. We will apply the MOV file that we previously created to the IBL in our scene. This will create the appearance of our 2D glare animation being reflected in our object.
In the 3D Panel, select the “Environment” layer and, in the Properties Panel, click the IBL thumbnail and select Replace Texture. Select the 2D Glare MOV file that we just created.
Pressing the space bar will preview the animation, but it will only show the first 15 frames since we adjusted the work area in Step 20. Go ahead and expand the work area to 90 frames.
Step 35
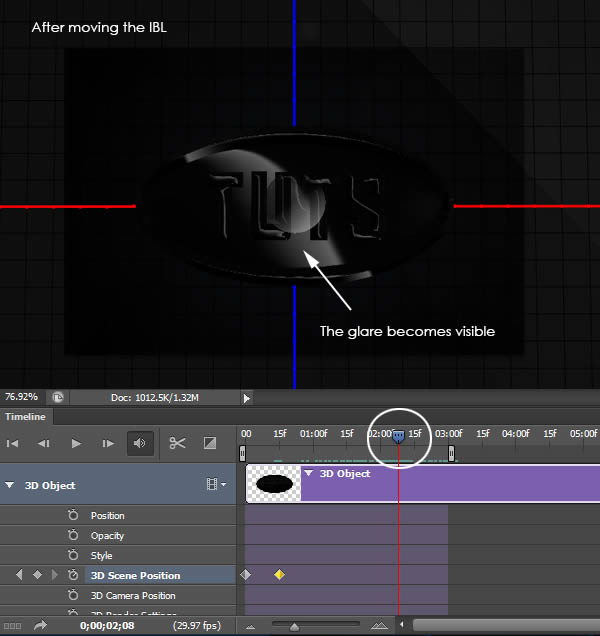
As explained in Step 15, we can us the onscreen widget to manipulate the position of the IBL. Currently, if you preview the animation, the IBL is positioned in such a way that it is not reflecting the ‘glare’ in our animation. Set the Current Time Indicator towards the end of the timeline (when the glare in our .MOV file starts to animate).
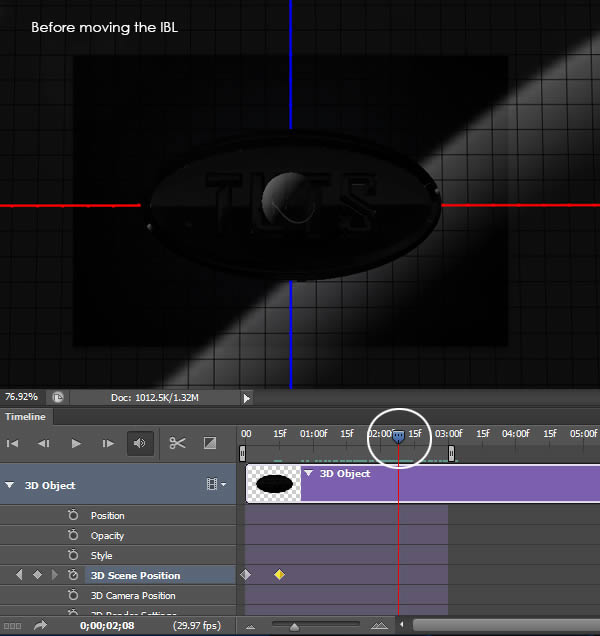
Rotate the IBL until we see that glare in the reflections of our object.
Step 36
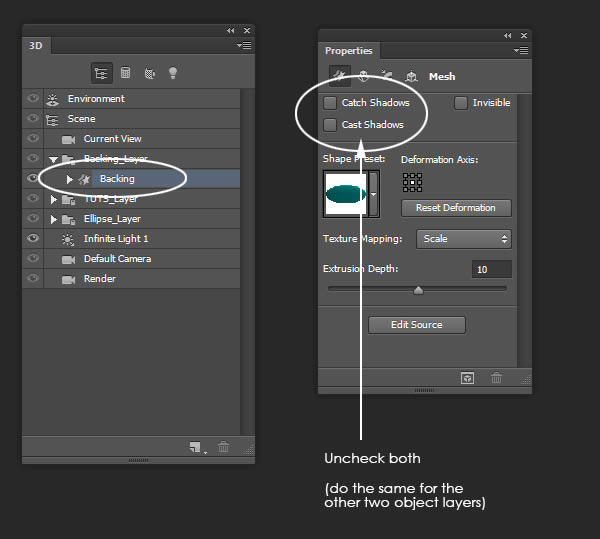
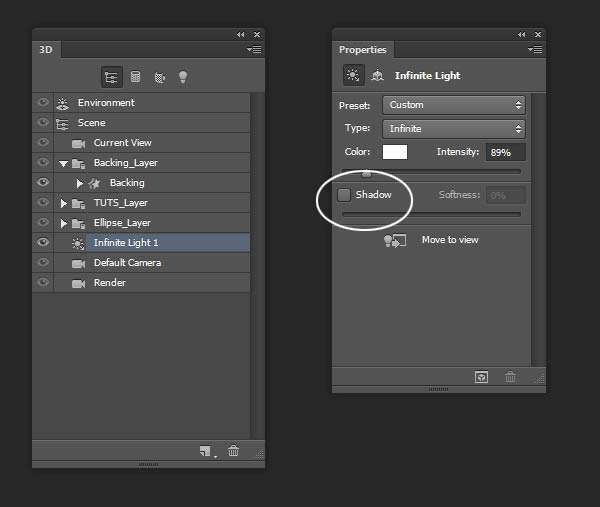
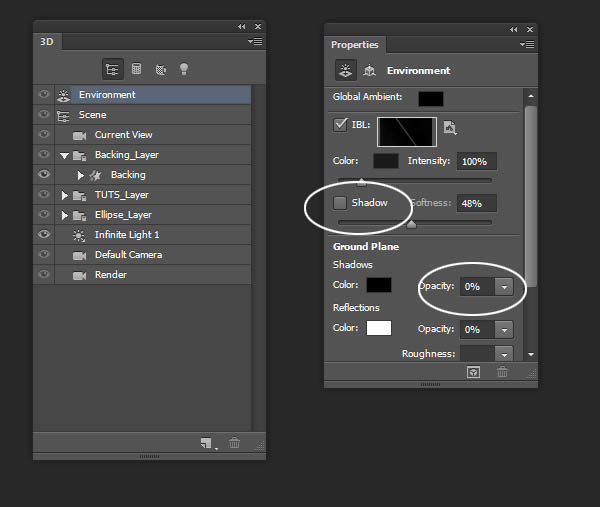
Since there are minimal textures in our scene, our scene will render a little faster. However, there are some additional steps we can take that will make little visual difference, but a significant time saver when rendering.
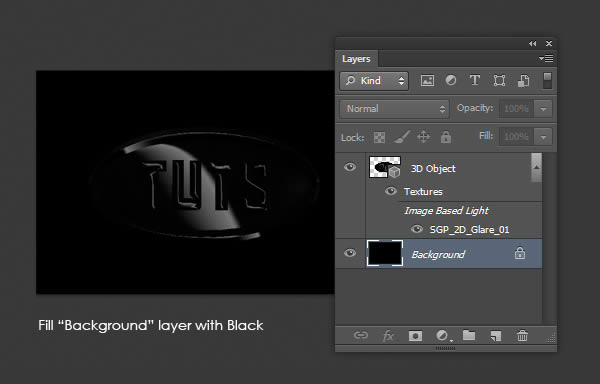
Click on each object layer and uncheck Catch Shadows and Cast Shadows (found in the Properties Panel).
Select the “Infinite Light 1″ layer and uncheck Shadow in the Properties Panel.
Select the “Environment” layer and uncheck Shadow in the Properties Panel. Also, set the Ground Plane Shadow’s Opacity to 0%.
Lastly, as an optional step, go to Edit > Preferences > 3D and set the Ray Tracer High Quality Threshold to 3 or 4.
Step 37
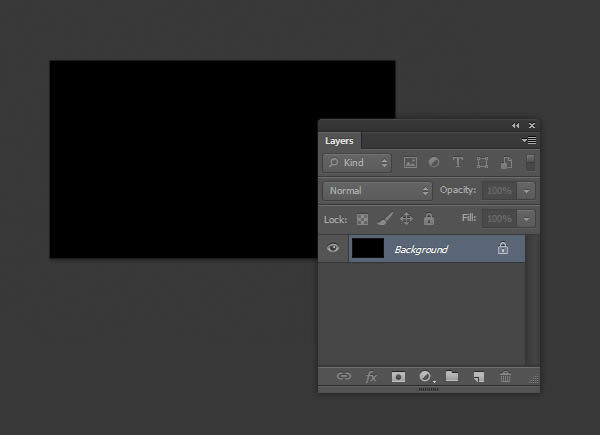
The last thing we need to do before rendering is to make the background solid black. Select the “Background” layer and give it a black fill.
Step 38
Just like we did in Step 22, go to File > Export > Render Video and render the animation as a JPG Image Sequence.
Step 39
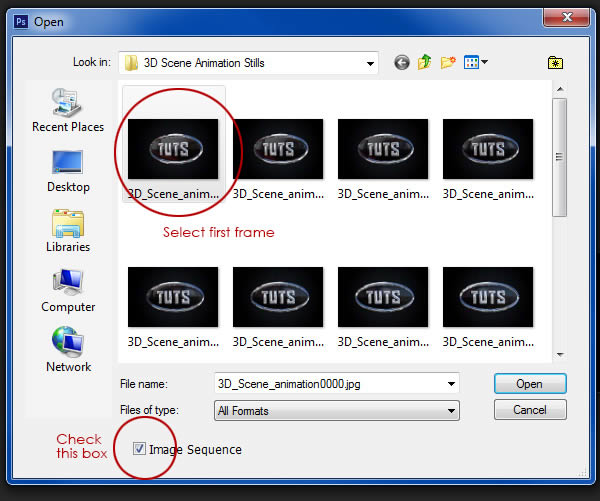
Now that we have all of our components rendered out, we can begin to composite our animation in a new document, using the video timeline. Go to File > Open and navigate to the folder where we saved our 3D animation image sequence. Make sure to check the Image Sequence box before opening.
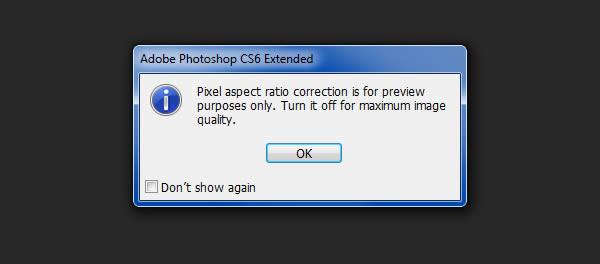
Since we are working with video layers, you may get the following message before you open the file. When the file is open, just go to View and uncheck Pixel Aspect Ration Correction to correct.
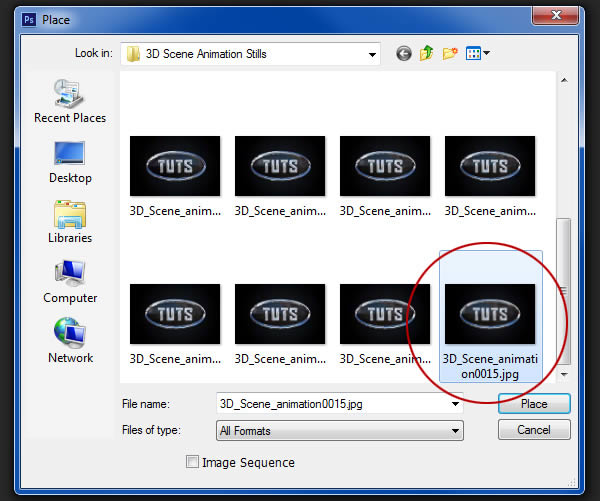
Next, go to File > Place and select the last frame only of our 3D animation. This will place the last frame of our animation on the same layer as our video file.
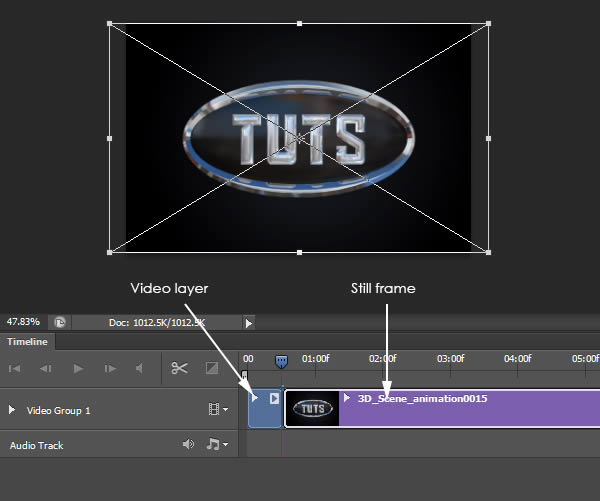
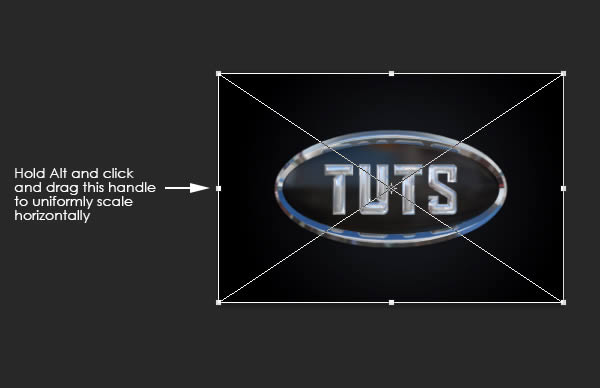
Notce that the file appears to be wider than the canvas. This is due to our video layer being portrayed in a different pixel aspect ratio than our still image. We can manually adjust the handles to correct.
Step 40
The next step is to add the 3D glare animation to our scene. Go to File > Place and navigate to the glare animation image. Make sure to open these as an Image Sequence. Note that this automatically converts the video layer into a Smart Object. This is important for the later steps (alternatively, you can right-click any video layer in the Layers Panel and select “Convert to Smart Object”).
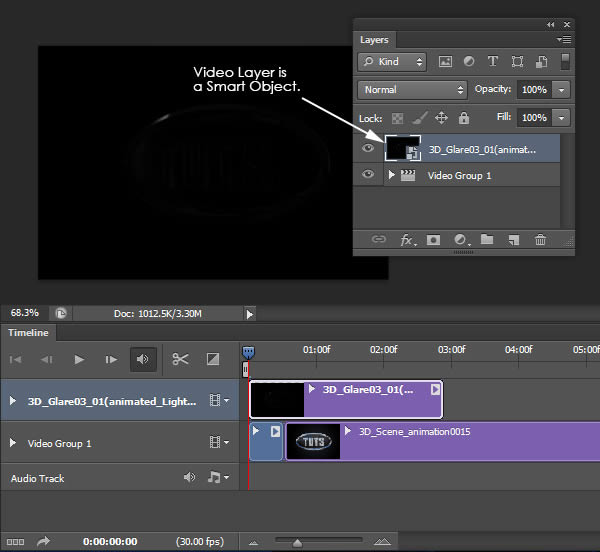
Step 41
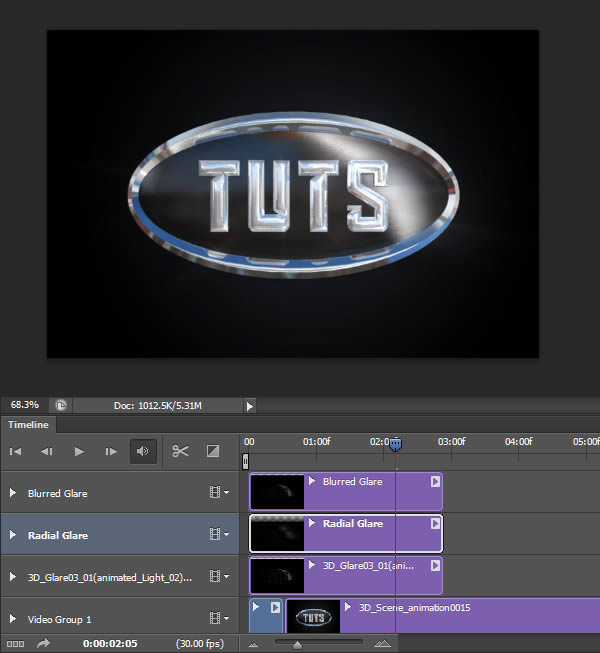
To start the initial glare effect, select the 3D glare animation layer and set the Blending Mode to Linear Dodge (Add).
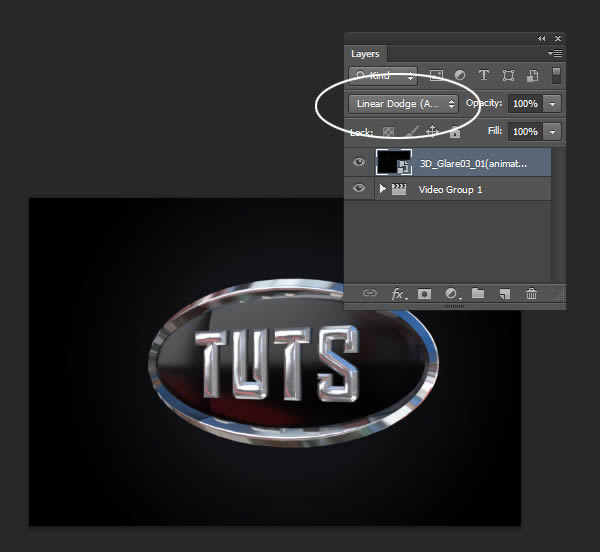
If you scrub through the animation, you can see how this Blending Mode affects the scene.

Step 42
As pointed out earlier, our 3D glare video layer is a Smart Object. As a Smart Object, we can now apply Smart Filters to the video layer. We will use Smart Filters to enhance our glare effect. Make a copy of the glare layer in the Layers Panel and name this “Blurred Glare.” This will automatically add a new layer to our video timeline.
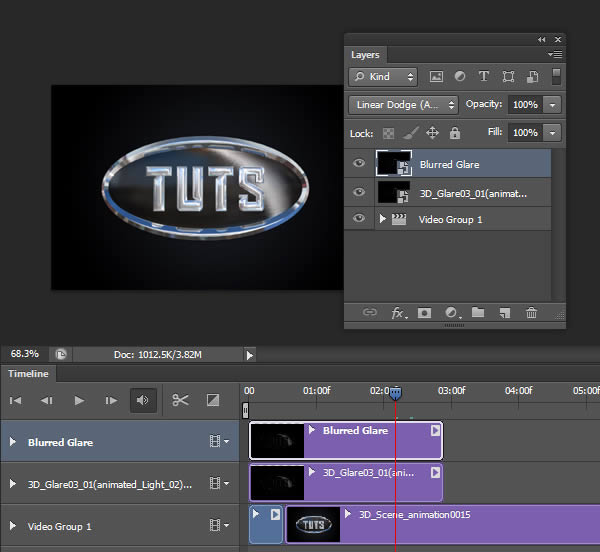
Give this a Gaussian Blur (Filter > Blur > Gaussian Blur) set to 6.8 pixels. This will add that glow that often accompanies a glare.
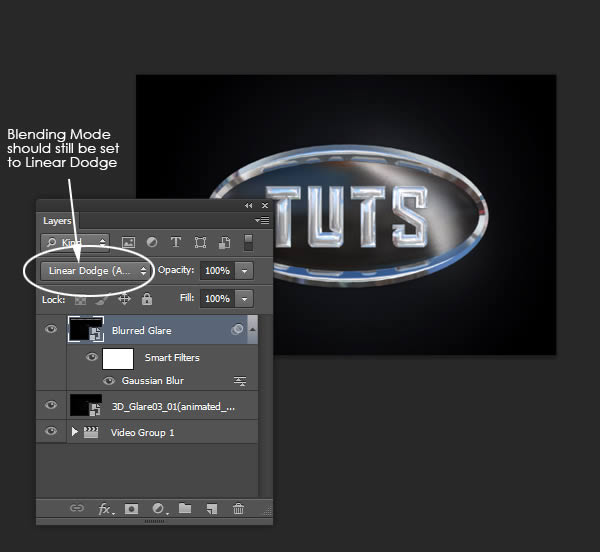
Step 43
We can get creative with the glare by adding a Radial Blur. Go ahead and make another copy of the original glare layer and go to Filter > Blur > Radial Blur. Set the Amount to 100. Feel free to add a second Radial Blur for a added emphasis (Smart Filters can be added multiple times).
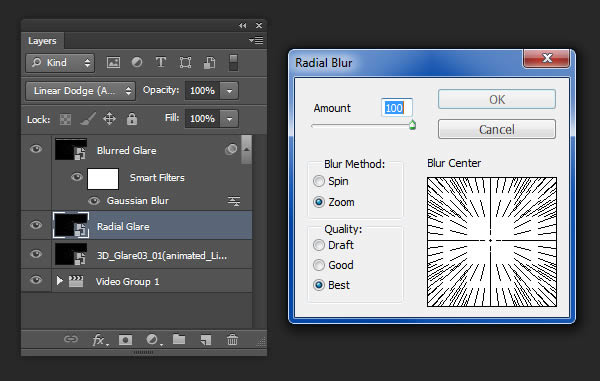
Your scene should resemble the following.
Step 44
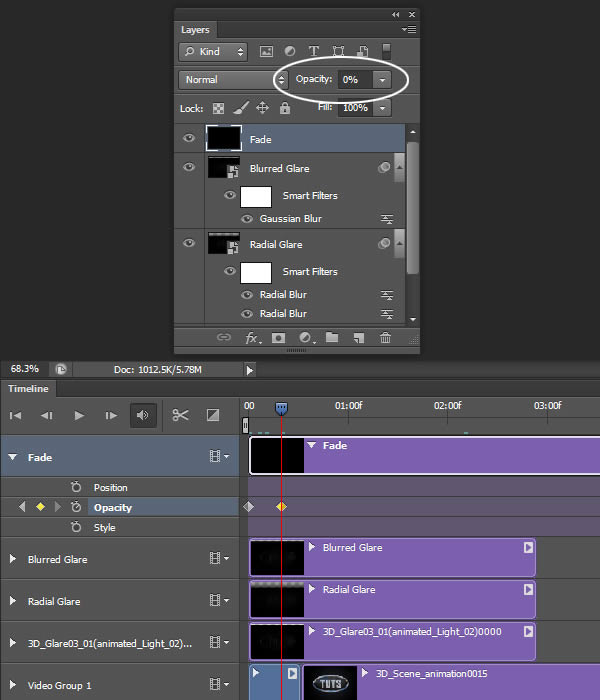
Now that our animation is almost done, we are going to add some final touches. Add a new layer using the Layers Panel and fill with black. Name this layer “Fade.”
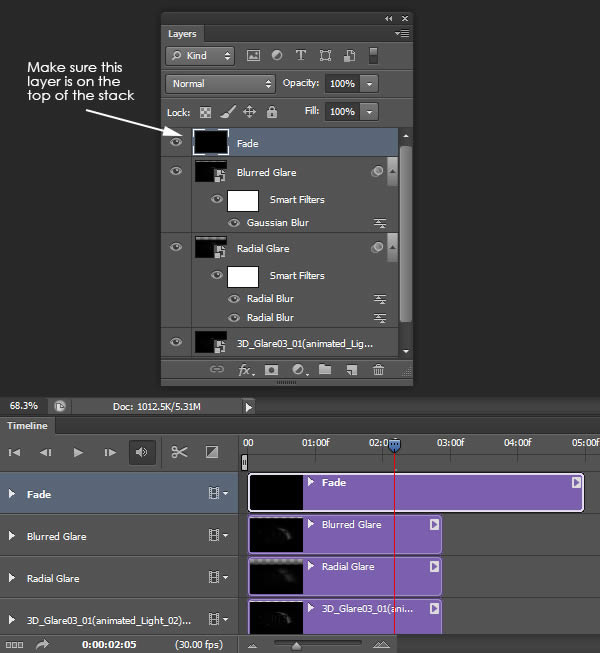
In the Video Timeline, twirl down the “Fade” layer and, click the Stopwatch icon to Enable Keyframe Animation for the Opacity property. When you Enable Keyframe Animation, a keyframe will be placed at the spot of your Current Time Indicator—move it back to frame 00.
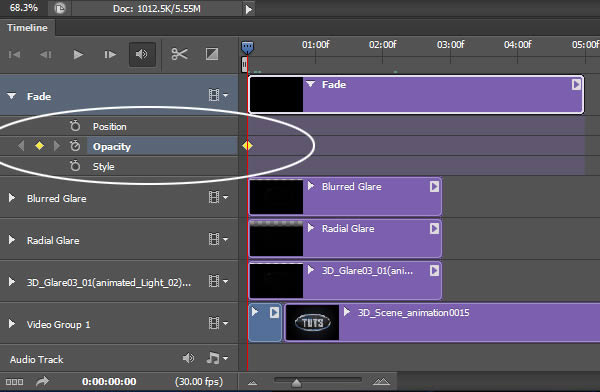
Step 45
Create another at the tenth frame. You can click and drag a keyframe after it’s added to position it more accurately.
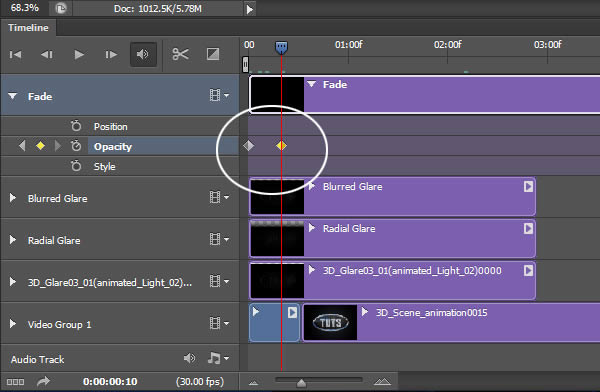
Step 46
With the second keyframe still activate (donated by the yellow highlight), adjust the “Fade” layer’s Opacity to 0% using the Layers Panel. Our fade-in is now complete.
Step 47
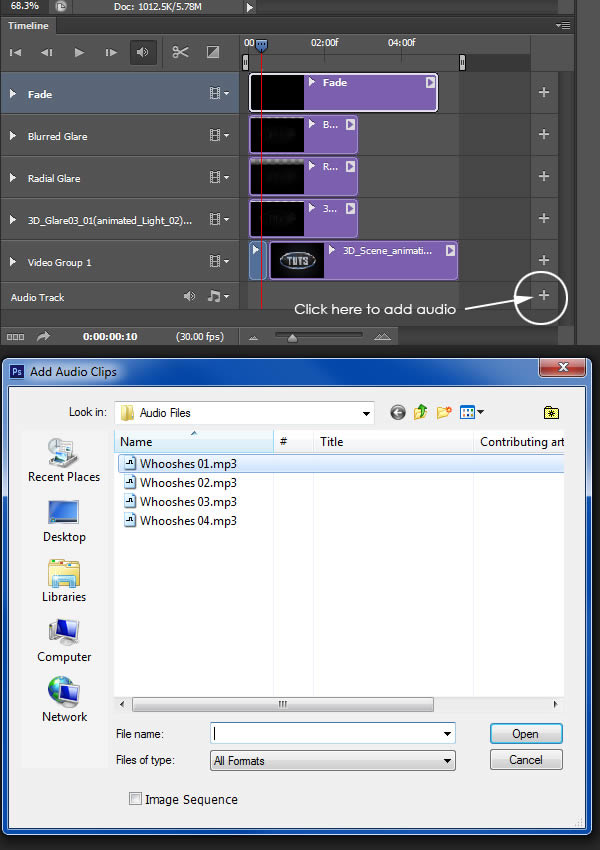
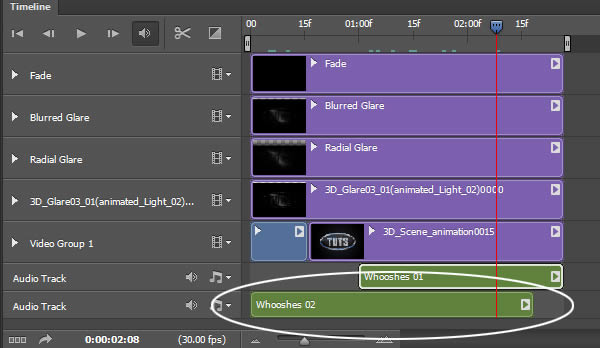
The last thing to do is to add the audio found in the Tutorial Assets. We’ll be using a sound clip bundle called “Magic Wooshes.” This file includes four seaparet ‘woosh’ clips.
At the very bottom of our Video Timeline, click the plus symbol on the end of the Audio Track layer. Load the “Wooshes 01.mp3″ sound clip.
Step 48
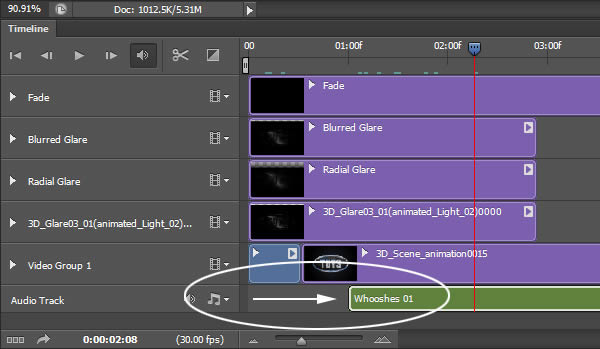
Pressing the Spacebar will preview the animation with the sound. This audio clip sounds like it will work best when the glare effect passes over our object. Move this sound clip so that that the ‘woosh’ plays as the glare starts moving across our object.
Step 49
Currently, the audio keeps playing past the end of our animation, to fix this, we will need to trim the clip. Click on the end of the Audio Track and drag it back so that it ends with our animation.
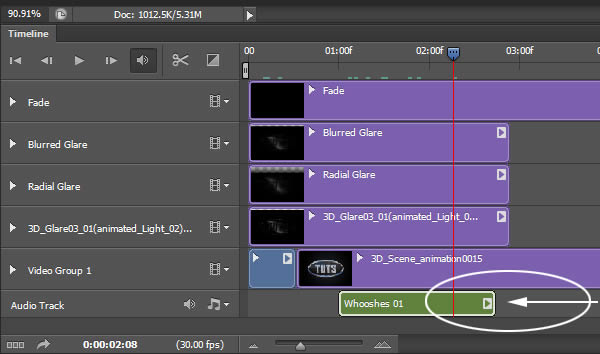
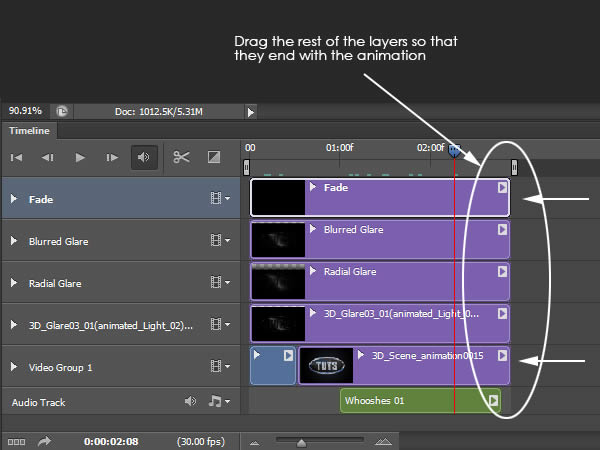
At this point, go ahead and drag the remaining to layers back so that they end with the animation.
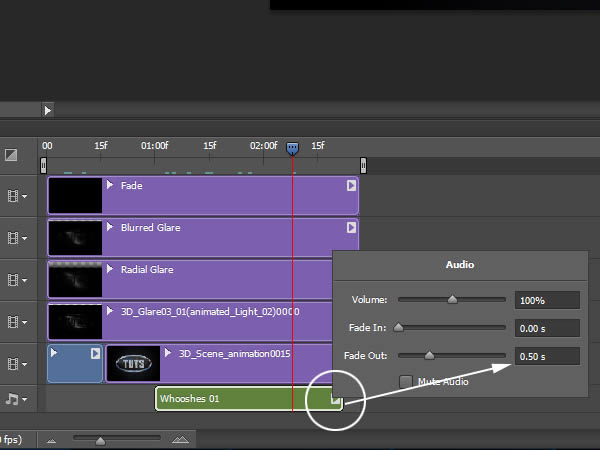
The audio still cuts off early. To fix that, we will add a fade out to the audio. Click the arrow icon at the end of the track and set the Fade Out to .5 sec.
Step 50
If you want, you can add another audio track to the beginning of our scene to play when our object rotates into position. To add another audio track, click the Music Notes Icon on the Audio Track and select New Audio Track.
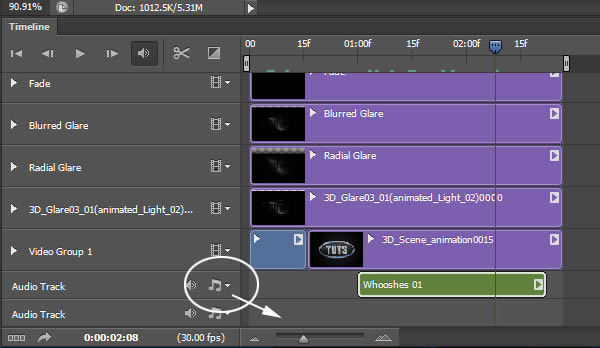
Just repeat Steps 47–49. I’ve found that the clip “Wooshes 02.mp3″ works well, however, it requires a little more adjusting.
Step 51
Finally, go to File > Export > Render Video.
Final Rendering
You’re Done! Below is the final animation with sounds effects:
Subscribe to:
Posts (Atom)