Photoshop has become a multi-purpose tool that can create some complex animations without the need to purchase additional software. In this tutorial, we will show you how to create and composite a 3D animation with sound and lighting effects. We will also cover techniques on how to optimize your rendering time. Let’s get started!
Tutorial Assets
The following assets were used during the production of this tutorial.
- 3D Object (In Free Download Files)
- Material Presets (In Free Download Files)
- Living Room
- Audio Clips
Step 1
Create a new document at a video resolution you prefer. In this case, I’m using 720 px by 480 px.
Step 2
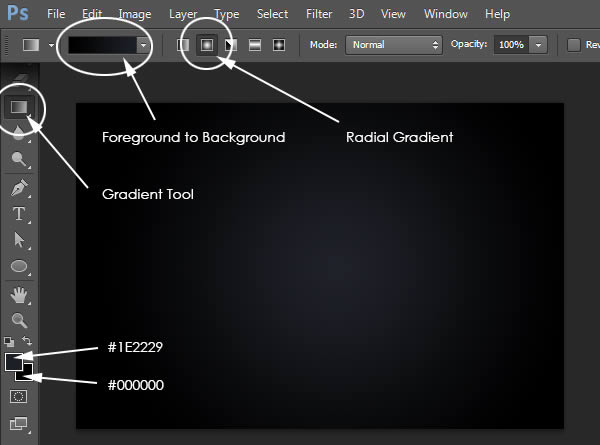
Choose a Foreground and Background Color and use the Gradient Tool to make a radial gradient as shown. Make sure the Radial Gradient icon is selected in the Top menu.
Step 3
The next step is to create our 3D object which we will later texture and animate. You can use or build any object that you want, but for this tutorial, we’ll be using a 3D object from one of my previous tutorials (included in the resources). To learn how to create this object, please refer to my Realistic Chrome Hood Ornament Premium Tutorial.
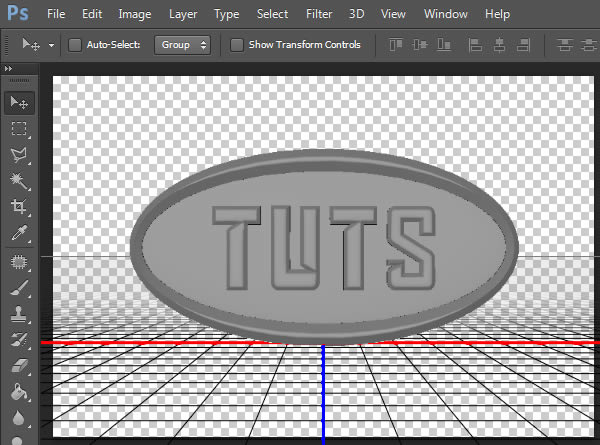
We will now add the 3D Object to our scene. Go to File > Open and navigate to the “3D_object.psd” file. This will open as a new document.
Step 4
We want to move the “3D Object” layer into the scene we were just working on. Normally, you would use the Move Tool (V) to click and drag the layer from the canvas to the correct document tab at the top. Hovering over a document tab would open that document to allow you to drop the new layer into that new document. Unfortunately, with a 3D layer, you cannot use the Move Tool directly. So, we will have to use it indirectly.
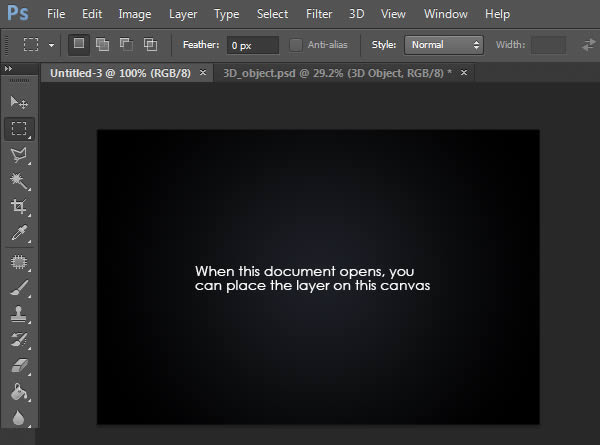
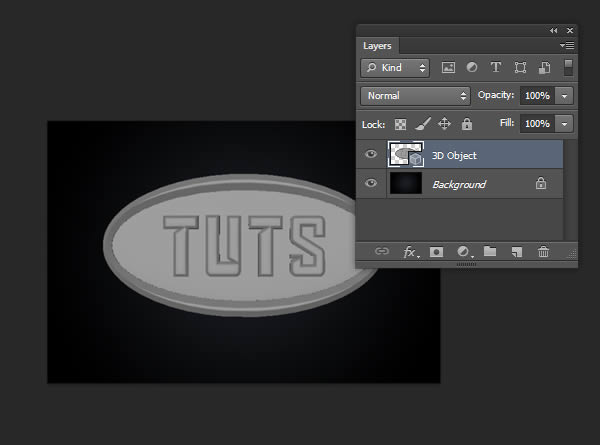
In the “3D_object.psd” document, make sure the 3D Object layer is selected in the Layers Panel. Also, make sure to select the Rectangular Marquee Tool (M).
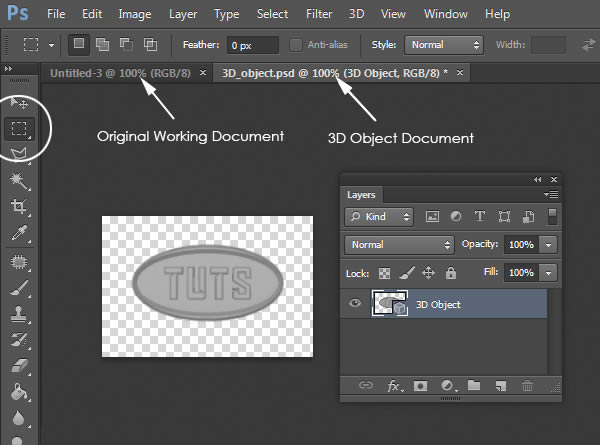
Holding Ctrl will change the cursor to the Move Tool temporarily which will now allow us to click and drag the 3D layer from document to document. Go ahead and hold down Ctrl + Shift while clicking and dragging the object from the canvas to our working document. Hovering over the working document will open it up.
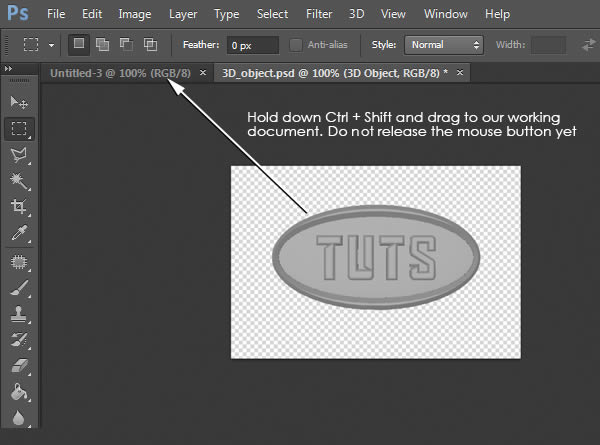
When the working document opens, drag your cursor over the canvas and release the mouse button to place the layer. Since we were holding Shift, the layer will automatically be placed in the center of the canvas.
Step 5
With the 3D layer selected, make sure the Properties Panel and the 3D Panel become visible. If these panels are not visible, just open them by going to Window > 3D, or Window > Properties. Here is an example of both windows when the “Current View” is selected:
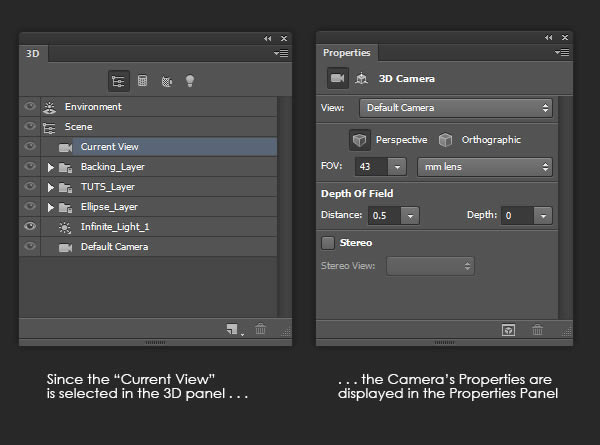
Our next step is to go through and apply textures to each surface. If we go to the 3D Panel, we can see the three object groups that make up our 3D object. By twirling down a group layer, we can see the 3D Object layer as well as its Material layer.
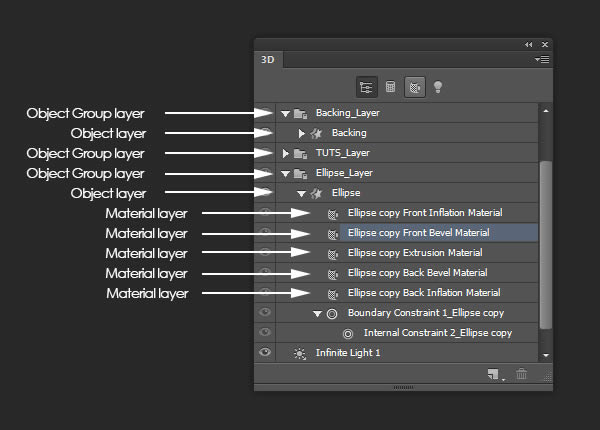
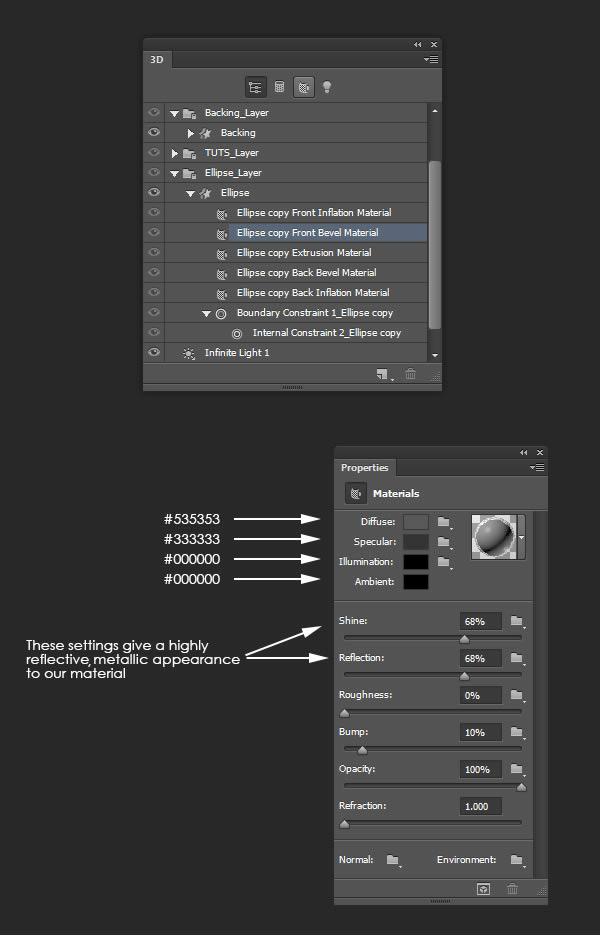
Select the “Ellipse” object’s “Front Bevel Material” layer in the 3D Panel. In the Properties Panel, make the following adjustments. Our goal is to create a chrome material for this surface.
Step 6
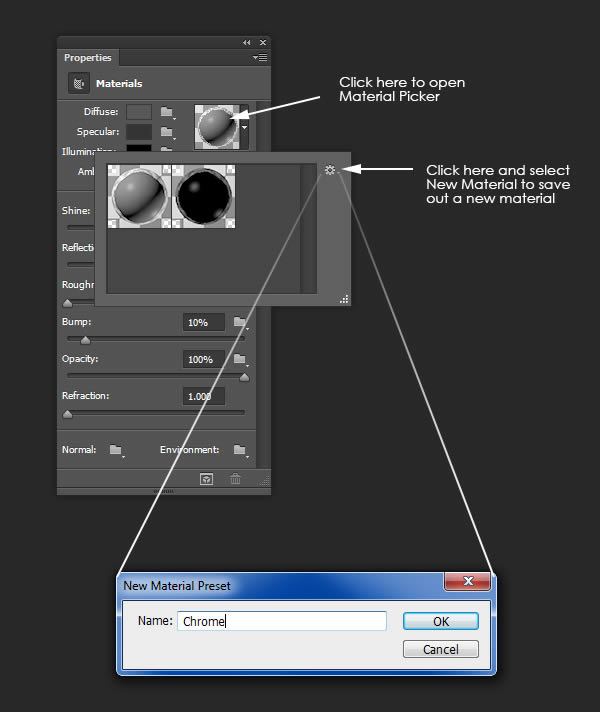
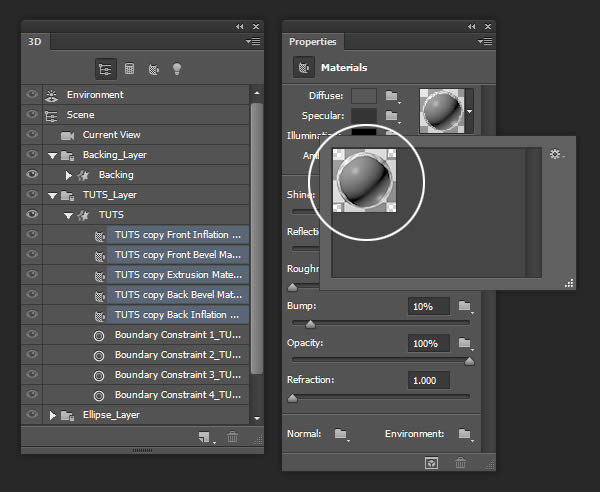
In order to apply this material to other surfaces, we need to save it to the Material Picker. To do this, click on the Material Picker preview window in the Properties Panel, select the small gear icon to open a fly-out panel with additional options and choose New Material. Name the new material “Chrome.”
Step 7
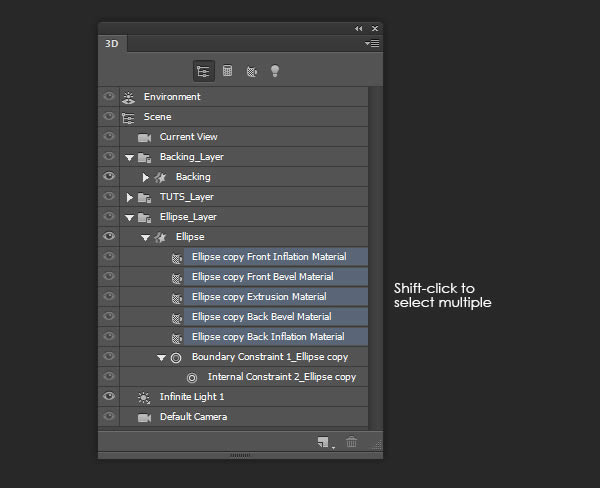
To apply the newly created “Chrome” material to the rest of the “Ellipse” material layers, go back to the 3D Panel and shift-click the rest of the surfaces. Next, go to the Material Picker in the Properties Panel and navigate to our “Chrome” material.
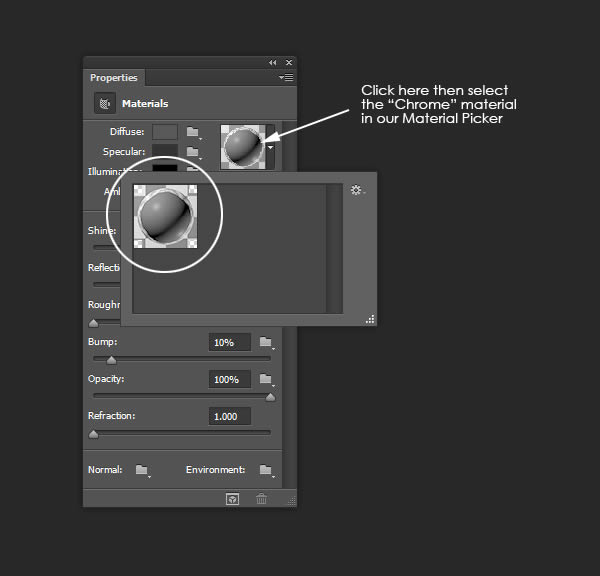
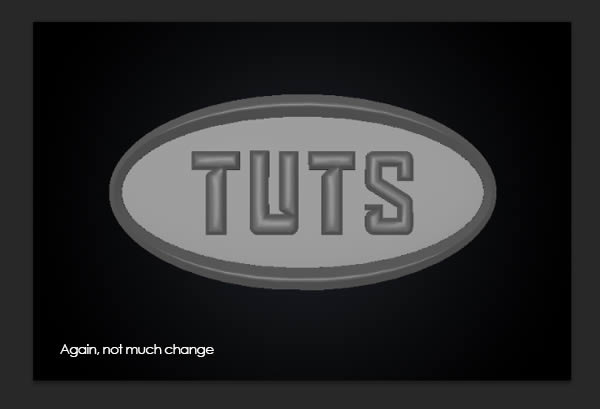
Now, the entire “Ellipse” object should be textured with the “Chrome” material. As you can see, there’s not much difference. This is because there’s nothing to reflect. We will address this later.

Step 8
We will use the same “Chrome” material for the “TUTS” object. Select all of the material layers for the “TUTS” object and apply the “Chrome” material. Your image should resemble that following:
Step 9
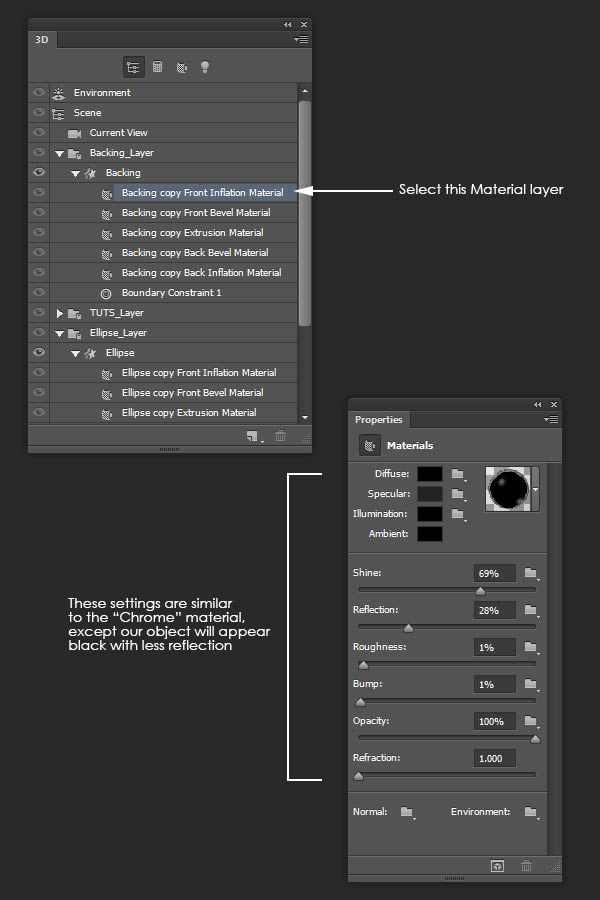
The last material we need to apply is on the “Backing Front Inflation Material” layer. Select this material layer and apply the following settings in the Properties Panel.

Step 10
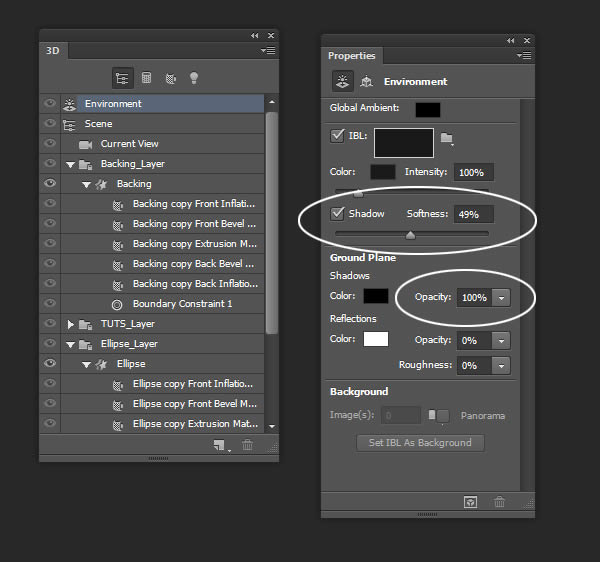
Photoshop automatically includes a ground plane in every 3D scene (denoted by the grid). It also allows the option to cast shadows on that ground plane. In the 3D Panel, select the “Environment” layer, then go to the Properties Panel and make sure the Shadow and Ground Plane settings are set as shown:
Step 11
Since our object is ‘standing’ on the ground plane, the object’s shadow will cast across it. We eventually want the object to be parallel with the ground plane and the light directly above so the shadow will be cast directly beneath the object.
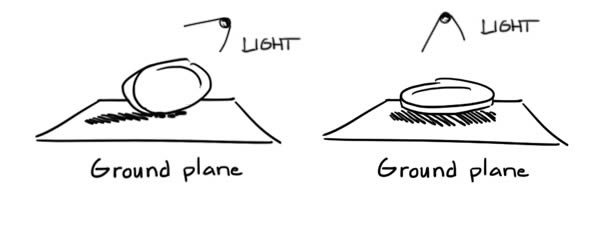
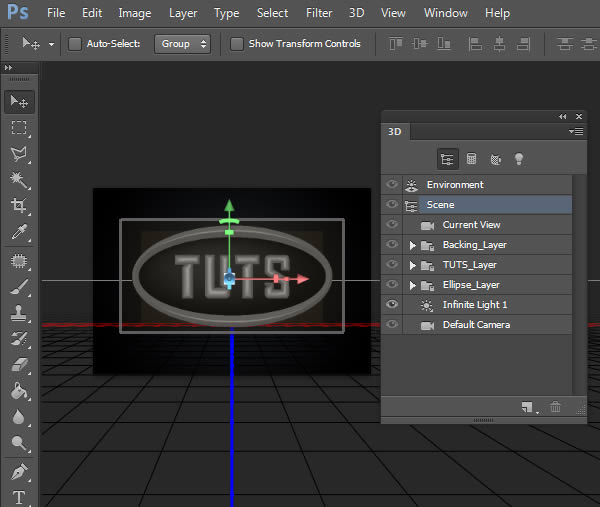
To achieve this, we will first move the object into position. Make sure the Move Tool (V) is selected and, in the 3D Panel, select the “Scene” layer (this selects all objects at once).
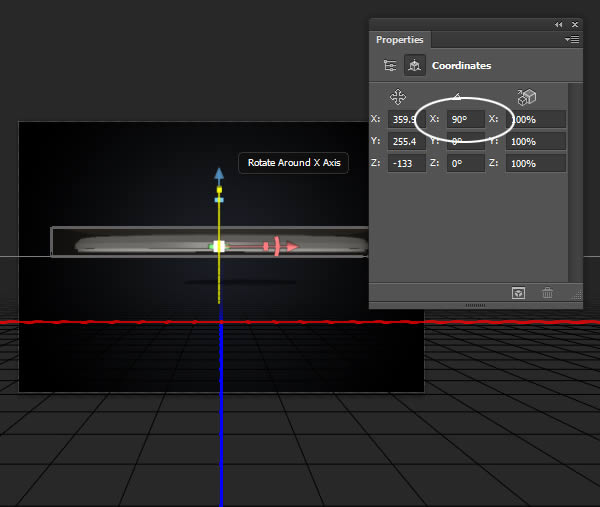
Use the onscreen widget to rotate the scene 90 degrees around the X-axis. You can also manually set the rotation using the Coordinated Tab in the Properties Panel.
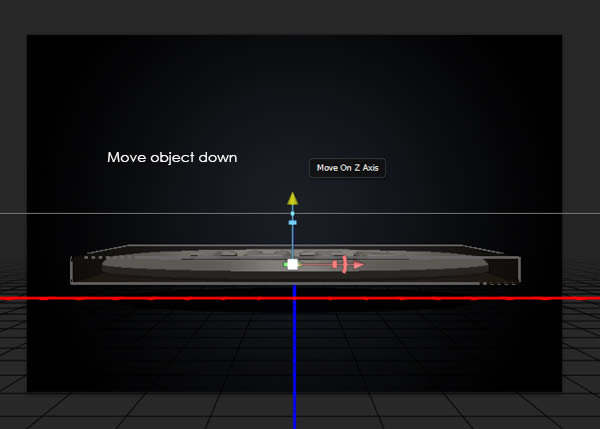
Lastly, use the onscreen widget to move the scene down so it’s closer to the ground plane.
Step 12
The next step is to adjust the lighting to get better looking shadows. In the 3D Panel, select the “Infinite Light 1″ layer and use the onscreen widget to rotate the light so that if points straight down at our object.
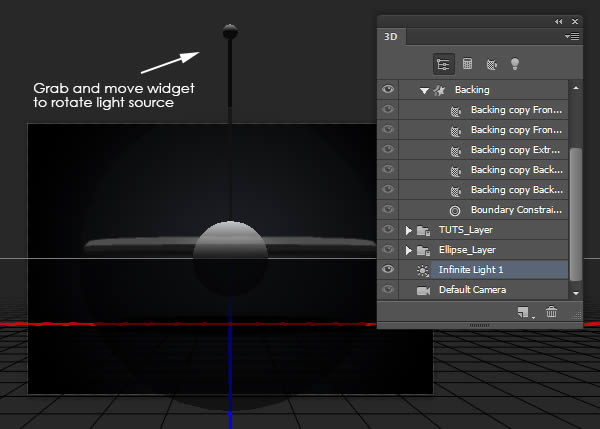
Here is a different angle so we can see how the shadow looks. If you need to reposition the object so that it’s closer or further from the ground plane, refer back to Step 11.
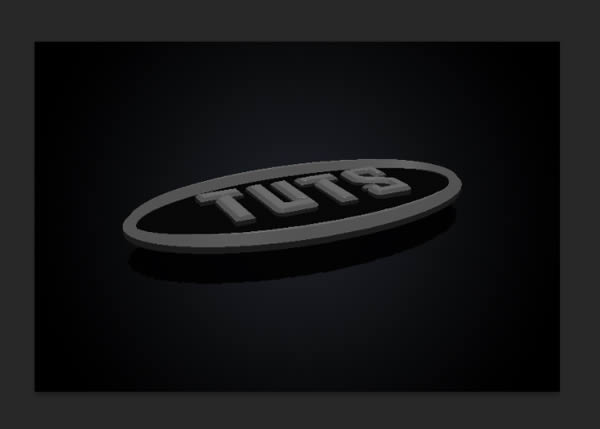
Step 13
Before we finish adjusting the lighting, let’s move the camera so we are facing our object straight on.. In the 3D Panel, select the “Current View” layer and use the tools in the Top Menu to manipulate the camera’s position.
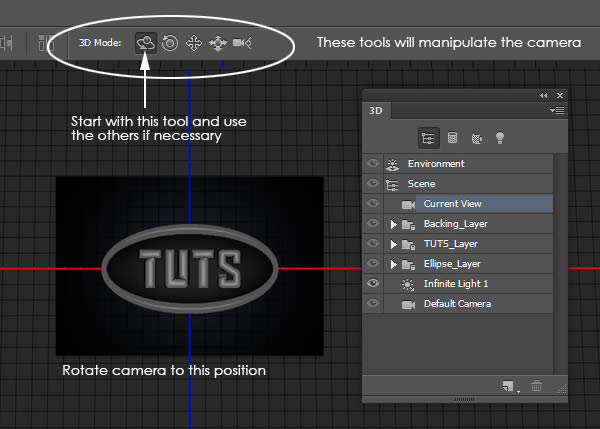
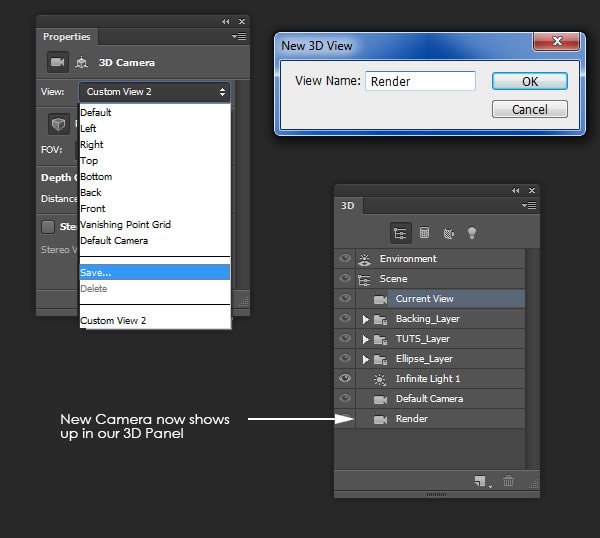
To save this camera, go to the Properties Panel and click the dropdown under “View.” Name this camera “Render.” Saving the camera will automatically add it to our 3D Panel so we can jump between multiple cameras at any time.
Step 14
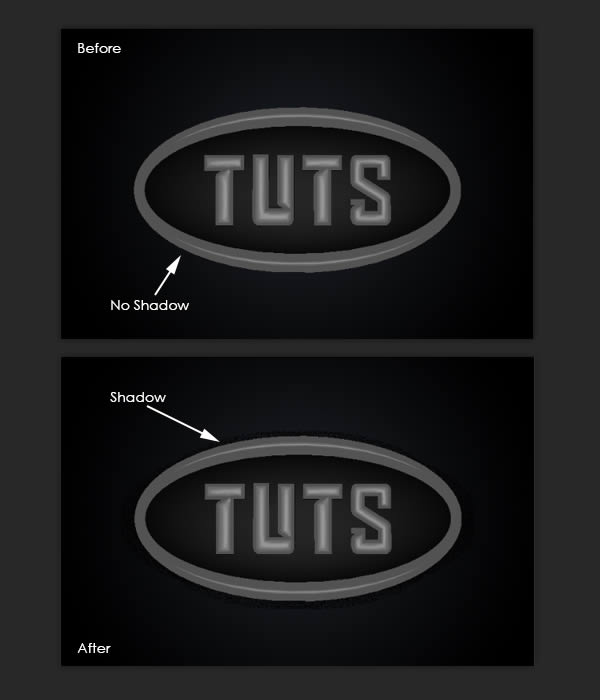
Now, it’s time to finish the lighting. We are going to change the settings of the light to allow for a small amount of shadow to be visible from behind the object. This will help our scene from looking too flat against the background. In the 3D Panel, select the “Infinite Light 1″ layer again and make the following changes in the Properties Panel.
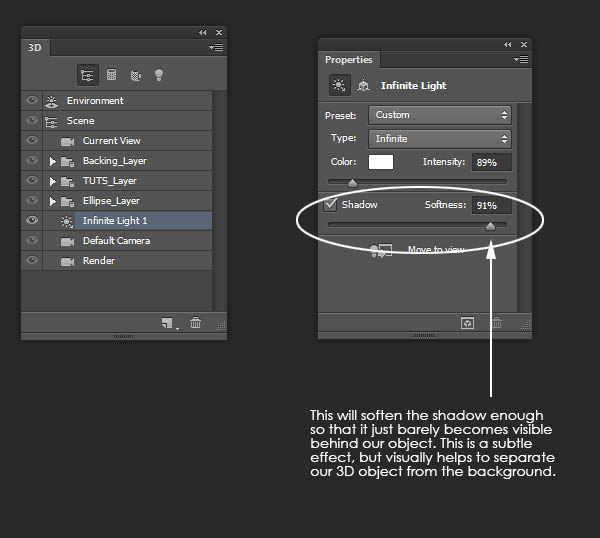
Notice that we can now see some of the shadow
Step 15
To finish lighting our scene, we are going to add an Image Based Light (IBL). As the name implies, it uses an image to light the scene (essentially mimicking the lighting in the image). The result is a much more natural and realistically lit scene.
In the 3D Panel, select the “Environment” layer. In the Properties Panel, make sure IBL is checked and click on the icon to load a texture. Go ahead and add the image of the living room from the Tutorial Assets.
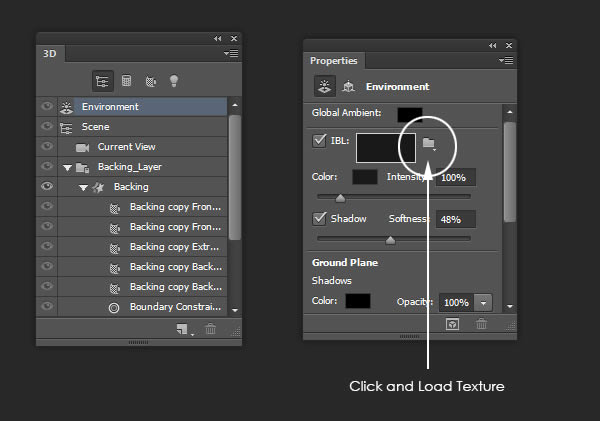
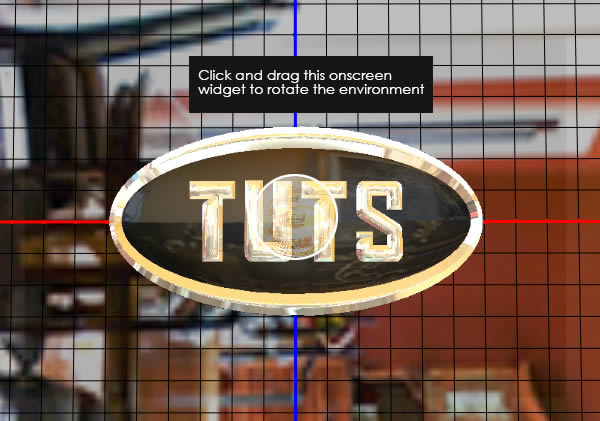
Our scene is now lit by the IBL which is represented in the background of our canvas. This image is for reference only and will not render in the background.
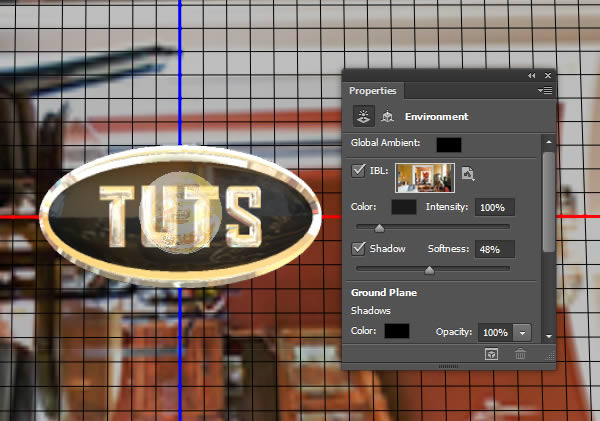
As long as the Environment layer is highlighted, we will see this reference image as well as an on-screen widget that can be used to rotate the IBL around. By moving the image, we can change the reflections in our scene. Feel free to rotate the environment as you see fit.
Step 16
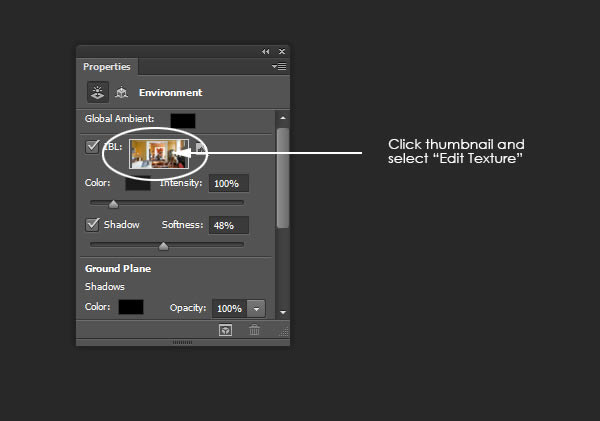
Lastly, the reflections appear too yellow. We can change this by editing the source image for the IBL. To do this, go to the Properties Panel, click the IBL thumbnail and click Edit Texture.
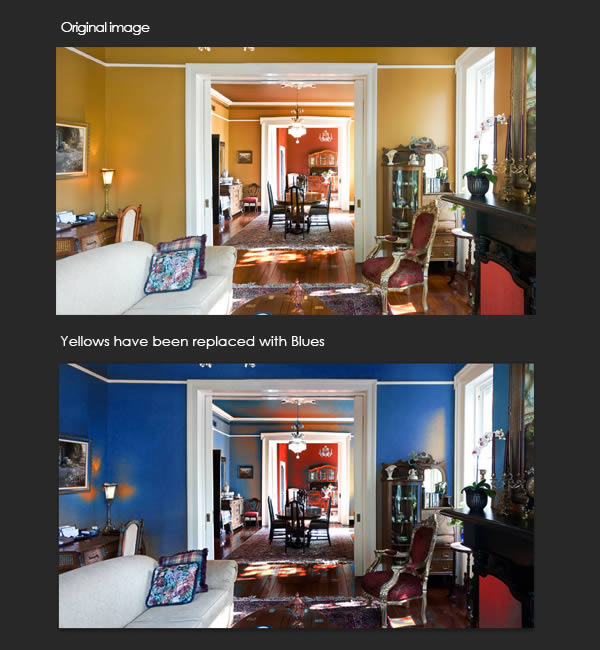
This will open the texture file in a new window. I’ve used Image > Adjustment > Replace Color to replace the yellow to a blue. This doesn’t have to look realistic; we are just introducing a new color.
Here is how our scene reflects the new colors from the IBL map.

Step 17
We will now create a small amount of animation in our scene. Start by clicking on the Create Video Timeline button to activate the timeline. If this button is not visible, you can go to Window > Timeline.
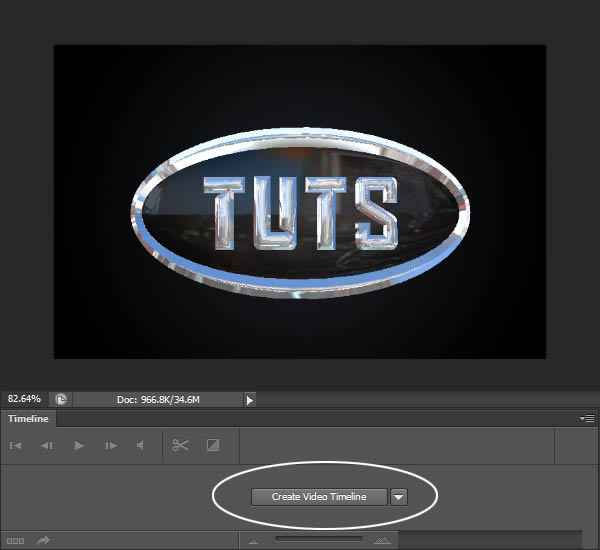
The “3D Object” layer will now be portrayed as a video layer in the Video Timeline.
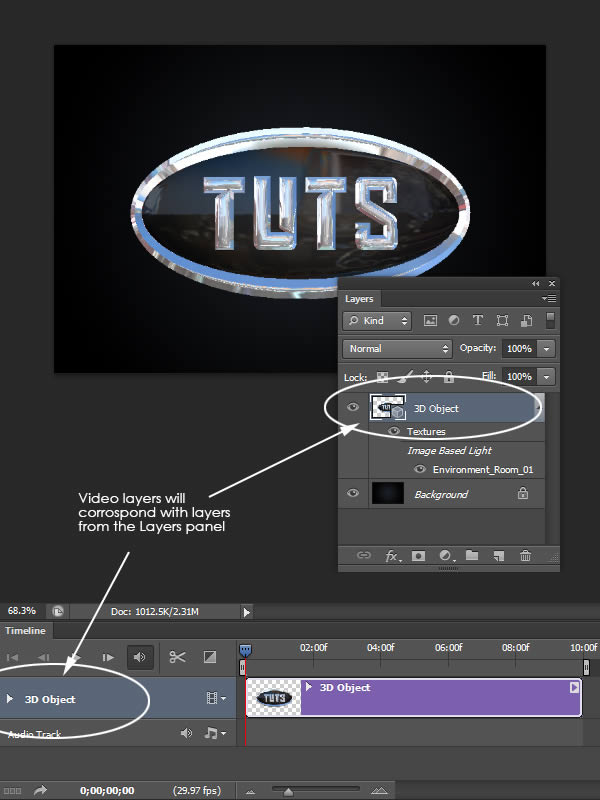
Step 18
Since we’ll be animating the “3D Scene Position” of the “3D Object” layer, twirl down the “3D Object” layer in the timeline.
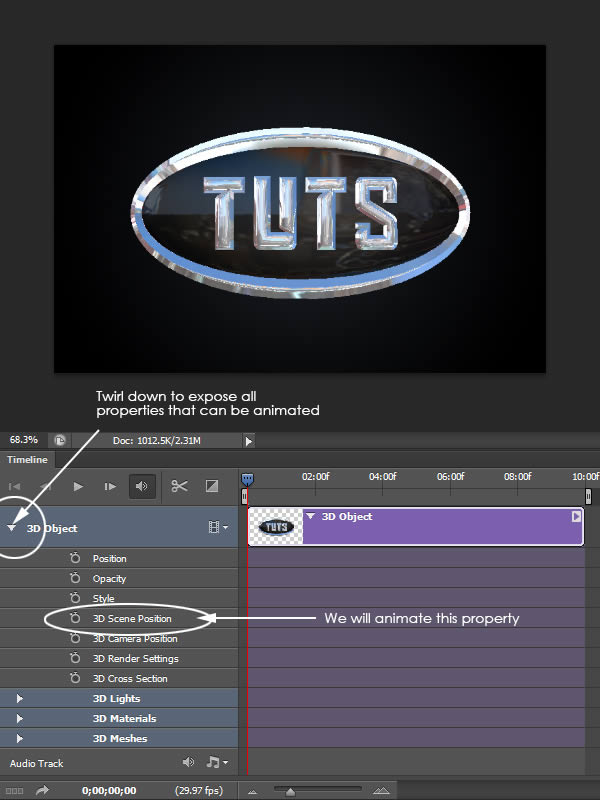
Step 19
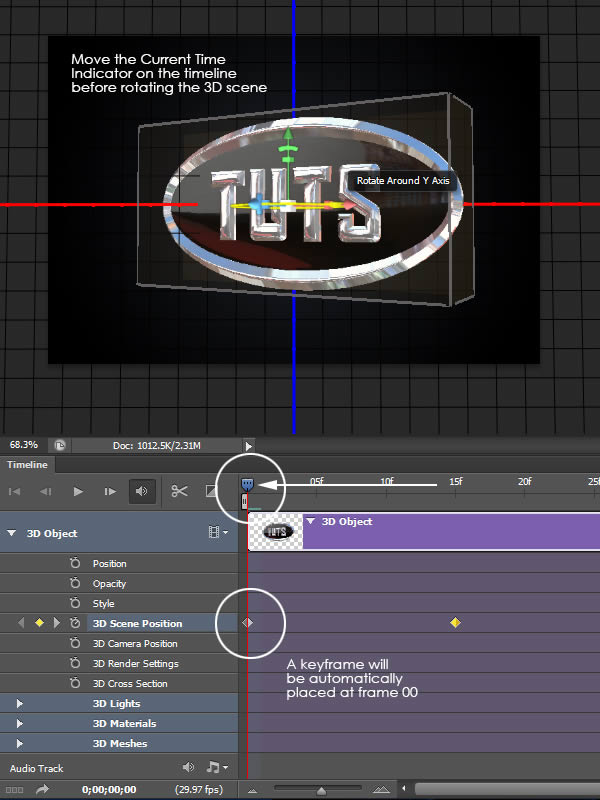
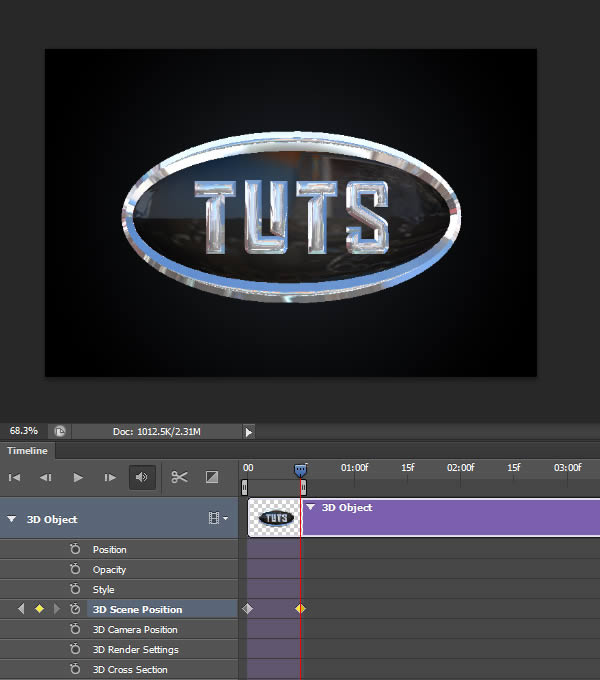
In the 3D Panel, make sure the “Scene” layer is selected. Next, move the Current Time indicator to the 15 frame mark and click the “Enable Keyframe Animation” icon.
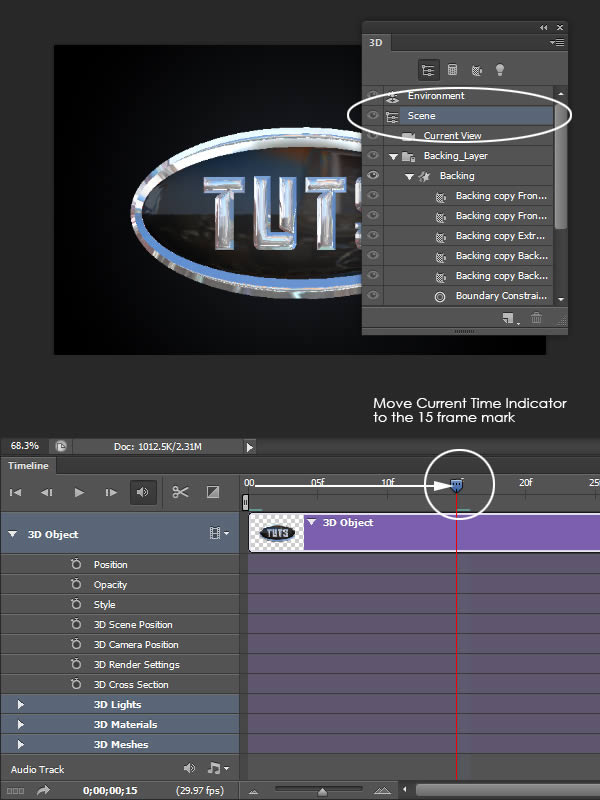
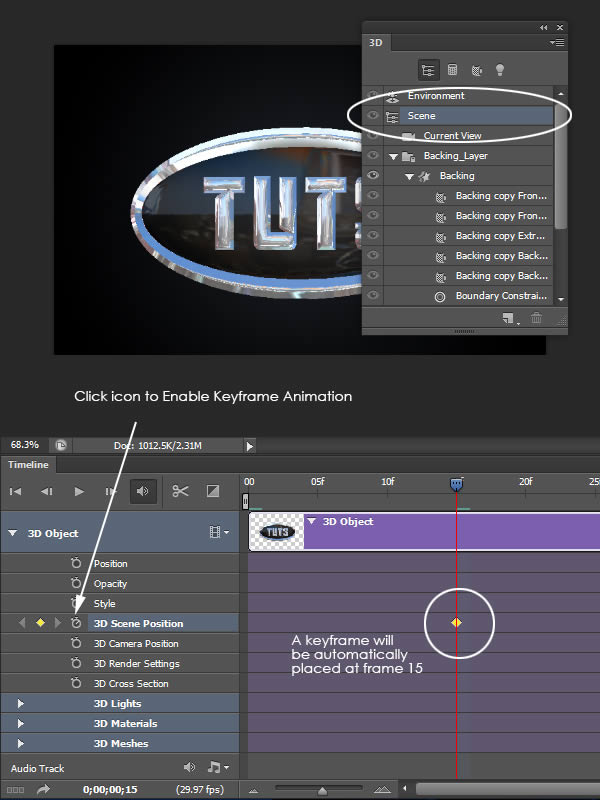
Next, move the Current Time Indicator to the “00″ mark and use the onscreen widget to rotate the scene roughly 30 degrees around the Y Axis. A new keyframe should automatically appear at the first frame for the 3D Scene Position.
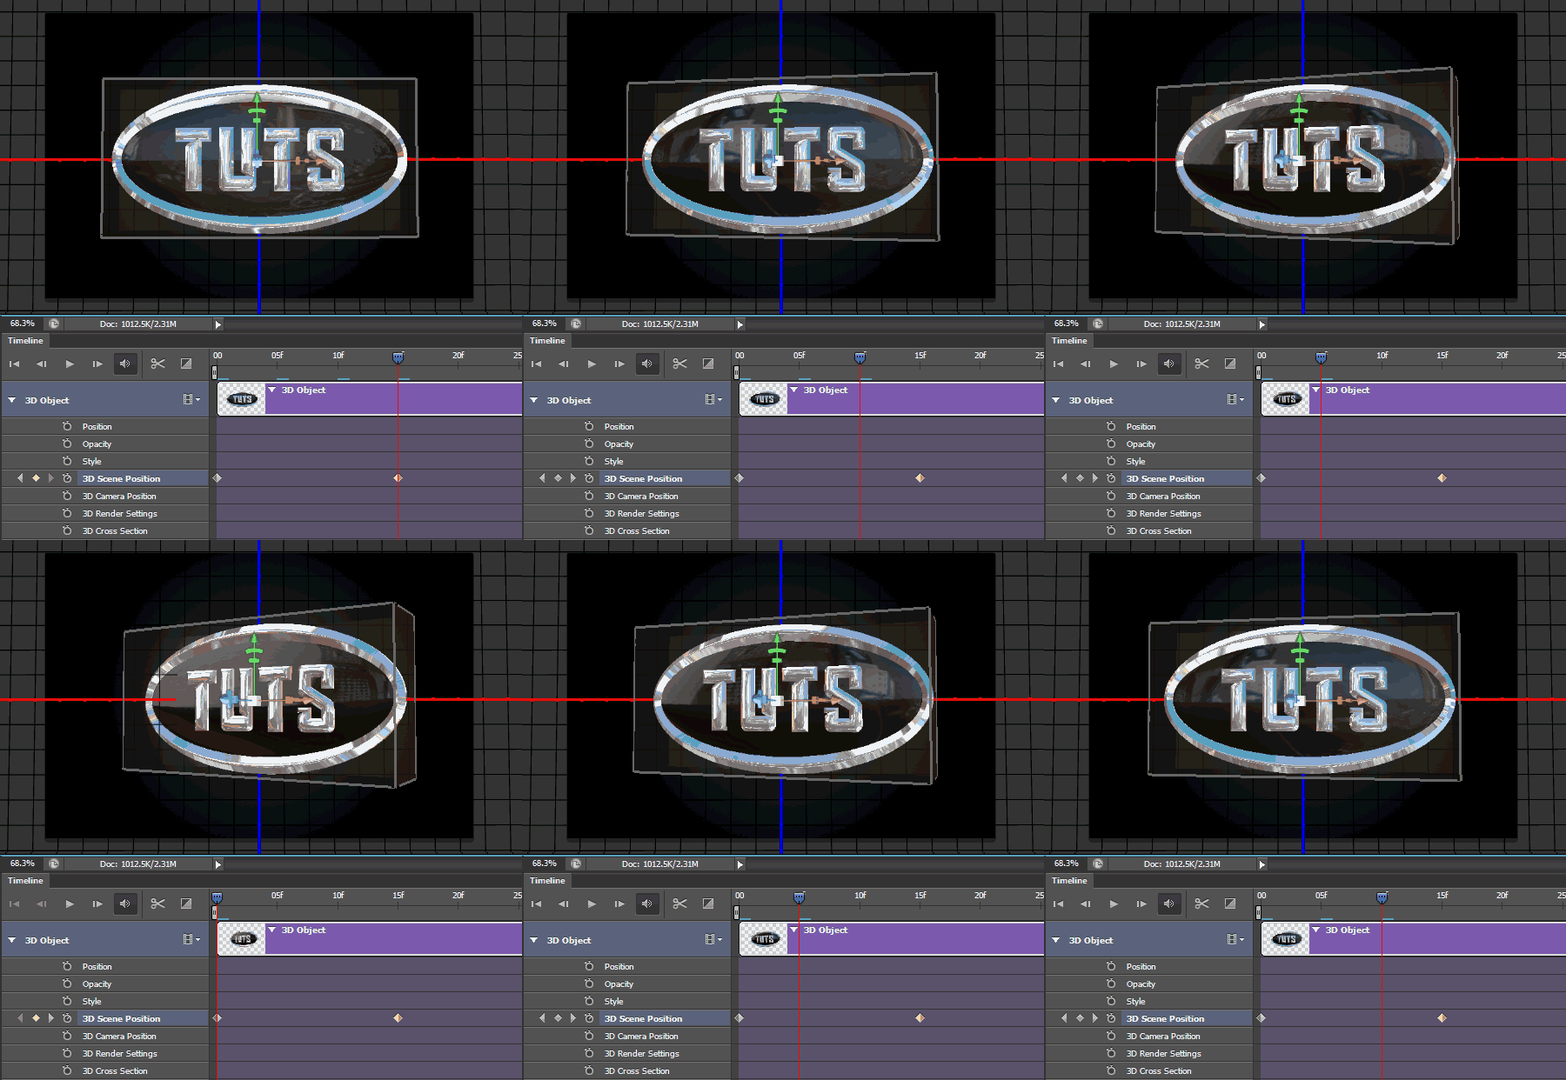
Scrubbing the Current Time Indicator back and forth between the keyframes will allow us to preview the animation.
Step 20
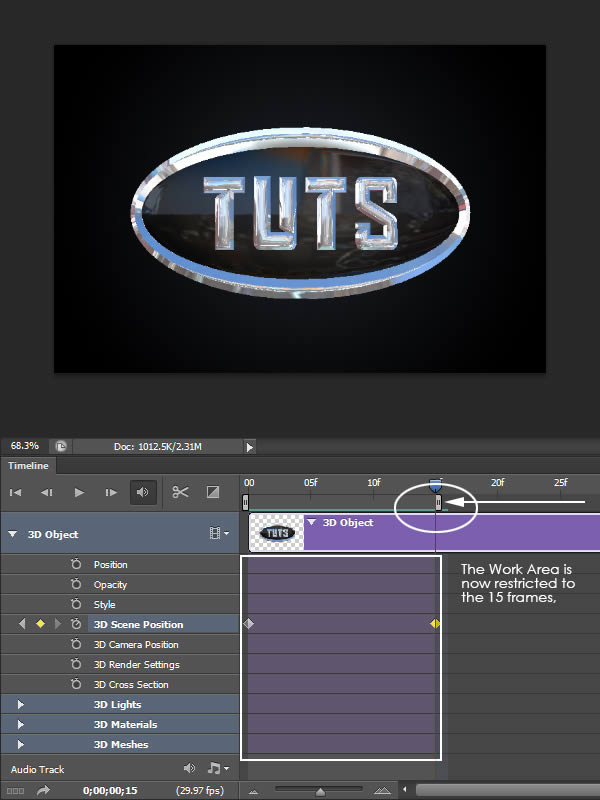
Use the slider directly below the Timebar to set the end point of our Work Area to 15 frames.
Step 21
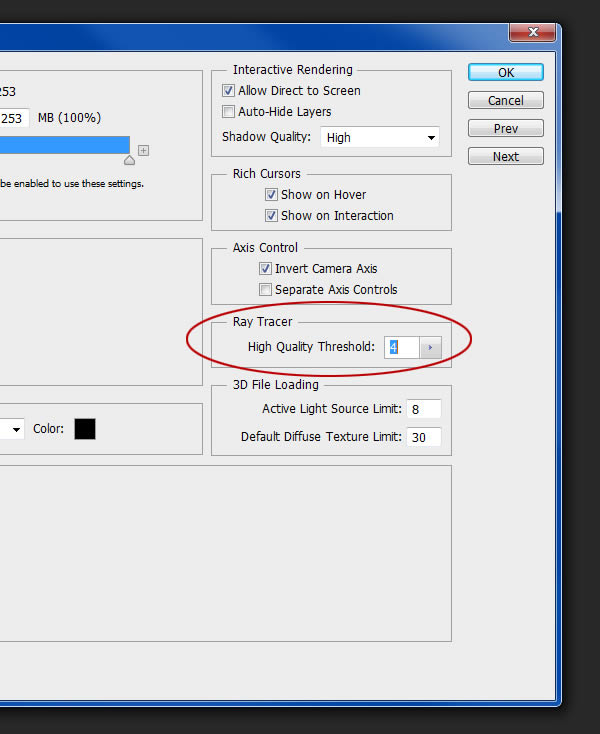
Before we render the animation, we can make some small changes to optimize the rendering time. Go to Edit > Preferences > 3D and set the Ray Tracer High Quality Threshold to 4. Alternatively, if you want a more polished final rendering, and don’t mind waiting a little longer, feel free to set this to 5 or even 6 (we are only rendering 15 frames after all).
Step 22
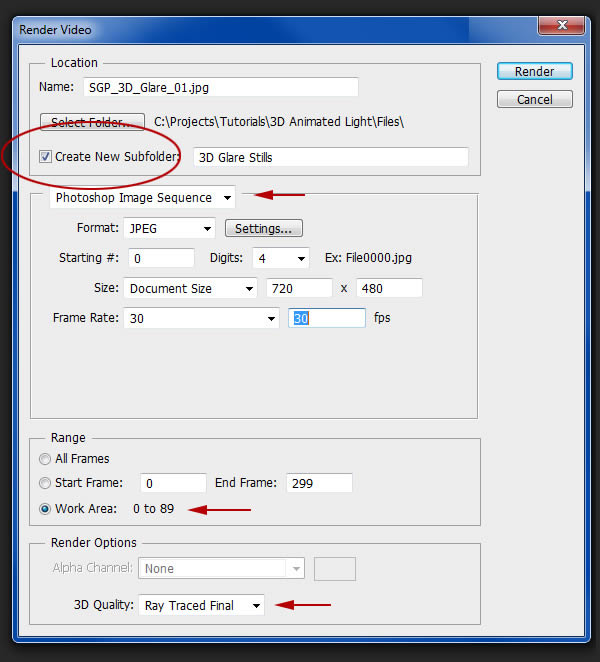
Go to File > Export > Render Video and apply the settings as shown. We will be rendering our scene as a JPG sequence instead of a video. This will give us more control later. I recommend saving the rendered stills to a new folder to better organize the files.
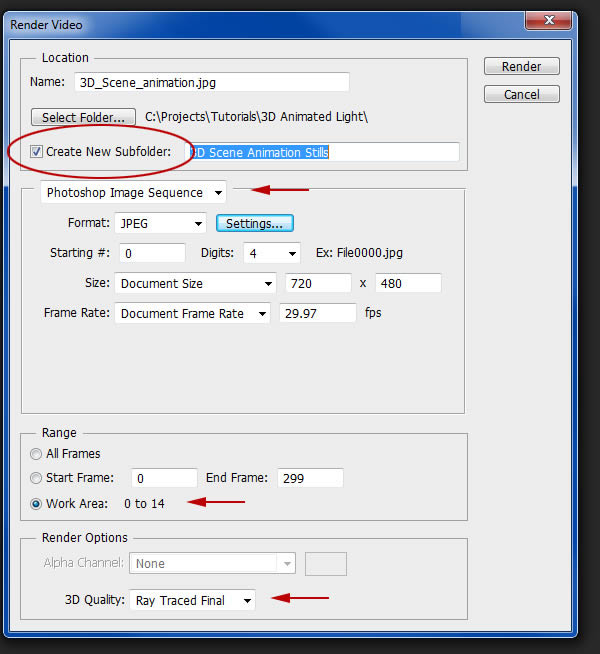
Step 23
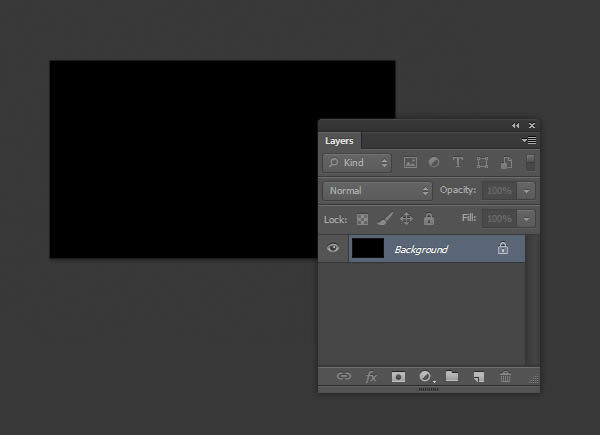
At this point, save your file and open a New Document. We are going to build a quick 2D animation of our glare effect. We will later apply this to our 3D object. Create a new document 525 px by 300 px with a black background.
Step 24
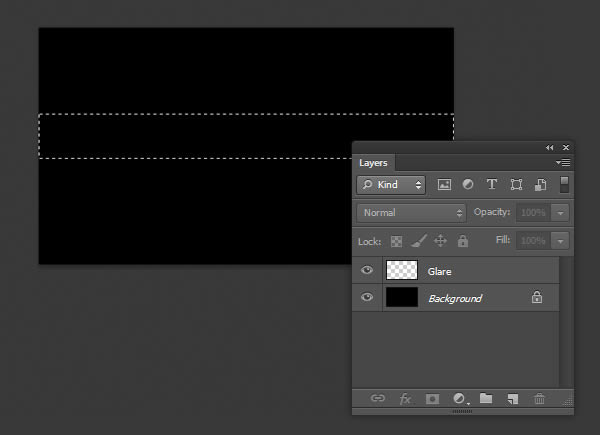
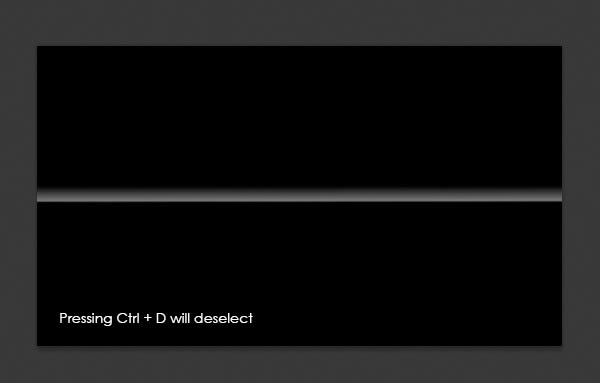
Create a new layer called “Glare” and use the Rectangular Marquee Tool to make a horizontal selection as shown.
Step 25
Select the Gradient Tool and make sure it is set to Foreground to Transparent and Linear Gradient. Also, set the Foreground Color to White.
Using the Gradient Tool, make a small gradient at the bottom of the selection.
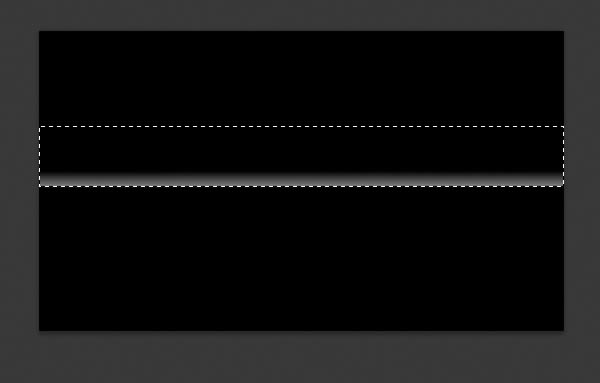
Press Ctrl + D to deselect.
Step 26
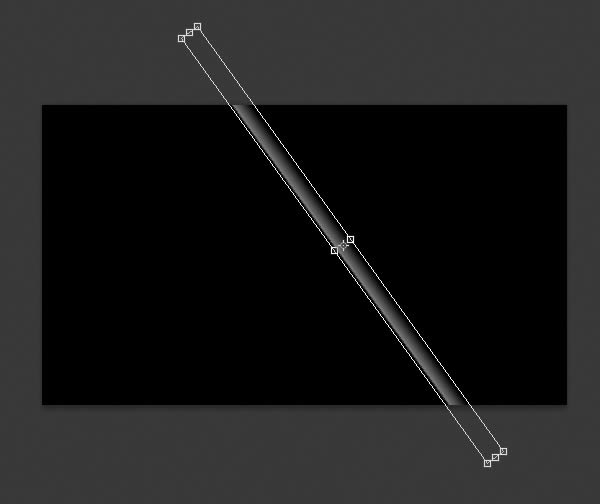
Rotate (Ctrl + T) the “Glare” layer as shown.
Step 27
The next step is to animate this layer across our canvas. To do this, open the Timeline like we did in Step 17.
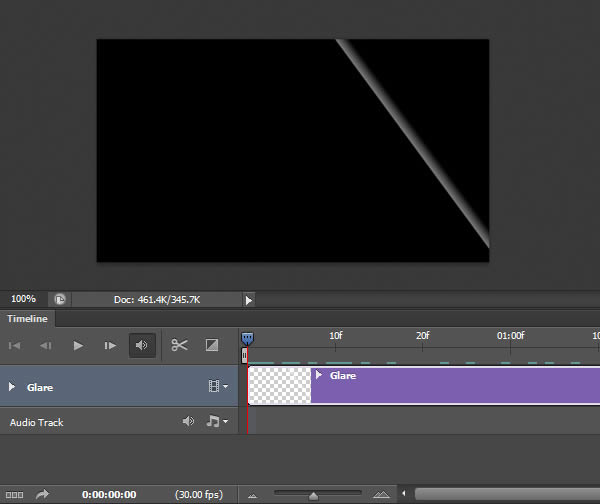
Twirl down the “Glare” layer and click on the icon to Enable Keyframe Animation for the “Position” property.
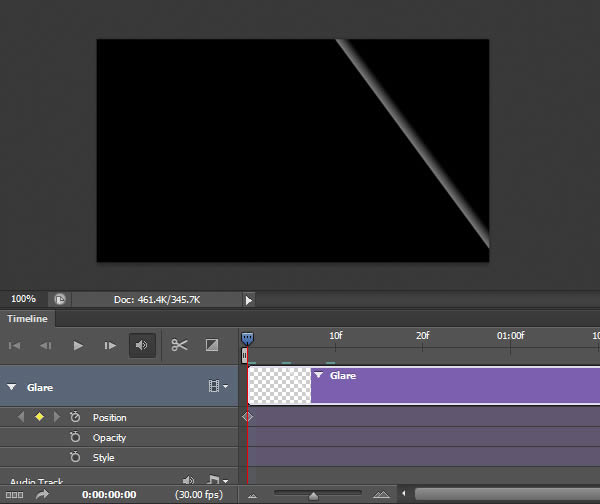
Move the Current Time Indicator to frame 50 and click on the Add Keyframe icon to set the position..
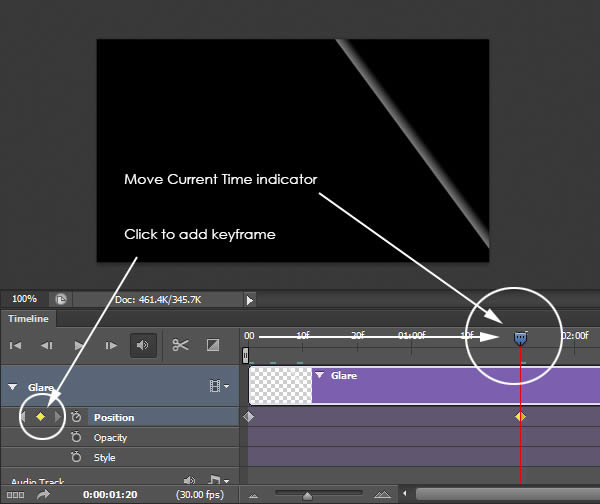
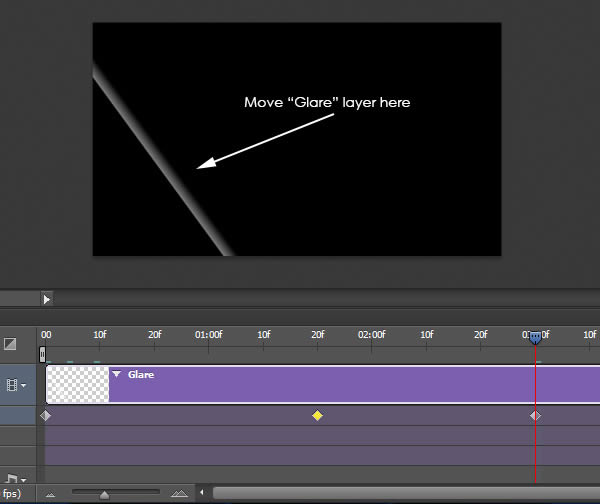
Move the Current Time Indicator further down the timeline (to frame 90, or so) and move the “Glare” layer across the canvas as shown. A key frame should automatically be generated at this position.
Step 28
Pressing Spacebar will preview the animation.

Feel free to embellish this animation as you see fit. I’ve added a few additional layers with different types of glare moving at different speeds. Here is a short preview.

Step 29
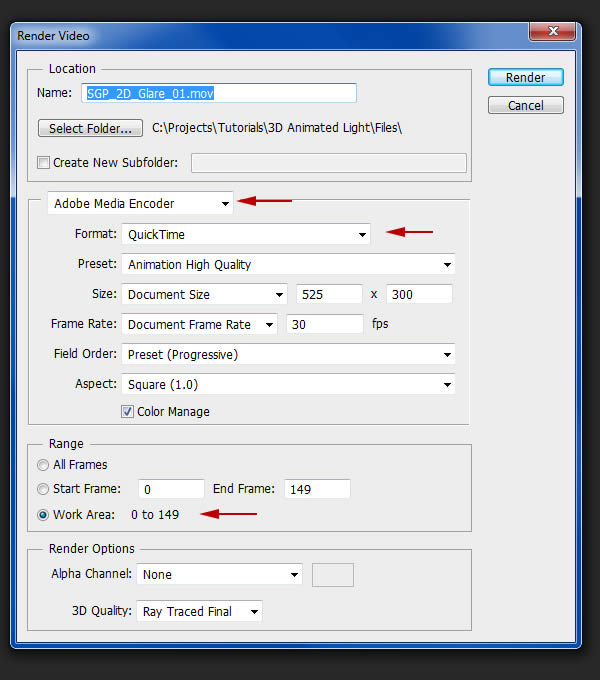
Go to File > Export > Render Video. Since we are working with a 2D animation (and don’t have to worry about rendering times), we can save out as a .MOV file.
Step 30)
Now that we have our 2D glare animation finished, we can go back to our original scene to work on the glare effect.
Step 31
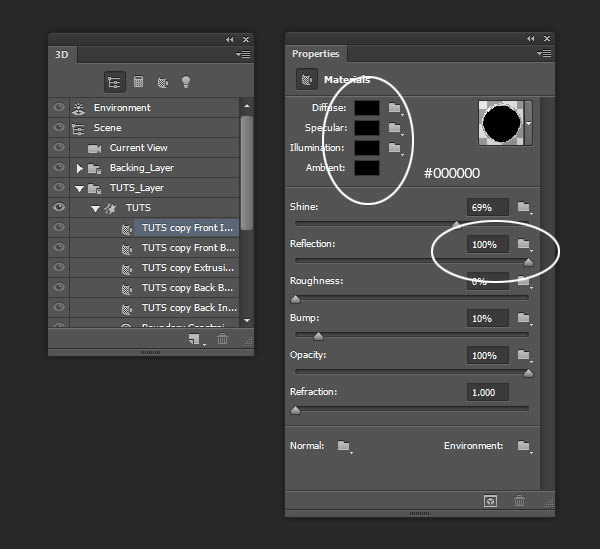
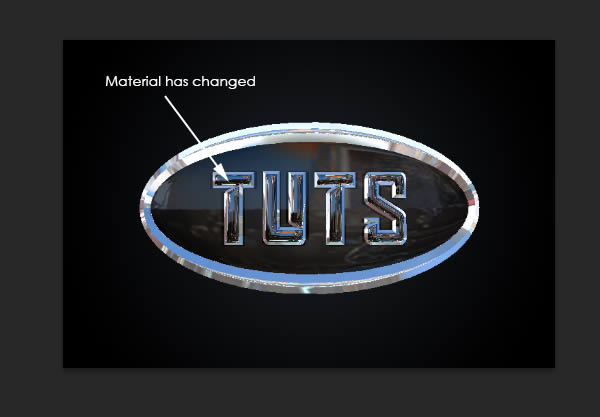
For this next part, we want the object to be all black. Click on the first material layer of the “TUTS” object and change the material settings in the Properties Panel as shown.
Step 32
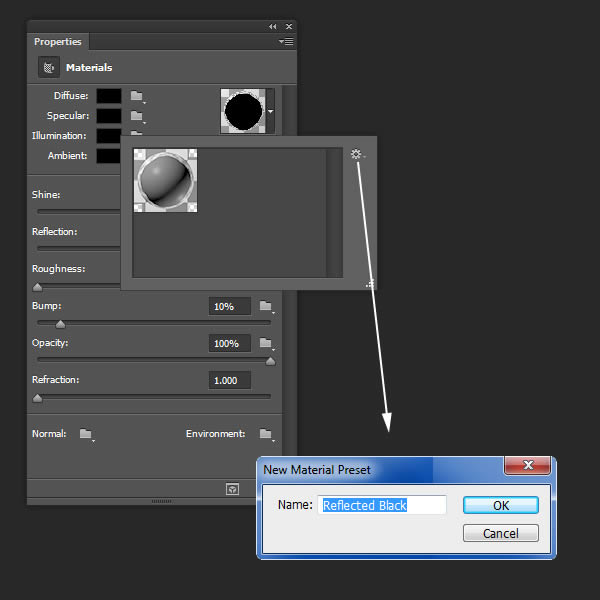
Save this material like we did in Step 6. Name it “Reflected Black.”
Step 33
Apply this texture to every surface on all three objects. The result should be an unrealistically reflective object.

Step 34
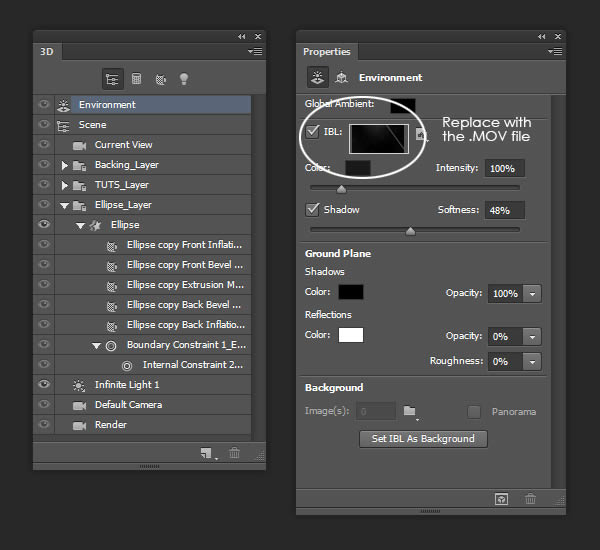
One of the great features in Photoshop is the ability to add animated GIFs or MOV files as textures. We will apply the MOV file that we previously created to the IBL in our scene. This will create the appearance of our 2D glare animation being reflected in our object.
In the 3D Panel, select the “Environment” layer and, in the Properties Panel, click the IBL thumbnail and select Replace Texture. Select the 2D Glare MOV file that we just created.
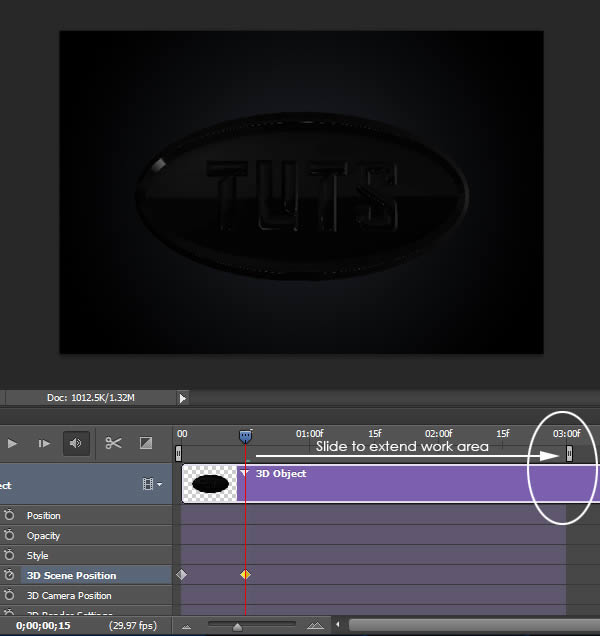
Pressing the space bar will preview the animation, but it will only show the first 15 frames since we adjusted the work area in Step 20. Go ahead and expand the work area to 90 frames.
Step 35
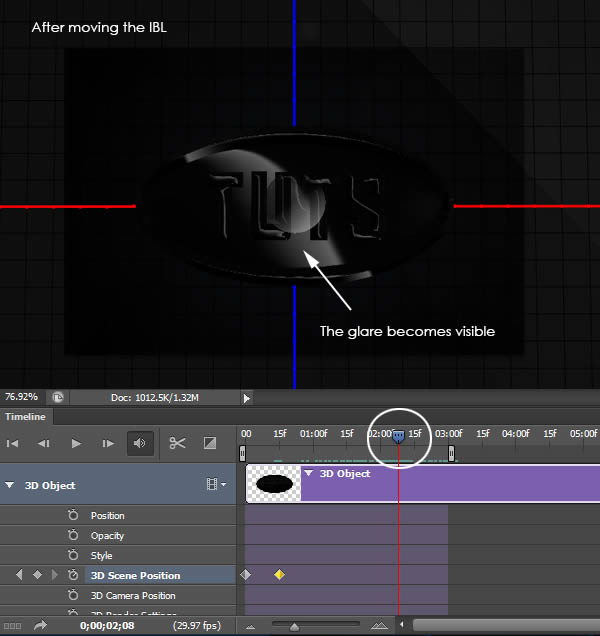
As explained in Step 15, we can us the onscreen widget to manipulate the position of the IBL. Currently, if you preview the animation, the IBL is positioned in such a way that it is not reflecting the ‘glare’ in our animation. Set the Current Time Indicator towards the end of the timeline (when the glare in our .MOV file starts to animate).
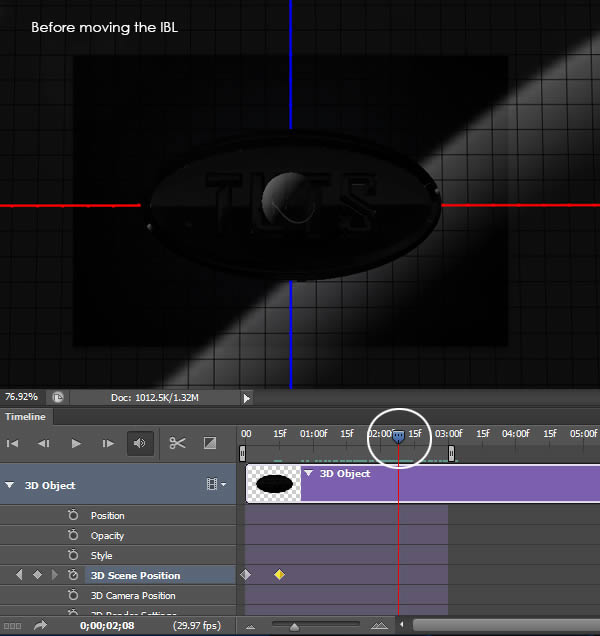
Rotate the IBL until we see that glare in the reflections of our object.
Step 36
Since there are minimal textures in our scene, our scene will render a little faster. However, there are some additional steps we can take that will make little visual difference, but a significant time saver when rendering.
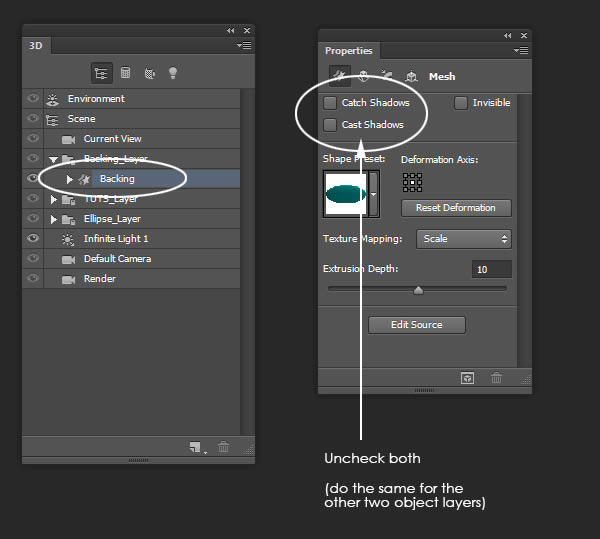
Click on each object layer and uncheck Catch Shadows and Cast Shadows (found in the Properties Panel).
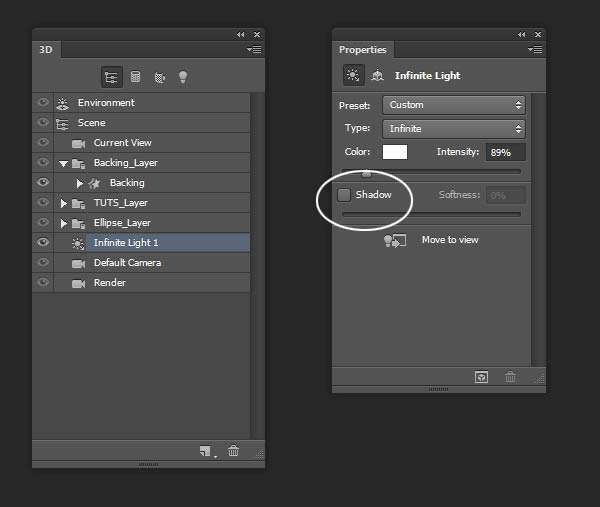
Select the “Infinite Light 1″ layer and uncheck Shadow in the Properties Panel.
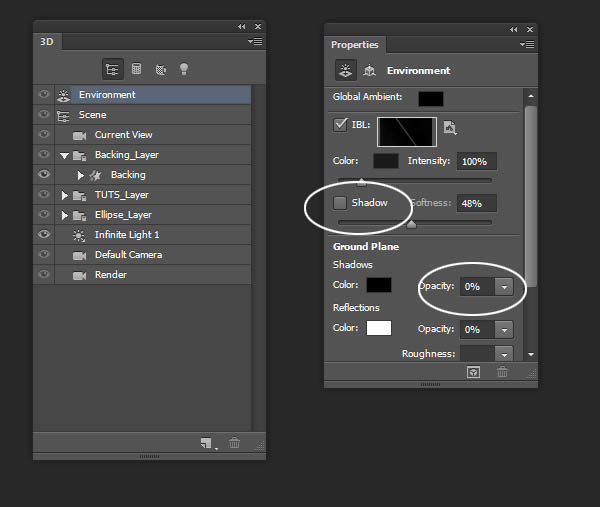
Select the “Environment” layer and uncheck Shadow in the Properties Panel. Also, set the Ground Plane Shadow’s Opacity to 0%.
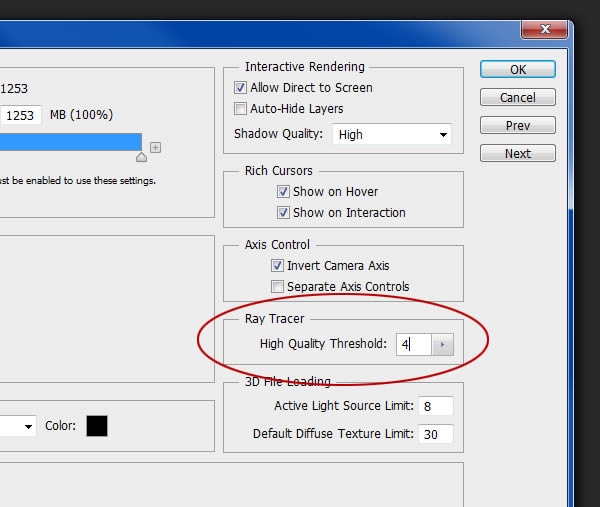
Lastly, as an optional step, go to Edit > Preferences > 3D and set the Ray Tracer High Quality Threshold to 3 or 4.
Step 37
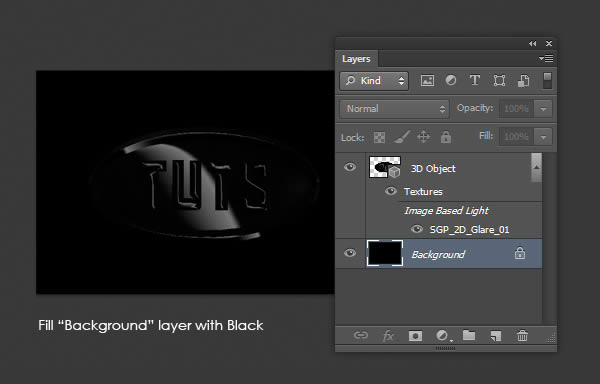
The last thing we need to do before rendering is to make the background solid black. Select the “Background” layer and give it a black fill.
Step 38
Just like we did in Step 22, go to File > Export > Render Video and render the animation as a JPG Image Sequence.
Step 39
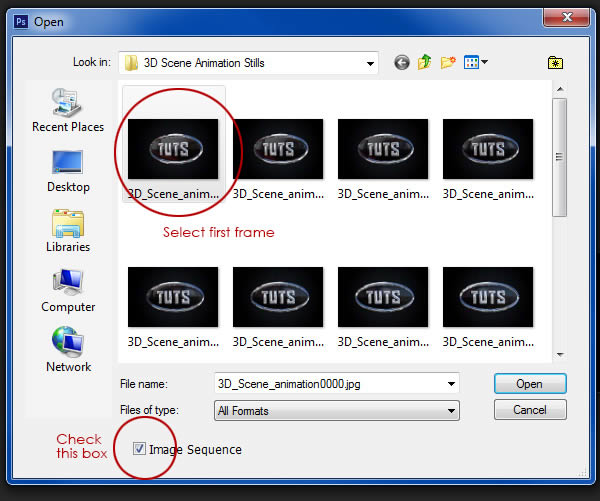
Now that we have all of our components rendered out, we can begin to composite our animation in a new document, using the video timeline. Go to File > Open and navigate to the folder where we saved our 3D animation image sequence. Make sure to check the Image Sequence box before opening.
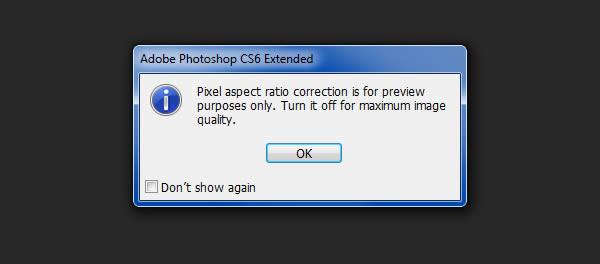
Since we are working with video layers, you may get the following message before you open the file. When the file is open, just go to View and uncheck Pixel Aspect Ration Correction to correct.
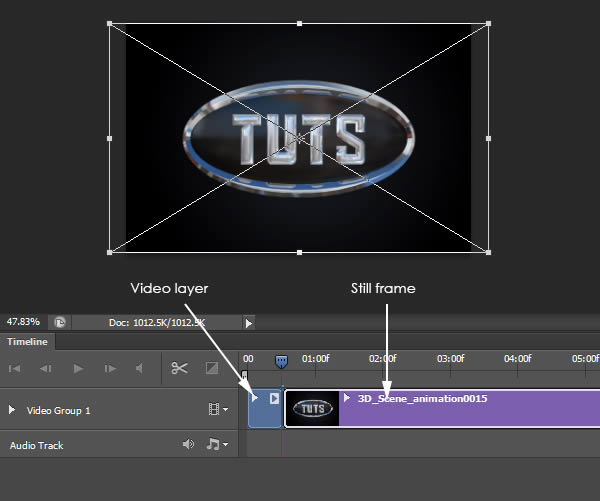
Next, go to File > Place and select the last frame only of our 3D animation. This will place the last frame of our animation on the same layer as our video file.
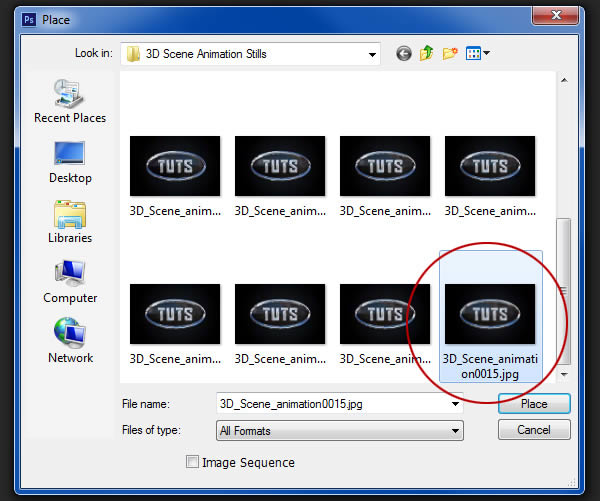
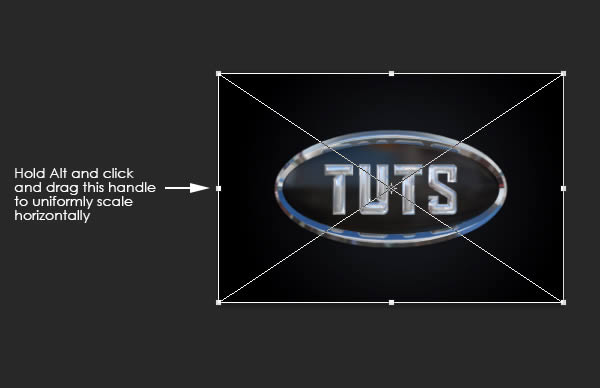
Notce that the file appears to be wider than the canvas. This is due to our video layer being portrayed in a different pixel aspect ratio than our still image. We can manually adjust the handles to correct.
Step 40
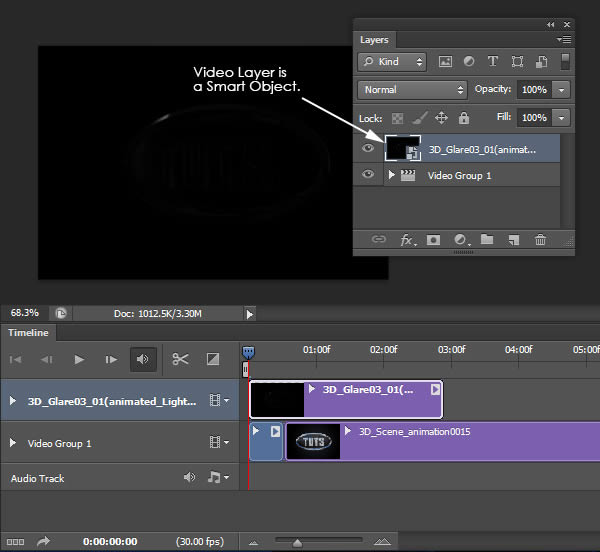
The next step is to add the 3D glare animation to our scene. Go to File > Place and navigate to the glare animation image. Make sure to open these as an Image Sequence. Note that this automatically converts the video layer into a Smart Object. This is important for the later steps (alternatively, you can right-click any video layer in the Layers Panel and select “Convert to Smart Object”).
Step 41
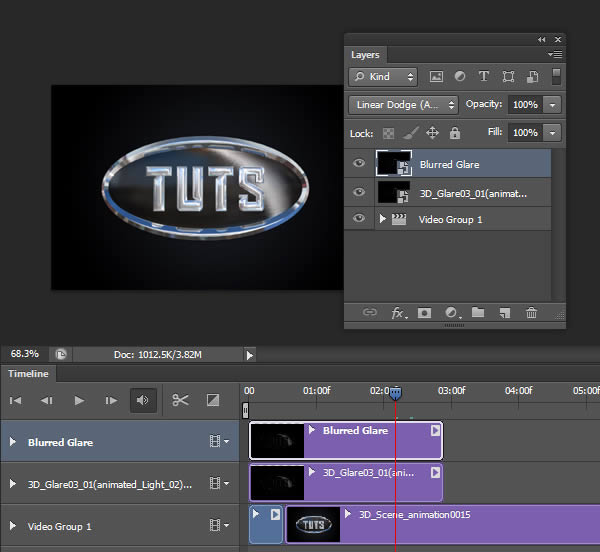
To start the initial glare effect, select the 3D glare animation layer and set the Blending Mode to Linear Dodge (Add).
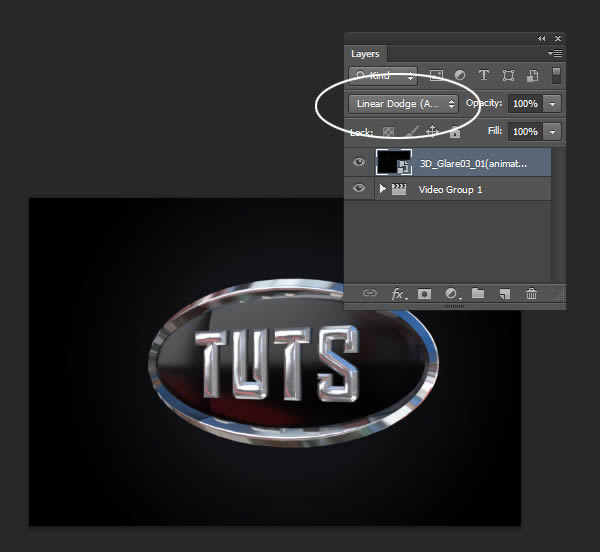
If you scrub through the animation, you can see how this Blending Mode affects the scene.

Step 42
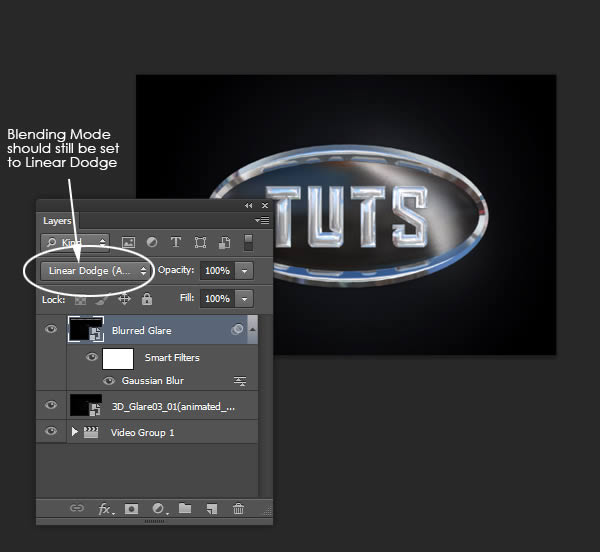
As pointed out earlier, our 3D glare video layer is a Smart Object. As a Smart Object, we can now apply Smart Filters to the video layer. We will use Smart Filters to enhance our glare effect. Make a copy of the glare layer in the Layers Panel and name this “Blurred Glare.” This will automatically add a new layer to our video timeline.
Give this a Gaussian Blur (Filter > Blur > Gaussian Blur) set to 6.8 pixels. This will add that glow that often accompanies a glare.
Step 43
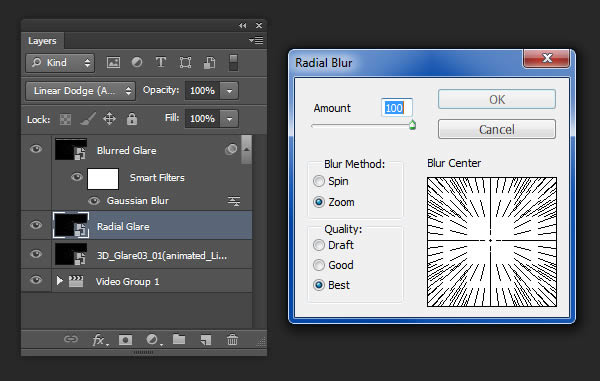
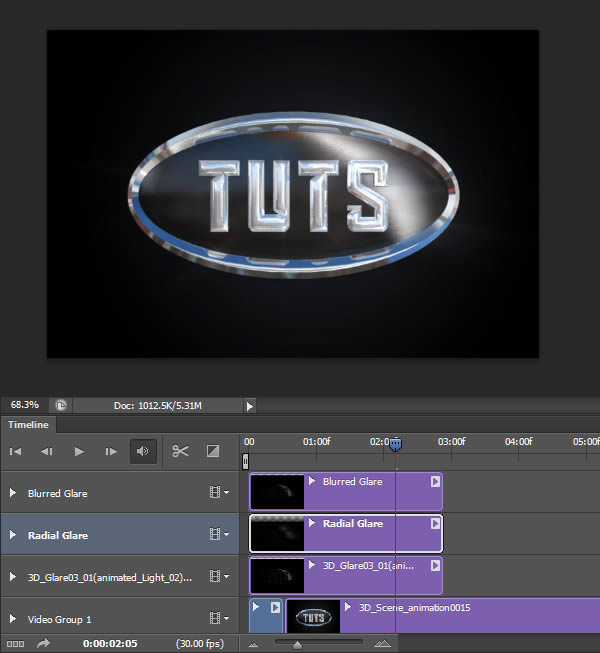
We can get creative with the glare by adding a Radial Blur. Go ahead and make another copy of the original glare layer and go to Filter > Blur > Radial Blur. Set the Amount to 100. Feel free to add a second Radial Blur for a added emphasis (Smart Filters can be added multiple times).
Your scene should resemble the following.
Step 44
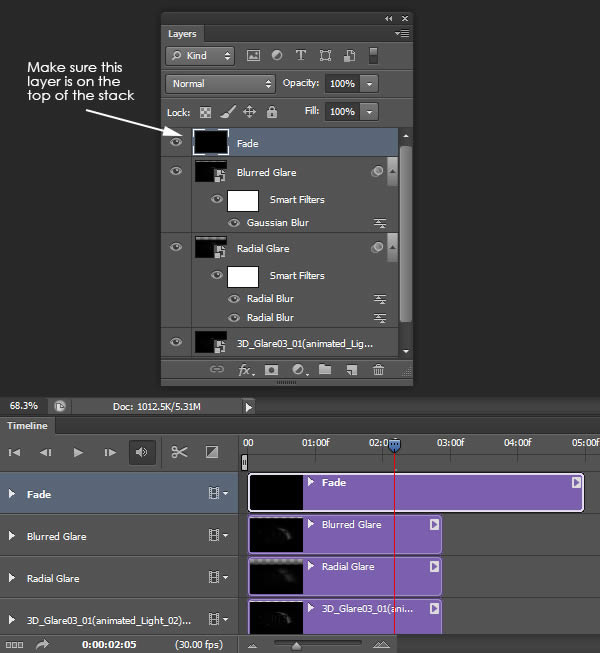
Now that our animation is almost done, we are going to add some final touches. Add a new layer using the Layers Panel and fill with black. Name this layer “Fade.”
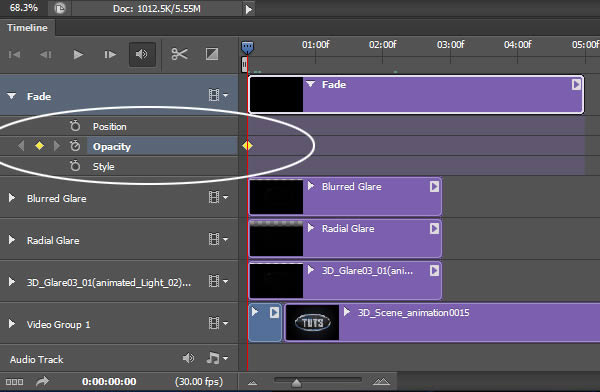
In the Video Timeline, twirl down the “Fade” layer and, click the Stopwatch icon to Enable Keyframe Animation for the Opacity property. When you Enable Keyframe Animation, a keyframe will be placed at the spot of your Current Time Indicator—move it back to frame 00.
Step 45
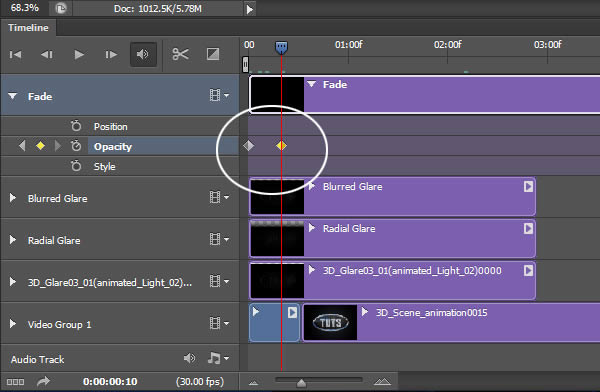
Create another at the tenth frame. You can click and drag a keyframe after it’s added to position it more accurately.
Step 46
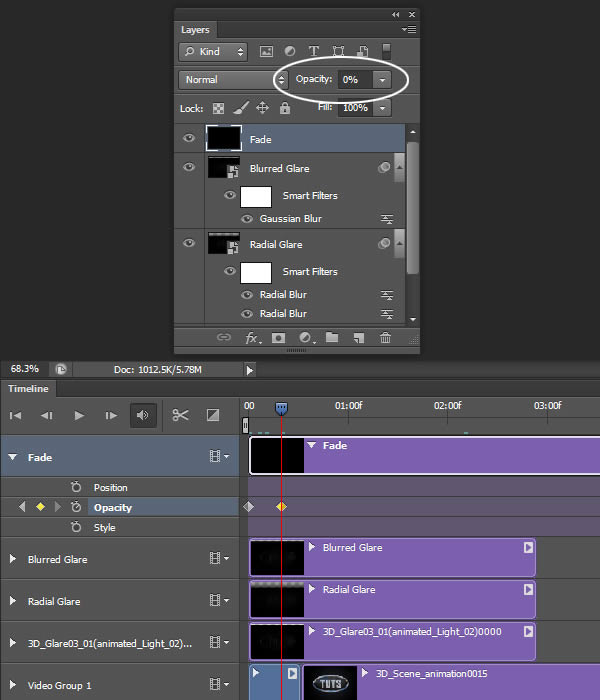
With the second keyframe still activate (donated by the yellow highlight), adjust the “Fade” layer’s Opacity to 0% using the Layers Panel. Our fade-in is now complete.
Step 47
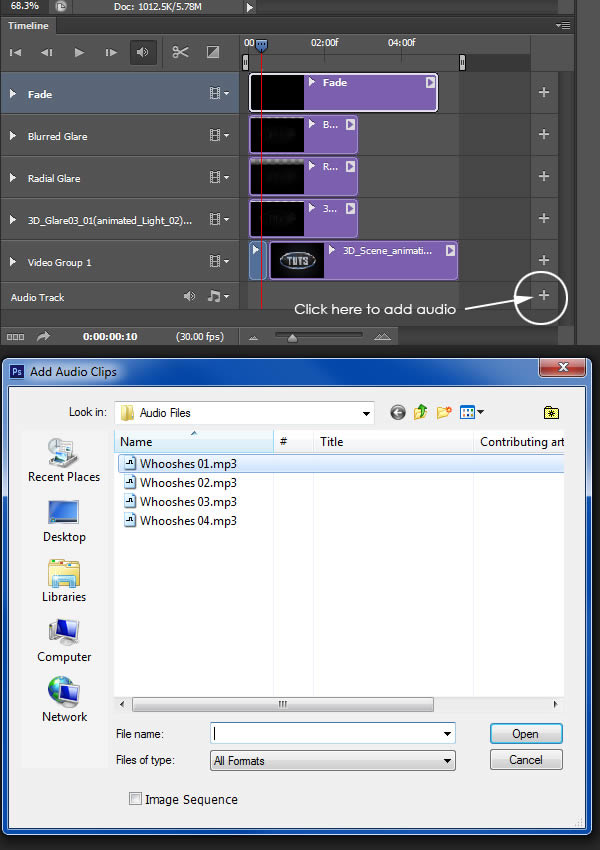
The last thing to do is to add the audio found in the Tutorial Assets. We’ll be using a sound clip bundle called “Magic Wooshes.” This file includes four seaparet ‘woosh’ clips.
At the very bottom of our Video Timeline, click the plus symbol on the end of the Audio Track layer. Load the “Wooshes 01.mp3″ sound clip.
Step 48
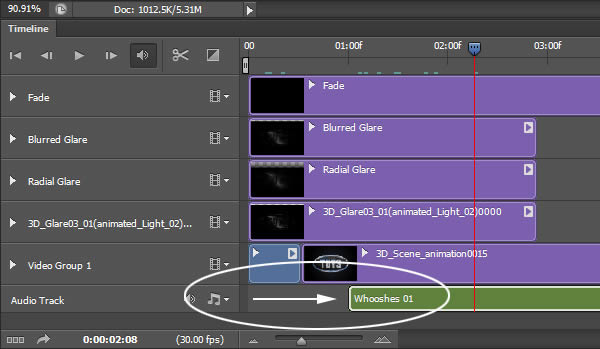
Pressing the Spacebar will preview the animation with the sound. This audio clip sounds like it will work best when the glare effect passes over our object. Move this sound clip so that that the ‘woosh’ plays as the glare starts moving across our object.
Step 49
Currently, the audio keeps playing past the end of our animation, to fix this, we will need to trim the clip. Click on the end of the Audio Track and drag it back so that it ends with our animation.
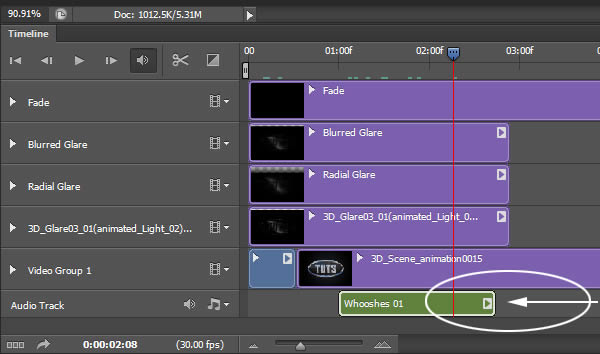
At this point, go ahead and drag the remaining to layers back so that they end with the animation.
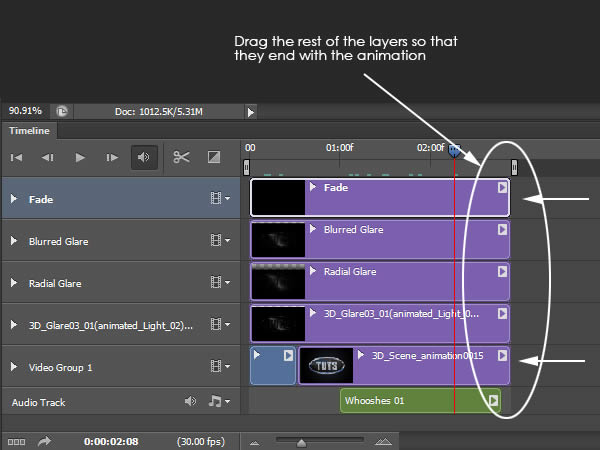
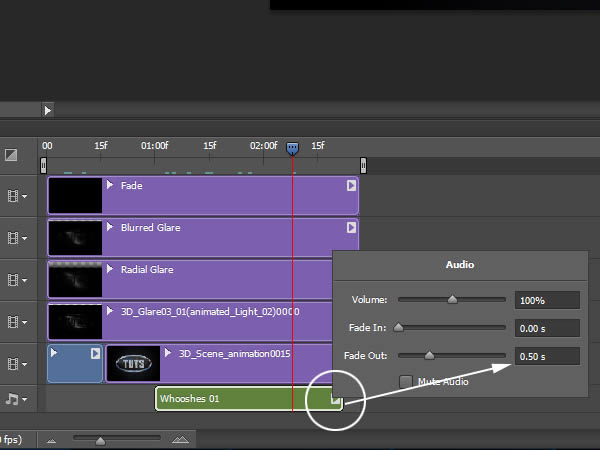
The audio still cuts off early. To fix that, we will add a fade out to the audio. Click the arrow icon at the end of the track and set the Fade Out to .5 sec.
Step 50
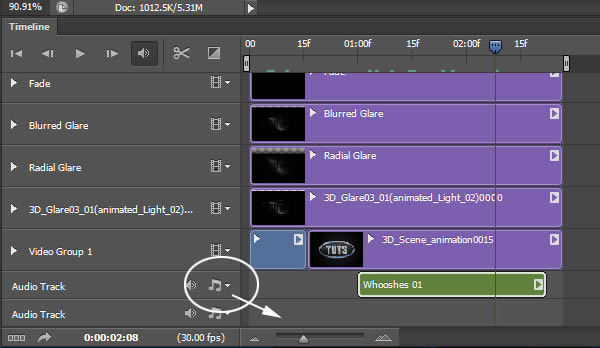
If you want, you can add another audio track to the beginning of our scene to play when our object rotates into position. To add another audio track, click the Music Notes Icon on the Audio Track and select New Audio Track.
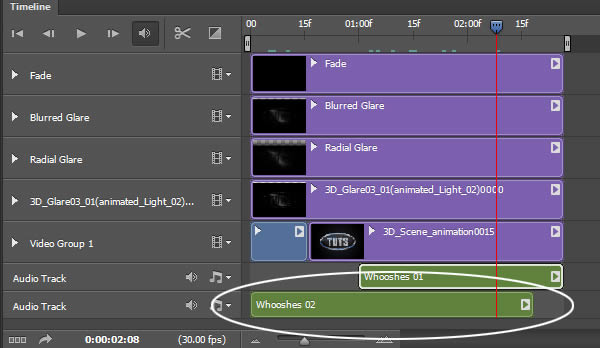
Just repeat Steps 47–49. I’ve found that the clip “Wooshes 02.mp3″ works well, however, it requires a little more adjusting.
Step 51
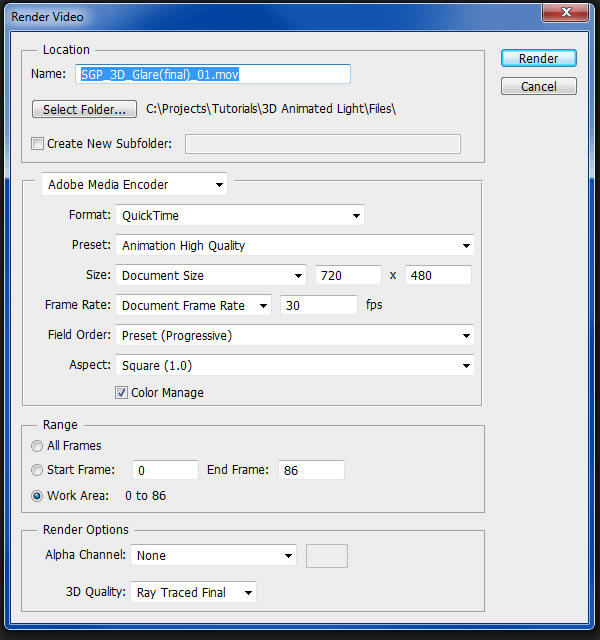
Finally, go to File > Export > Render Video.
Final Rendering
You’re Done! Below is the final animation with sounds effects:


No comments:
Post a Comment